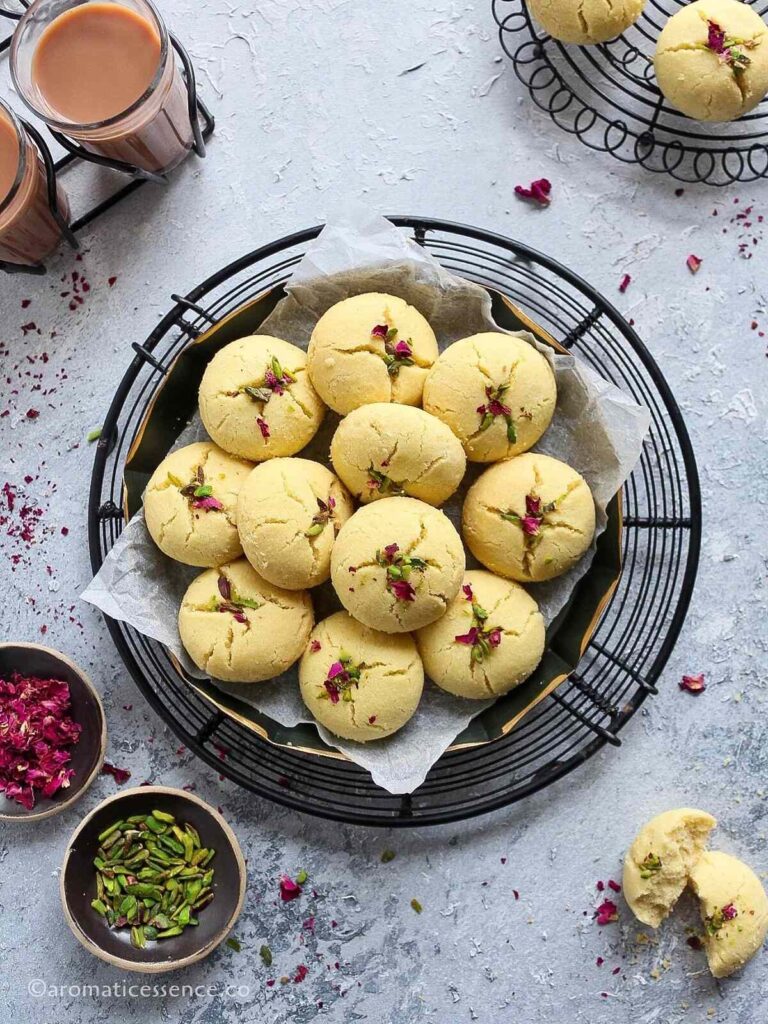
The festive season has begun with a bang in India! I’m sure you know what that means. Since Indian festivities and food are synonymous with each other, you can expect quite a lot of festive treats in the coming weeks. The festival of lights, Diwali, is just a few weeks away, so I’m starting my series of festive treats with these classic Indian buttery cookies also known as nankhatai cookies. I baked my first batch of nankhatai in 2015 when I was in the US. I missed having the Indian bakery-style nankhatai, so when I came across a recipe for these biscuits, I didn’t waste time making some. To my surprise, the biscuits turned out way better than the bakery ones too, they were light, crisp, crumbly and so flaky. The sweet aroma of cardamom-flavored nankhatai’s wafting from the oven is simply irresistible! I’m quite certain that one bite of this yummy biscuit will evoke nostalgic feelings that will take you back to your childhood days. 🙂
Ingredients needed
To make these eggless nankhatai biscuits, you will need; ☑ Is a one-bowl recipe ☑ Does not need eggs ☑ Is made with basic ingredients that you probably have sitting in your pantry right now ☑ Can be made without an oven ☑ Yields khasta (flaky, crispy, and tender) cookies that have a rich, buttery flavor and just melts-in-the-mouth ☑ Does not need any special equipment such as a stand mixer or hand mixer ☑ Is a beginner-friendly cookie recipe ☑ Can be made and shared all year round as you don’t really need an occasion to indulge in some nan khatai 😀
How to make nankhatai cookies at home – Step-by-step instructions
Step 1: Cookie dough
Line a baking tray with parchment paper and set aside. In a large mixing bowl, add 1/2 cup ghee. Place a fine-mesh sieve over the bowl, and sift 3/4 cup of powdered sugar. (Photos 1 and 2) Cream the ghee and sugar using a whisk. (Photos 3 and 4) Scrape the mixture off the sides and the bottom of the bowl occasionally using a spatula. (Photo 5) Whisk until the mixture turns light, pale, and creamy. (Photos 6 to 8) Place the fine-mesh sieve over the creamed mixture (make sure the sieve is not touching the mixture) and sift together 1 cup of all-purpose flour, 1/4 cup besan, 2 tablespoons rava, 1/4 teaspoon salt, and 1/2 teaspoon cardamom powder. (Photos 9 to 15) Combine everything using a spatula, then use your hands to bring the dough together. Do not knead. (Photos 16 to 18) If the dough looks dry, add a teaspoon of ghee and gently work the dough until it comes together. Pinch a small portion of the dough, and roll it between your palms to form a smooth ball. Flatten it slightly and check if there are any cracks on the edges. If it appears smooth, the dough is ready and does not need more ghee. (Photos 19 and 20) Wrap the dough in plastic wrap and refrigerate for 15-20 minutes. (Photo 21)
Step 2: Shape the dough
Pinch a lime-sized portion of the dough. Roll it between your palms to form a smooth round shape. Flatten them slightly. (Photos 22 to 24) Place it on the baking tray lined with parchment paper. Repeat with the rest of the cookie dough. Place them 1 inch apart since they will expand on baking. (Photo 25) Using a knife, make a criss-cross pattern in the middle. (Photo 26) You can also make an indentation in the middle of the cookie using your thumb or the back of a small measuring spoon. This helps the cookie expand during baking. Cover loosely and refrigerate for another 15-20 minutes. In the meantime, preheat the oven to 190°C (375 °F).
Step 3: Bake
Oven:
Bake at 190°C (375° F) for about 15 to 18 minutes or until the edges begin to turn a light golden in color. (Photos 27 and 28) The baking time may vary depending on the oven and the size of the cookies. So please keep an eye out. I baked them for 16 minutes and they were perfect. Sprinkle some slivered pistachios. (Photo 29) The cookies will be soft in the middle but will firm upon cooling. Let the cookies rest on the baking tray for 5 minutes, then transfer to a wire rack to cool completely. (Photo 30)
Without oven:
Shape the cookies as instructed above. Place them on a small aluminum, stainless steel, or nonstick baking pan greased and lined with parchment paper. You may use aluminum foil too. Refrigerate while the cooker preheats. (Photo 31) Add 1 to 1.5 cups of salt to the bottom of a pressure cooker or kadai. Place a trivet or stand over the layer of salt. (Photo 32) Make sure you remove the gasket and the whistle. Cover the cooker with the lid. Preheat on medium-high heat for 10 minutes. (Photo 33) Place the plate with the cookies carefully. (Photo 34) Close the lid, and let the cookies cook on medium-low heat for about 25 minutes or until done. (Photos 35 and 36) Switch off the heat and transfer the plate onto a stand very carefully using tongs or silicon mitts and allow it to cool down for 5 to 10 minutes. (Photo 37) The bottom of the cookie has a beautiful golden brown color. (Photo 38) Look at the texture! (Photo 39)
Serving suggestions
These cookies make for a delicious accompaniment to your morning coffee or evening chai. They are also great as a snack! Since it is like a cross between a cookie and a mithai, you can also enjoy them as a sweet treat post meals.
Storage instructions
Allow nan khatai to cool down completely. Store in an airtight container at room temperature in a cool and dry place for up to 3 weeks. Though, I really doubt they will last that long 😀 Do not leave them exposed to air for a long time or they will lose their crispiness.
You may also enjoy these Indian biscuit recipes
Karachi Fruit Biscuits Badam Pista biscuits Crispy coconut cookies Digestive biscuits
Editor’s Note: The original recipe published on June 9, 2015, was adapted from here. The recipe has been modified slightly and the post has been republished to include new images, detailed step-wise pictorials, video, and content on September 14, 2022. Ghee: To make the best khasta nankhatai recipe, it is recommended to use ghee as the fat. Consistency of the ghee: Make sure that you use room temperature ghee which is in a semi-solid state with a grainy texture. It should not be melted or the cookies will be flat. If you live in a hot and humid climate and find the ghee to be a bit runny, pop it in the fridge for some time to help it solidify slightly. Do not knead the dough: All you have to do is simply mix ingredients and get the dough together (refer to video). Kneading the dough will develop gluten which will make these cookies dense as opposed to light and flaky. Adjust the quantity of ghee as needed: If the dough feels too crumbly and is not coming together, add a few teaspoons of ghee and mix until it comes together. Do not add milk, or it will alter the texture. Chill the dough and shaped cookie dough balls before baking: It is also important that you chill the dough, chilling the dough helps solidify the fat (in this case, ghee), so when the cookies hit the oven, the fat melts slowly, preventing the cookies from spreading too much. If you bake them without chilling the dough, the cookies will spread out, as the dough is soft and the fat is already at room temperature. Even-sized cookies: Use a small cookie scoop or a tablespoon for uniform-sized cookies. You can also weigh the cookie dough and divide it by the number of cookies you need to make sure that each cookie is the same size. FYI, the dough weighs about 400 grams. Let cookies rest after baking: Nankhatais are quite delicate and fragile right after they are baked. Let them rest on the baking tray for at least 5 minutes to achieve the perfect texture. If you try to remove them earlier, they might just crumble and fall apart. Sprinkle pistachios in the end: I prefer adding slivered pistachios in the end because they tend to turn brown after baking and don’t look very appealing. It’s a personal preference. If using other nuts like almonds or cashew nuts, you may add them before baking. Coconut flavored: Add about 1/2 cup of desiccated coconut along with the flours. Add a teaspoon of ghee at a time, if the dough isn’t coming together. Nuts: Though I’ve added slivered pistachios just for garnishing, you can most certainly incorporate some coarsely chopped nuts like walnuts, almonds, cashew nuts, pecans, etc in the cookie dough for added texture. Chocolate: Add 2 to 3 tablespoons of cocoa powder along with the flour. You can also add some semi-sweet or dark chocolate chips. Thandai flavored: Add 3 to 4 tablespoons of thandai masala powder along with the flours. Vegan: Swap the ghee with vegetable shortening (make sure it is vegan) or vegan butter. The word Nankhatai is derived from the Persian word Naan meaning bread and “Khatai” from an Afghan word meaning Biscuit. In Afghanistan and Northeast Iran, these biscuits are called Kulcha-e-Khataye. Kulcha is a type of bread similar to Naan. There is also an interesting history of how Nankhatai originated. Nankhatai is believed to have originated in Surat in the 16th century, the time when Dutch and Indians were the important spice traders. A Dutch couple set up a bakery in Surat to meet the needs of local Dutch residents. When the Dutch left India, they handed over the bakery to an Iranian. The bakery biscuits were disliked by the locals. To save his business he started selling dried bread at low prices. It became so popular that he started drying the bread before selling it. With time, his experimentation with bread ultimately gave birth to Nankhatai. (Source- wiki) Do not be tempted to overbake them, because they will continue to cook once they are out of the oven and will turn 1 to 2 shades darker. Note: If you swap the all-purpose flour with wheat flour, then do add about 1/2 teaspoon of baking powder so that the cookies do not turn dense. Once it is preheated, place a short stand, and the tray containing the shaped dough on the stand. Bake the cookies for about 10 to 12 minutes or until done. Have you made this recipe? I would love to hear from you! Please be sure to share your feedback and/or give this recipe a rating in the comment below. Your reviews help others know the recipe better too. Also, be sure to subscribe to our free weekly newsletters for the latest recipes. You can also FOLLOW me on Facebook, Pinterest, Instagram & Twitter