Growing up in Japan, I ate Japanese milk bread, or what we call shokupan (食パン), as a staple for breakfast. The square-shaped white bread is incredibly soft, fluffy, and moist, even after toasting! These days, you can find shokupan at Japanese or Asian bakeries and markets. I’m here to tell you that there’s nothing like homemade shokupan! This recipe makes a delicious loaf. I’ve given this bread to my Japanese and non-Japanese friends, who all highly approve of the results. I hope you will, too. Before I begin, I’d like to inform you: This blog post and my recipe are long, but for good reasons. It is easy for the beginner home baker to follow along, and you’ll find all the tips to make the best shokupan. Precision is required for a successful outcome. Those few grams of liquid or dry ingredients do make a difference. You may need to buy some special kitchen and baking tools you do not have yet for this recipe. I’m confident you’ll fall in love with this bread as I have and find these tools worth purchasing. You may make this bread monthly, if not weekly, like me!
What is Japanese Milk Bread?
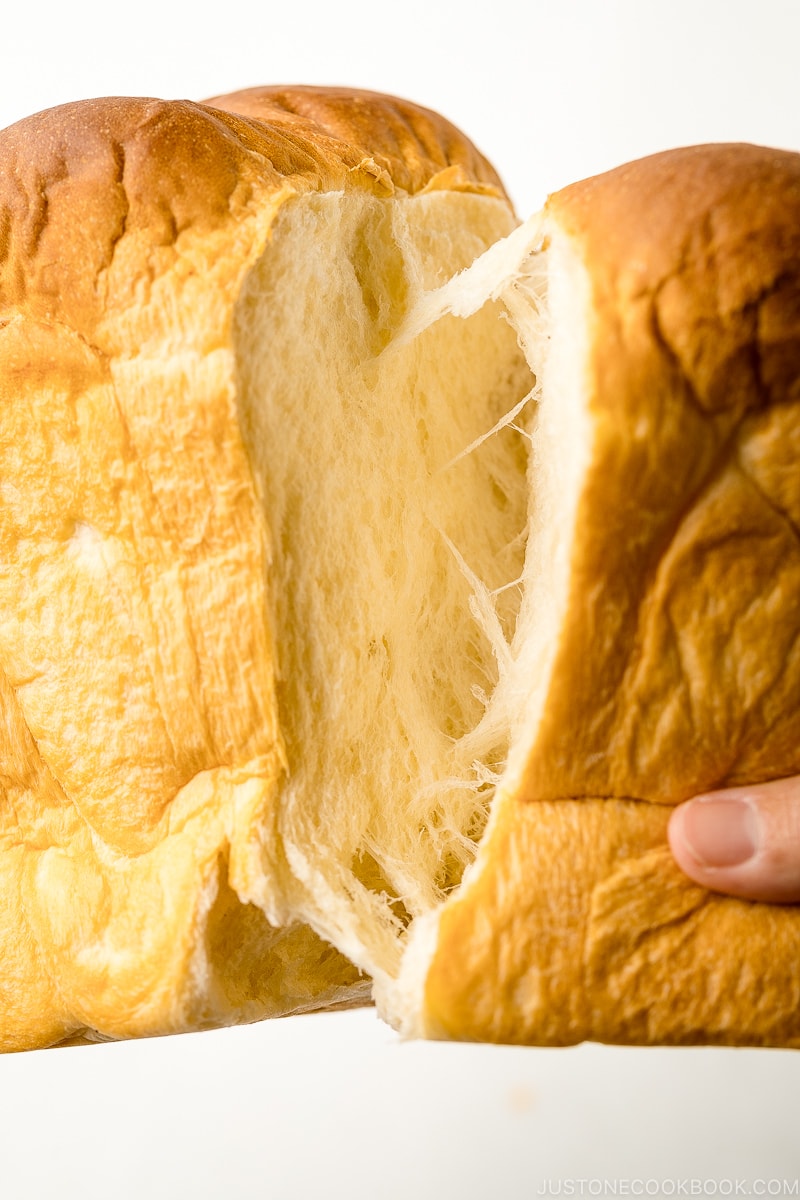
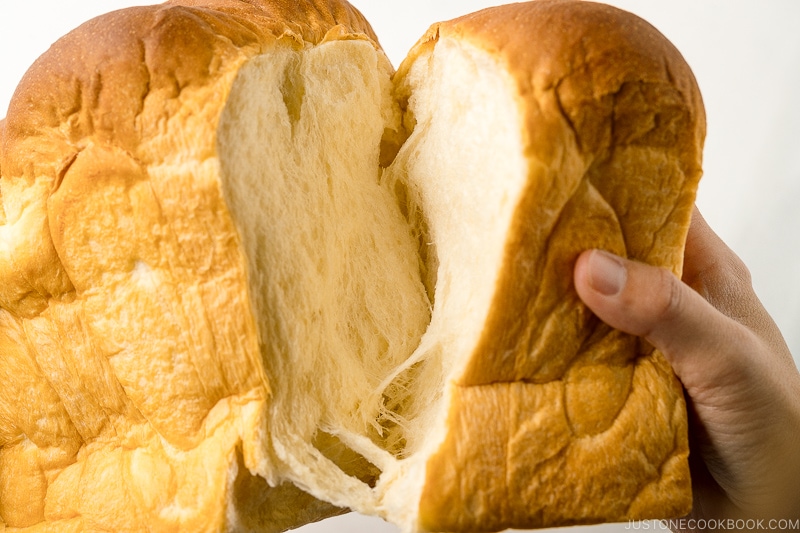
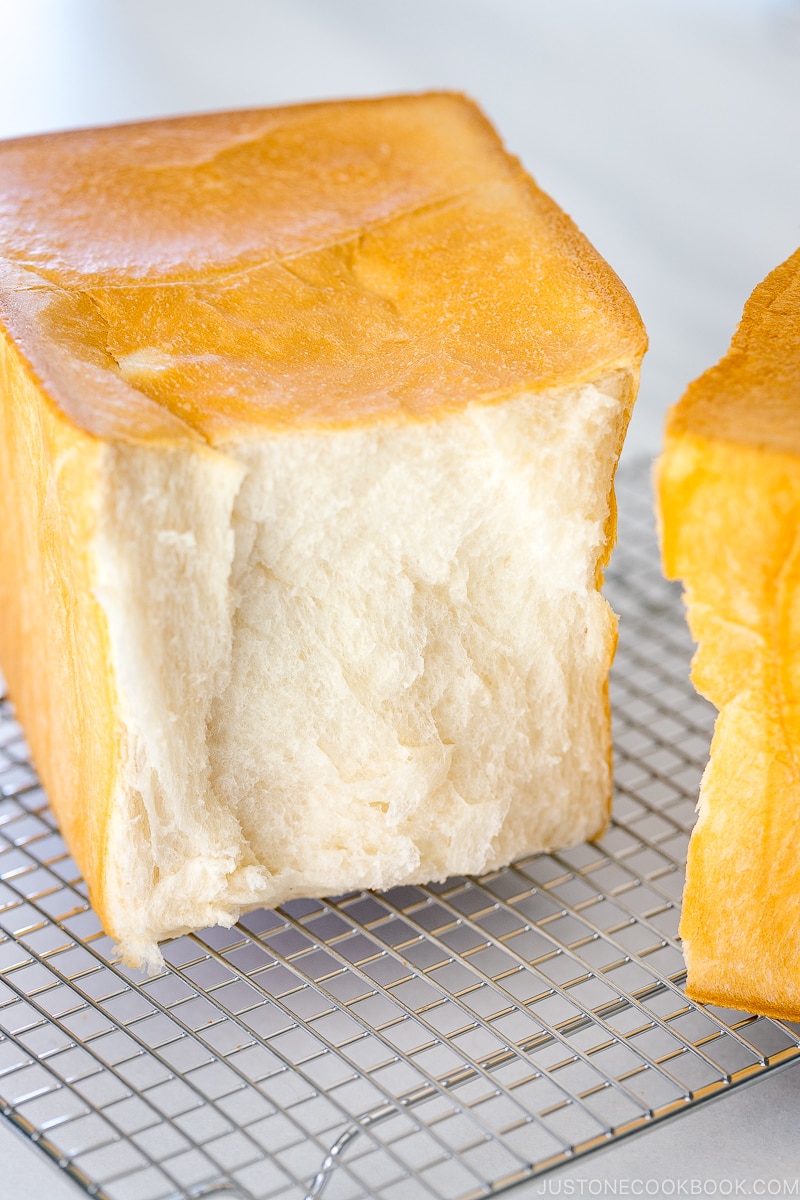
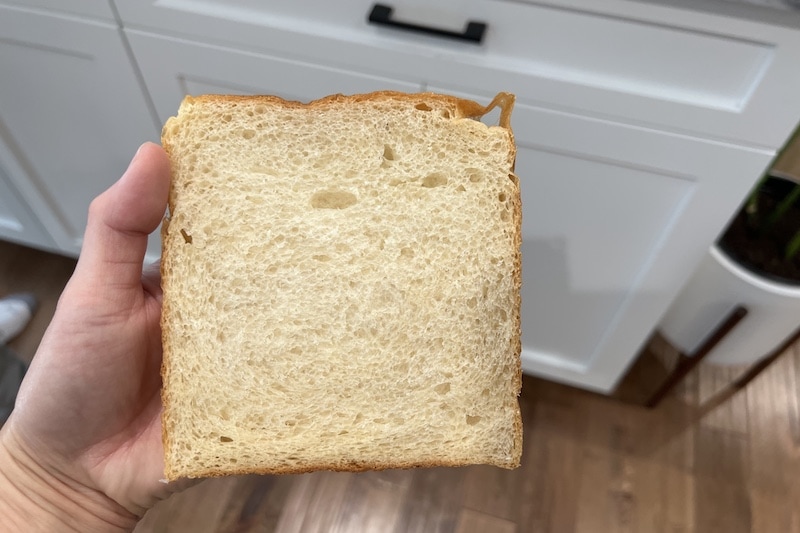
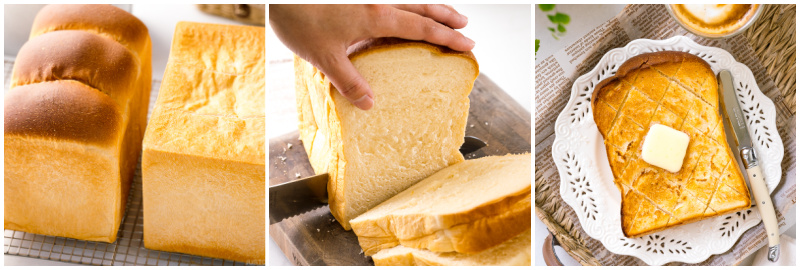
Shokupan (食パン), or simply Japanese milk bread, is the Japanese version of sandwich bread or Pullman loaf. The characteristics of this bread are its delicate texture and subtly sweet taste. It has an exterior golden crust and an interior white crumb that’s light as a cloud and fluffy as cotton! It’s the most tender and moist bread you’ll find. While I’ve seen Japanese milk bread, also called Hokkaido milk bread, the Japanese do not use either of these names and simply call it shokupan, which translates to “eating bread.”
What Does Shokupan Taste Like?
Over the decades, Japanese bakers modified the Pullman loaf to appeal to the Japanese palate. As a result, shokupan is at once slightly sweet, buttery, and milky. This delicate balance comes from simple ingredients like white flour, yeast, milk powder, butter, salt, and sugar.
How Is Shokupan Different?
Shokupan is distinct from other types of bread in its texture, flavor, shape, and slice thickness. With its higher fat content, shokupan is a richer product than traditional white bread. You’ll instantly recognize shokupan by its distinctive square or rectangular block shape. Typically cut into thick slices, its flavor and texture are well suited for anything from breakfast toast to Japanese-style sandwiches.
Does Shokupan Taste Like Brioche?
While shokupan and brioche are soft and buttery, they are different. Brioche is a much richer bread than Japanese milk bread. It uses a lot more butter than shokupan dough, giving brioche a sweeter and more buttery taste. Brioche is also made with eggs. This helps give brioche its signature golden color and a denser, chewier texture than shokupan.
Two Types of Shokupan
There are two types of shokupan:
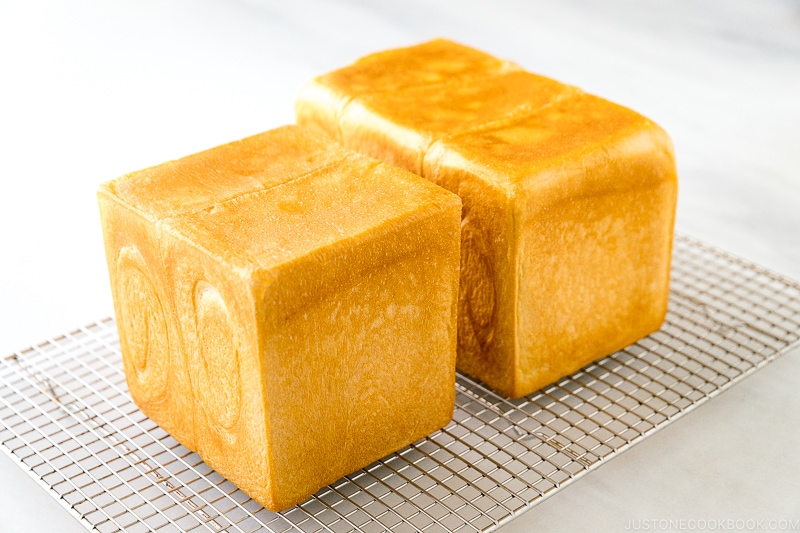
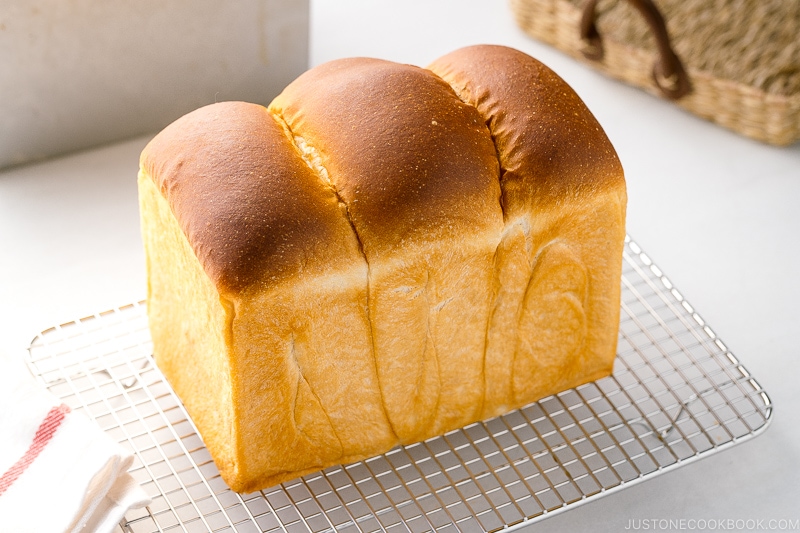
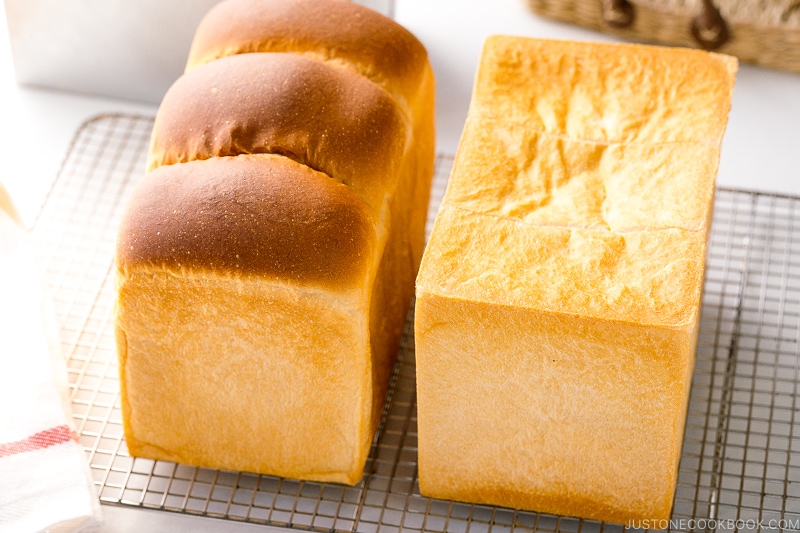
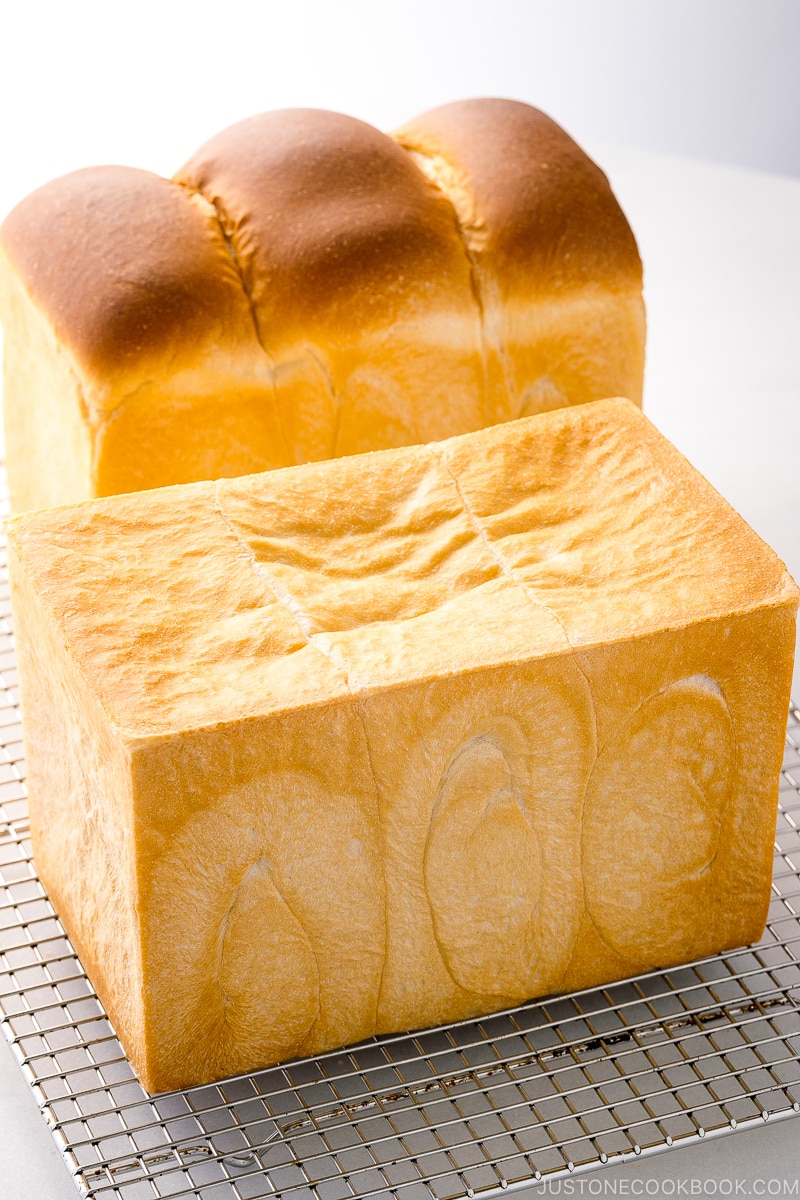
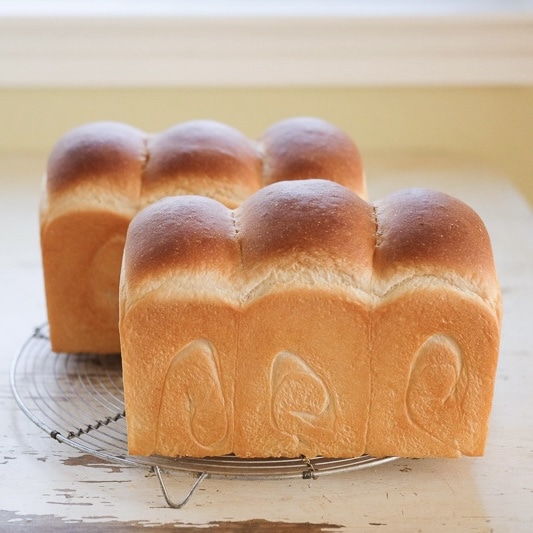
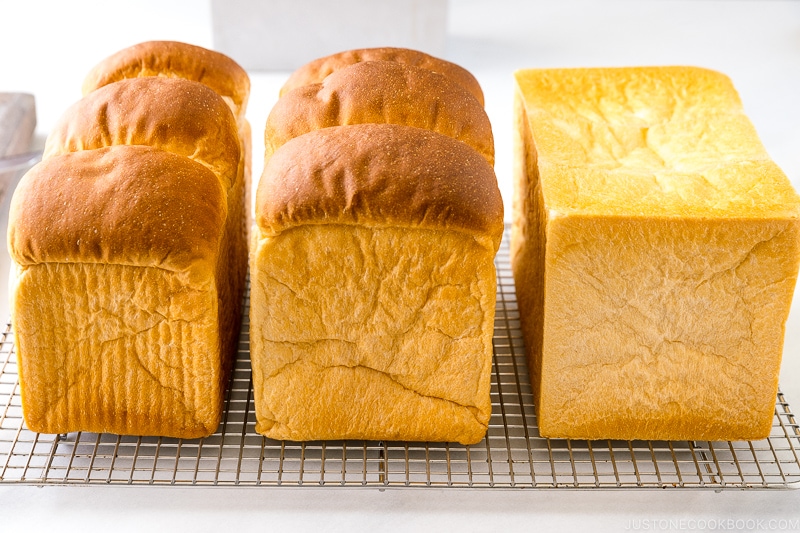
a flat-topped loaf called kakugata shokupan (角型食パン), kaku shokupan (角食パン), or kaku shoku (角食; mainly in Hokkaido); and a round-topped loaf called yamagata shokupan (山型食パン), yama shokupan (山食パン), or yama shoku (山食; in Hokkaido).
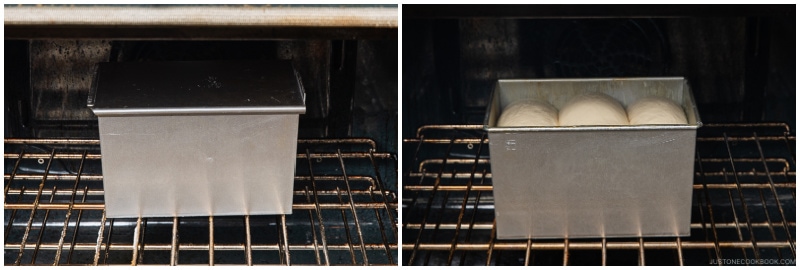
The round-topped loaf is baked without a lid, which allows it to stretch upward and have a light and soft texture. On the other hand, the flat-topped loaf is baked with a lid, so the evaporation of water is minimal; it has a moist and chewy texture.
History of Shokupan
Bread was first introduced to Japan in 1543 by the Portuguese (hence, we call it pan, derived from the Portuguese word pão). However, it wasn’t consumed regularly by the Japanese for centuries. When Japan underwent modernization in the early Meiji era of the late 1800s, British round-topped white bread (イギリスパン) was first introduced during that time. This bread was called honshoku pan (本食パン), literally meaning “staple food bread,” and was consumed mainly by foreigners. Bakeries started to open in Yokohama (my hometown!) and Kobe, where most foreigners resided. After World War II, the American Resident Army introduced a flat-topped square loaf. The loaf was cut into eight slices and made into sandwiches for stationed soldiers. Japanese bakers gradually adapted this bread to suit Japanese tastes, and shokupan was born. Since then, shokupan has been a big part of Japanese food culture.
My Past Disappointment and Mistakes
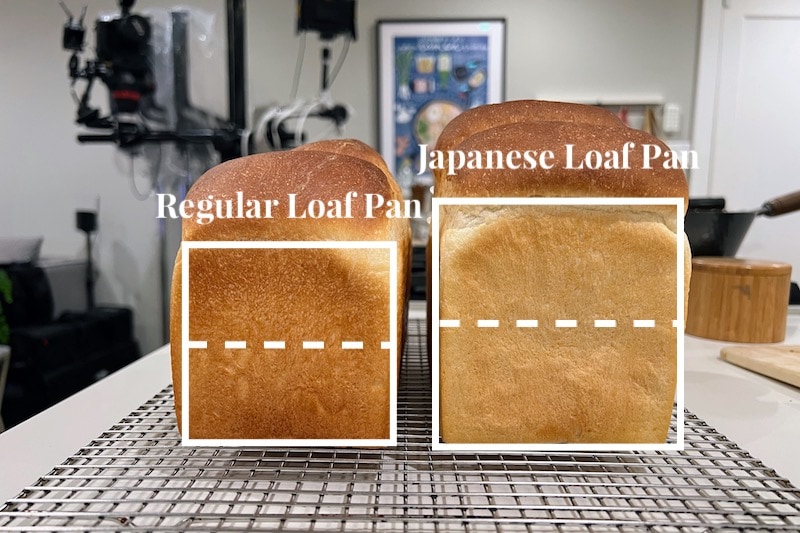
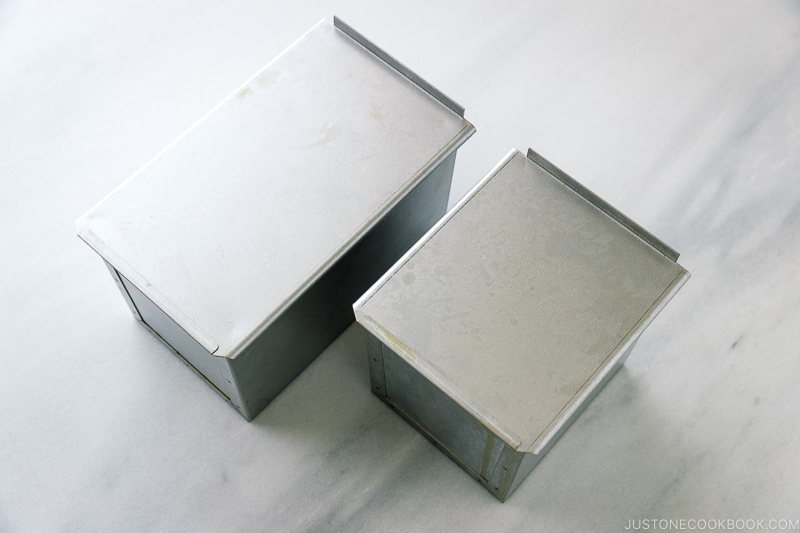
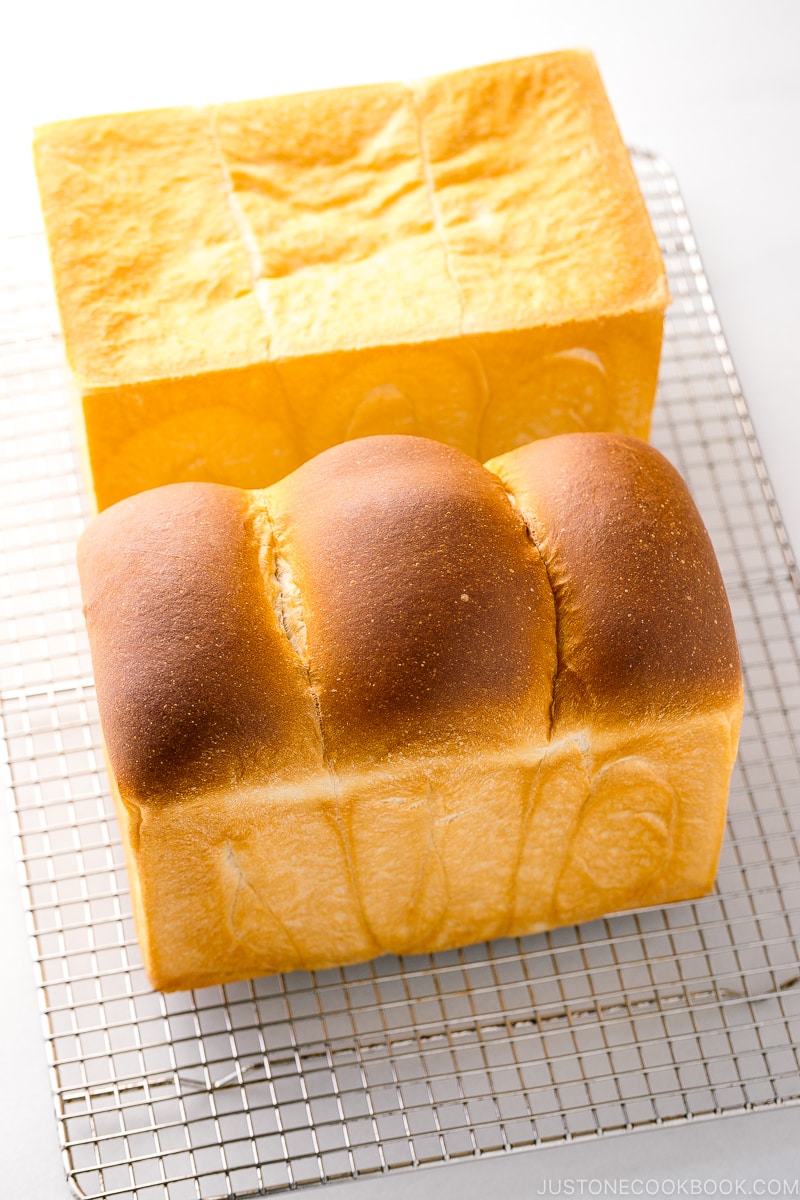
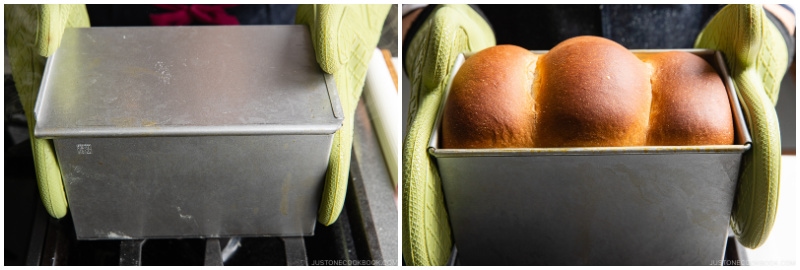
I want to share some mistakes from my early shokupan making in case some of you have had or will have similar disappointments. When I made my first shokupan almost a decade ago, I was so disappointed when my bread came out tiny compared to a regular Japanese loaf! I was using a regular American Pullman loaf pan to make shokupan. Even though the pan size difference seems insignificant, it does affect the outcome of the bread. You can see the contrast of the end results below. I made two loaves here—one with the regular Western-style loaf pan and the other with the Japanese loaf pan I’m using now. The square and dotted lines show the area we use for Japanese-style sandwiches. As you can see, a slice from the regular loaf pan is so tiny that I could barely make Japanese-style sandwiches with it! Looking for the right size, I went a bit crazy. I purchased four more loaf pans! I even brought back 1.5 kin Tiger Crown loaf pans from Japan. Unfortunately, none were even close to the authentic shokupan size. Please note that there is no standard for loaf pan sizes in Japan, and every company makes their shokupan mold a different size. But then, several years ago, my luck changed! That’s when Asai Shoten (浅井商店), the famous kitchen equipment company in Kappabashi, Tokyo, introduced its own line of “Ideal Shokupan Molds (理想の食パン型).” These pans make bread loaves close in size to the shokupan sold in bakeries and supermarkets in Japan. With the new loaf pans in hand, I took online shokupan lessons from Mariko, a Japanese friend who resides in Austin, Texas, and teaches bread-making classes. The bread I baked with her was the best shokupan I ever made. It was unbelievable. Her recipe is similar to those I’ve tried, but the techniques she taught me made such a huge difference! During my first class with Mariko, I learned two mistakes that I had made early on:
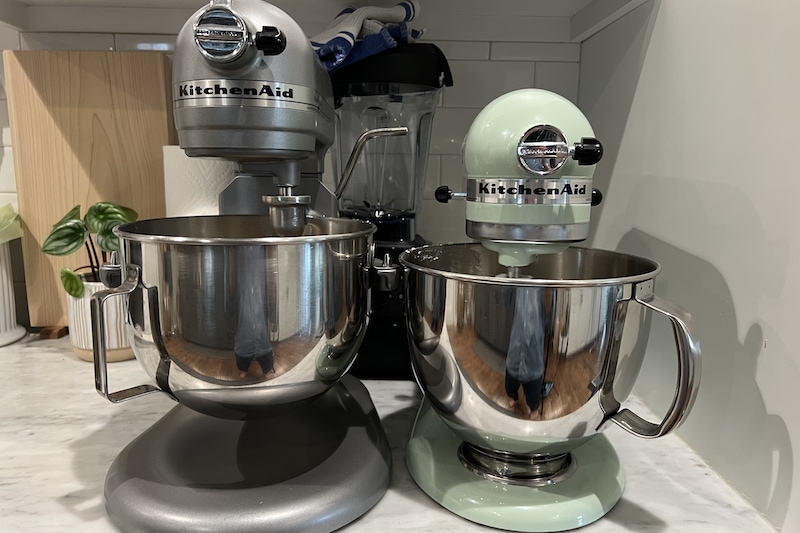
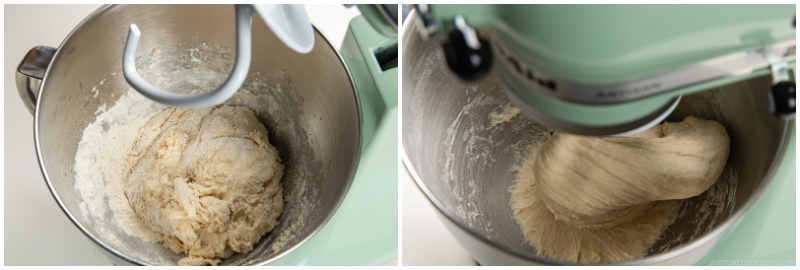
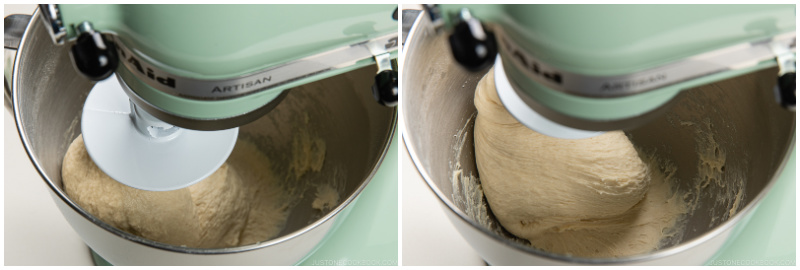
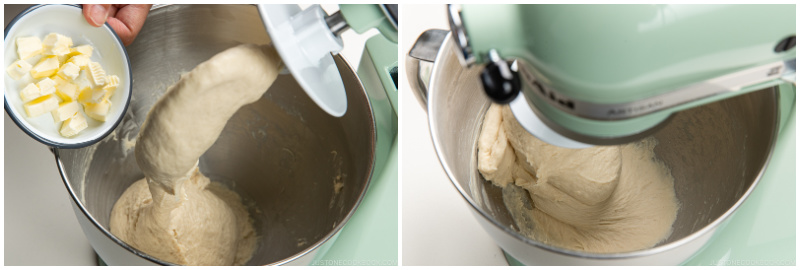
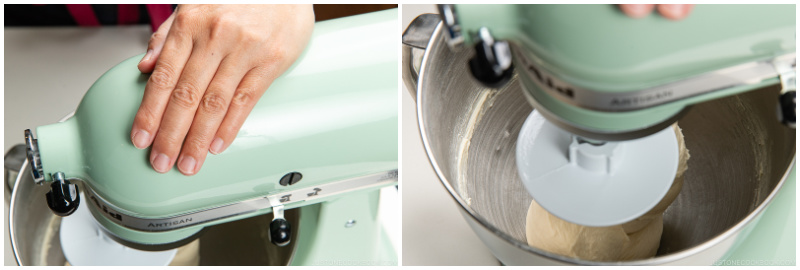
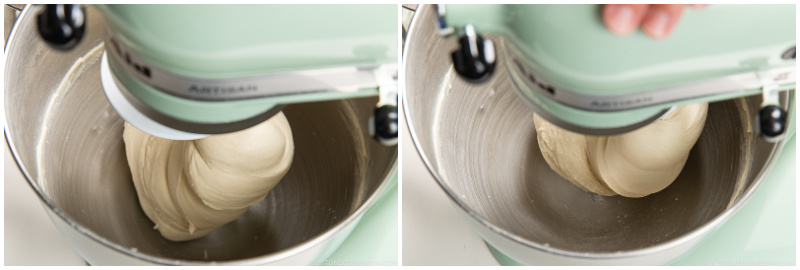
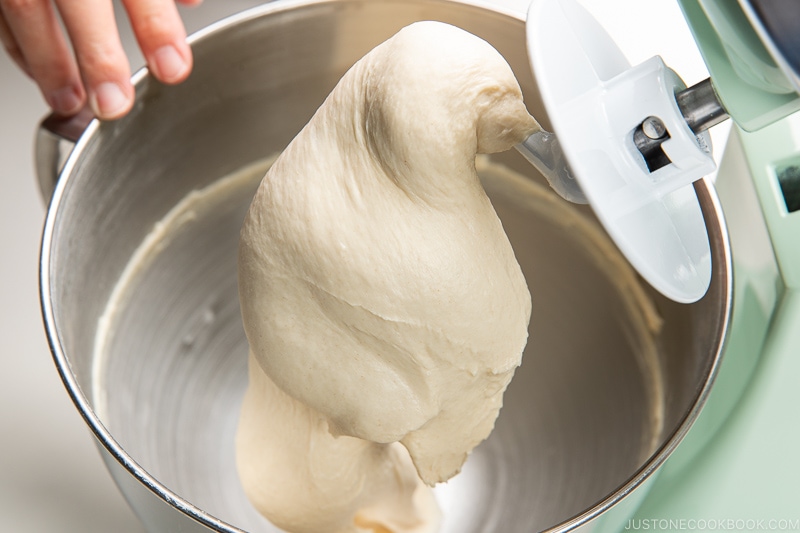
The KitchenAid Professional Series stand mixer with a spiral hook was wrong. I tried and failed many times to make a loaf of shokupan with this machine. The bowl is too wide on the bottom, and the wet dough doesn’t engage the spiral hook. Last year, I bought a KitchenAid Artisan Series stand mixer (325 watts), and this is the perfect tool for making a loaf of shokupan. Note: You can succeed with a Professional Series stand mixer IF you double the rectangular loaf recipe since there’s enough dough to engage the spiral hook. Speed 2 on KitchenAid is the wrong speed. The KitchenAid instruction manual recommends Speed 2 for kneading, but reaching the right dough texture takes forever. Shokupan dough requires more aggressive kneading to develop gluten. Mariko taught me to use Speed 4 and 6. It was a total game-changer.
I also learned that advanced knowledge and the proper techniques make a huge difference in the quality of your bread. This is where Mariko comes in. As an experienced bread-making teacher, she can provide detailed insight on how to improve your outcome. I’ve taken Mariko’s class twice so far, and I feel like I learned new things in each lesson. Trust me that you can make pretty good bread following my written recipe below, but with Mariko’s guidance, you can improve your techniques even further. It’s the little things you do that will improve the texture and flavor of your bread. I highly encourage everyone to take Mariko’s bread-making lessons (online now and in-person in the future). We also plan to do online classes for our JOC PLUS members.
Where to Buy the Right Japanese Loaf Pan
But if you want to make true shokupan at home, then you have to get this 1.5 kin loaf pan (4.7 in. x 7.8 in. x 5.1 in.) and/or this 1 kin loaf pan (4.7 in. x 5.3 in. x 5.1 in.) from Asai Shoten (浅井商店) in Japan. The loaf size in Japan is measured in “kin (斤),” an old Japanese unit for measuring bread weight. The British-style round-topped bread was 1 pound (450 g) back then and was called “1 kin.” How do you get a loaf pan shipped to your home from Japan? I have written an extensive post about Japanese loaf pans and how to order them from Japan.
Tools You Need for Shokupan
If you’ve never baked bread, you may need some new tools. However, these are essential tools that you can use for making any type of bread, and they can be valuable additions to your kitchen.
Must-Haves
A Pullman loaf pan—I use a rectangular loaf pan (4.7 in. x 7.8 in. x 5.1 in.) and a square loaf pan (4.7 in. x 5.3 in. x 5.1 in.) KitchenAid Artisan Series (5 QT, 325 watts; I do not recommend the bowl-lift Professional Series with a spiral hook unless you double the rectangular loaf recipe) C-dough hook Digital kitchen scale* (I use this and LOVE it after trying three other brands) Large bowl Dough scraper (I use this) Rolling pin (I use this) Mister (for round-topped loaf) Wire rack Bread knife (I use this)
*Precise measurement is vital for this recipe; therefore, please weigh your ingredients with a kitchen scale. I strongly discourage using a cup or volume measurement.
Nice-to-Haves
Flour duster/shaker (I use this) Plastic bags for storing your loaf (I use this)
From Your Kitchen
Tea towel Plastic wrap
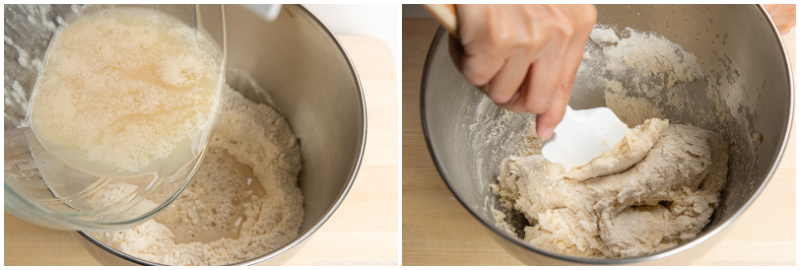
How to Make Japanese Milk Bread
You can make shokupan with straightforward ingredients and procedures. However, you need time, proper skill, and an understanding of yeast bread. To be completely transparent with you, I’m still learning and may not know all the answers. So again, I encourage you to take Mariko‘s bread-making classes!
Ingredients You’ll Need
(Baker’s percentages are in parentheses)
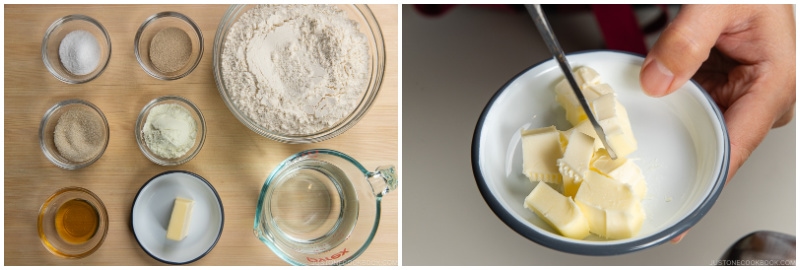
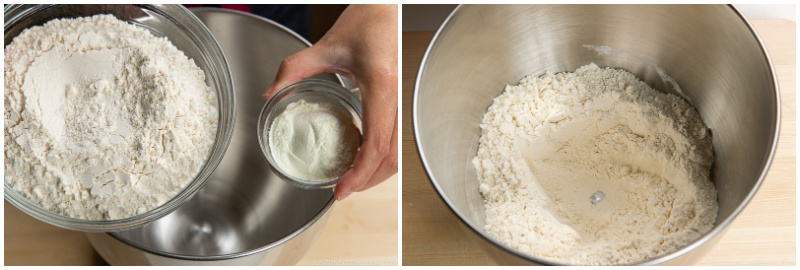
Warm water (71%): 104ºF or 40ºC Sugar (6%): I use organic cane sugar from Costco Instant yeast (2%): I use Fleischmann’s® bread machine yeast or RapidRise® instant yeast Kosher salt (2%) Honey (3%): I use multi-floral and clover honey from Trader Joe’s, but you can use other types Bread flour (100%): I use King Arthur bread flour, which is 12.7% protein–a whole point higher than other US brands Skim milk powder or nonfat dry milk powder (6%): Skim and nonfat dry milk differ. Skim milk powder has 34% protein, while nonfat dry milk powder has 18%. In Japan, shokupan is made with skim milk powder. Here in the US, you can only find nonfat dry milk powder, and I’ve been using Bob’s Red Mill’s to make shokupan. Unsalted butter (7%): I use Kerrygold. Please DO NOT use salted butter
Substitutions:
To substitute active dry yeast for instant yeast: Some online resources say to use the exact same amount as instant dry, while others say to use 25% more active dry. So please give it a try and adjust. Proof active yeast by dissolving it in a portion of the warm water (105º-110ºF or 41-43ºC) from the recipe before adding to the rest of the ingredients. Use the following yeasts interchangeably: Instant yeast = RapidRise® yeast = quick-rise yeast = bread machine yeast. Can I substitute bread flour with all-purpose flour? Please do not substitute if you want to make a proper shokupan. For the dough to rise high enough, you will need more protein in bread flour. Vegan milk powder option: I haven’t tried alternatives, but Mariko tried coconut milk powder, which worked. Avoid soy milk powder, as the dough does not rise well. Vegan butter option: Please use unsalted vegan butter such as Miyoko’s.
Overview: Bread-Making Steps
Total time: 3 hours and 35 minutes (+ cooling) / Active time: 1 hour and 10 minutes
Four Important Tips to Remember
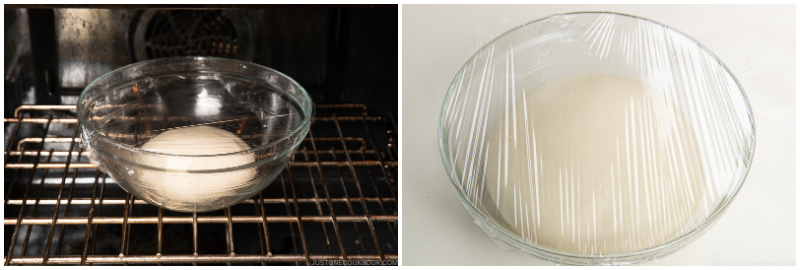
1. Create a Warm Environment for Your Dough
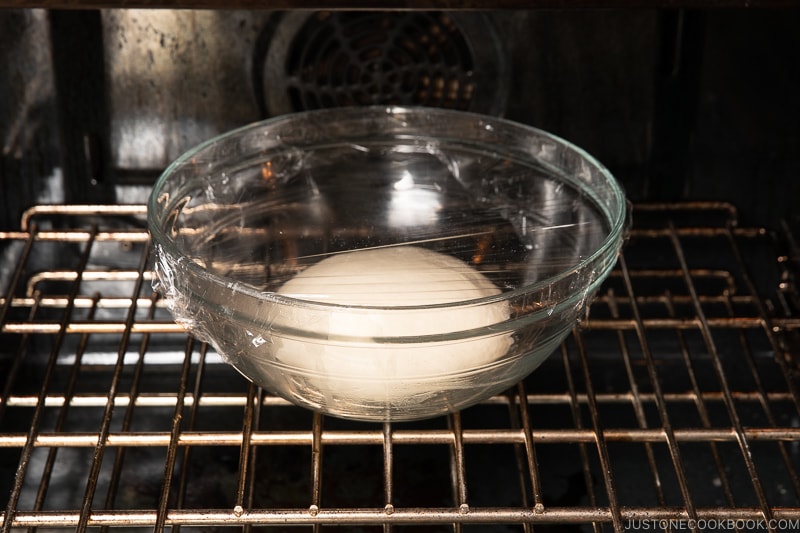
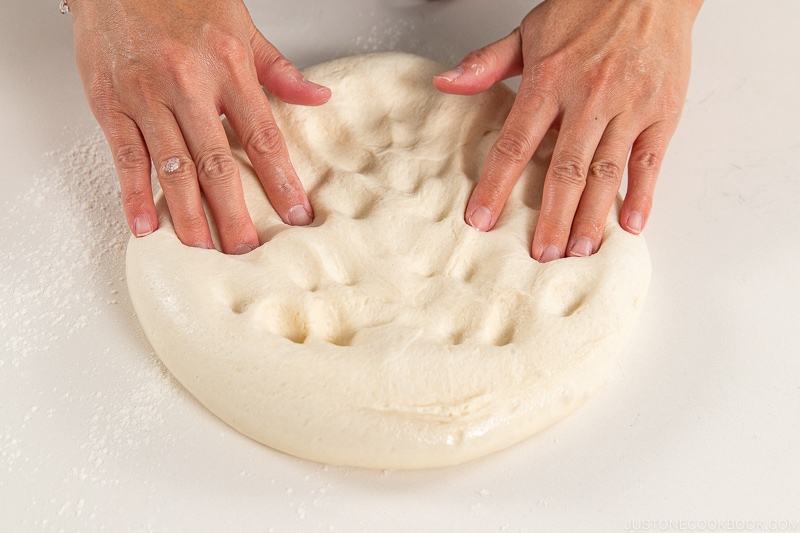
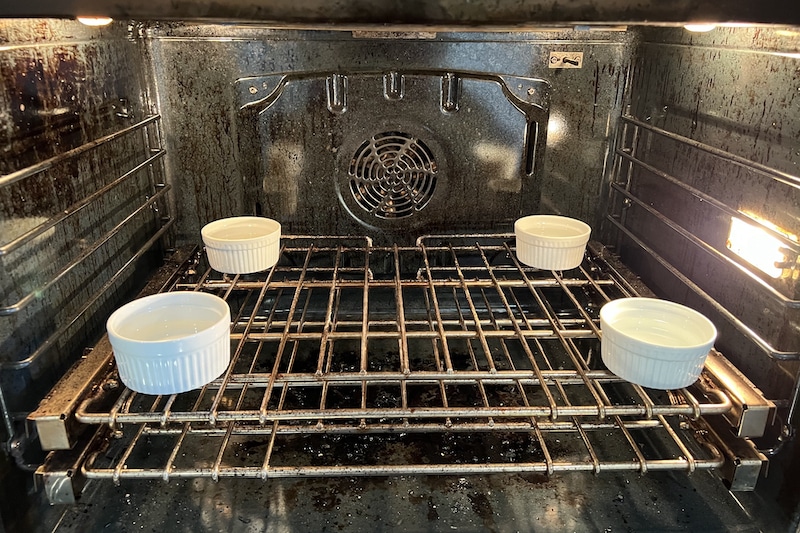
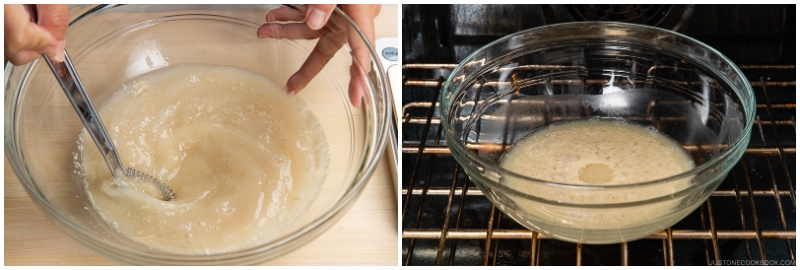
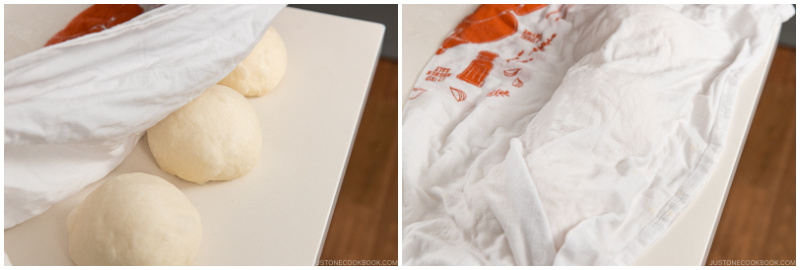
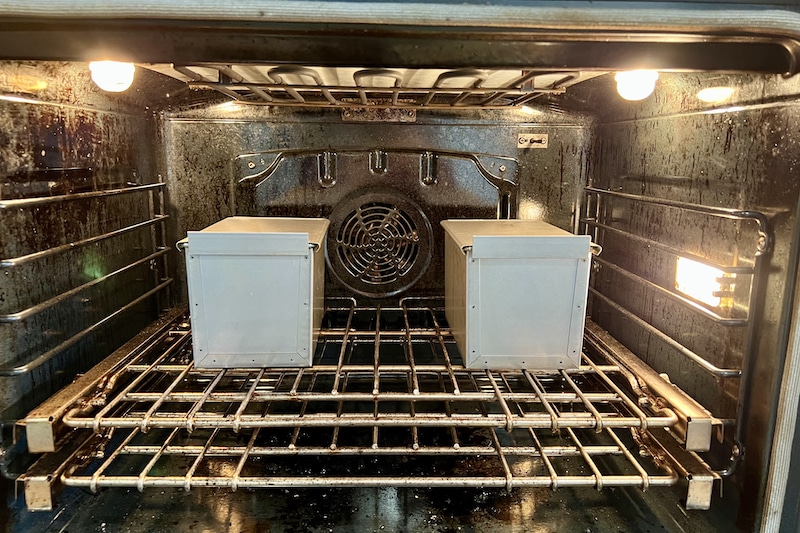
The optimal temperature for fermenting and proofing bread dough is 86-95°F (30-35°C) degrees. Living in San Francisco, where it’s relatively cool all year (60-65ºF degrees), I had a challenging time with dough proofing until I got a new oven with a proof set. However, you can successfully proof your dough without a special oven setting. Dough proofed at temperatures lower than 86ºF (30°C) will take longer to ferment or go dormant. The yeast will expand more quickly at higher temperatures than the gluten structure. If this happens, it won’t be able to keep up with fermentation, and the air bubbles will collapse. Also, avoid placing your dough in direct sunlight in the summertime as it gets too hot and develops a crust, even though it may seem like a warm location for proofing.
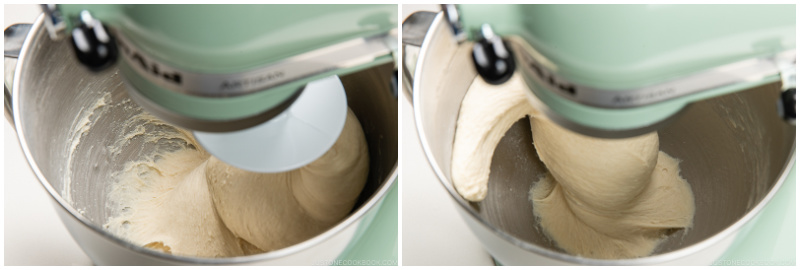
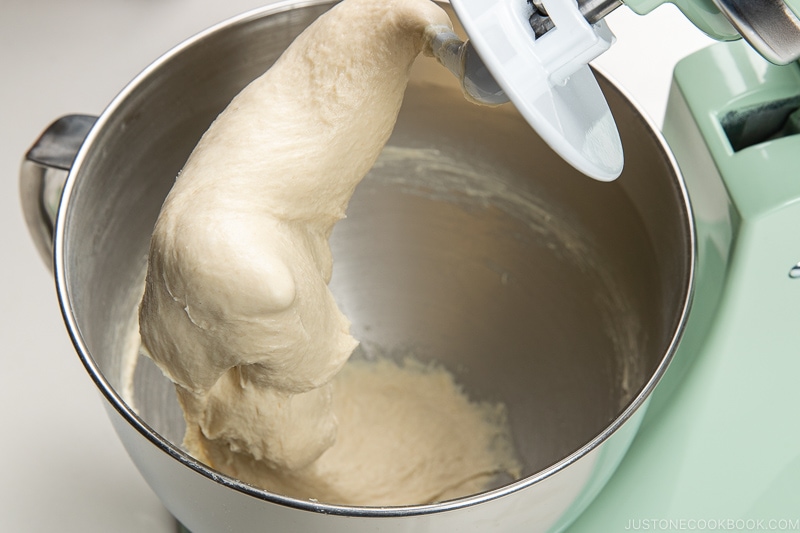
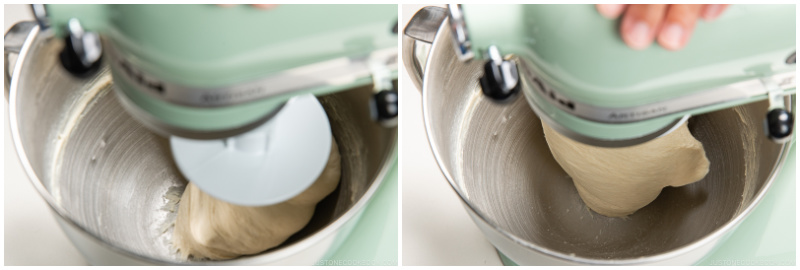
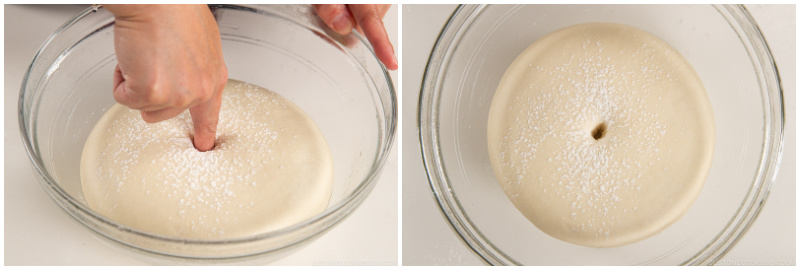
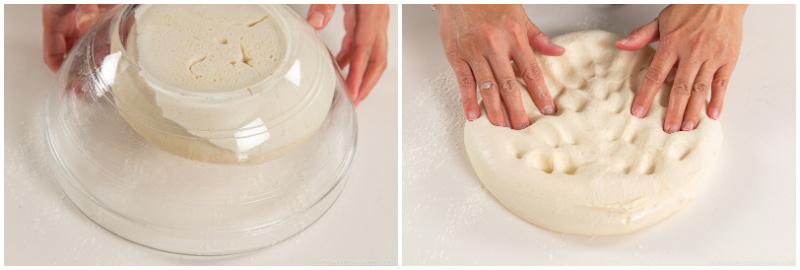
2. Use the Windowpane Test
The more you knead the dough, the stretchier it gets. But how do you know when to stop kneading? That’s where the windowpane test comes in handy. It’s a helpful way to check the elasticity of the dough, and here’s how to do it: Now you know your dough is kneaded correctly and the gluten is well developed. Dough with the proper elasticity can hold gases in while it rises and stretches even more as it expands.
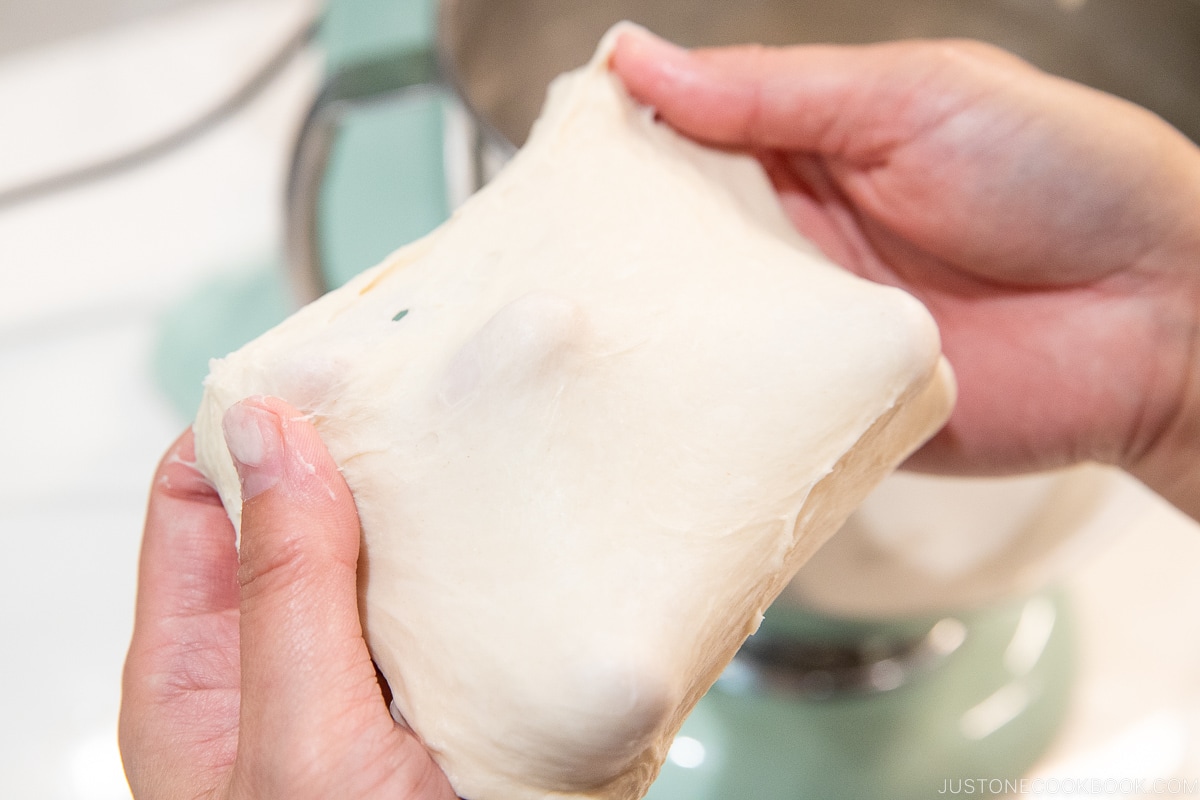
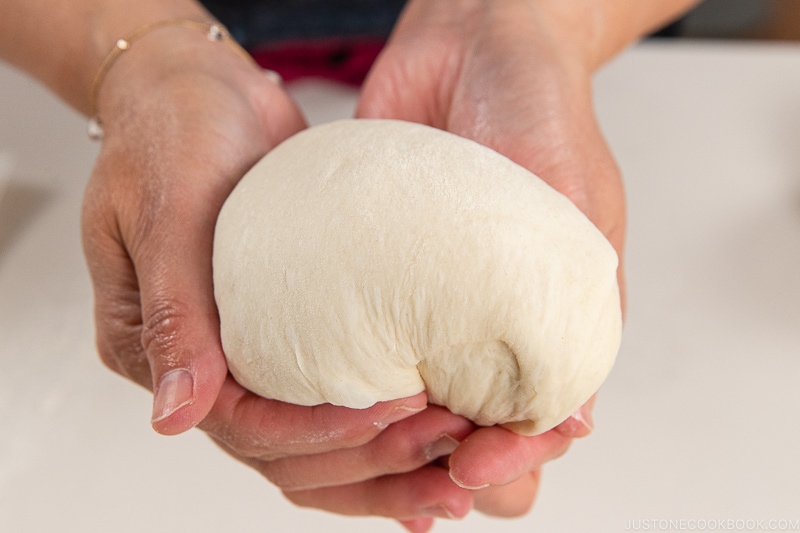
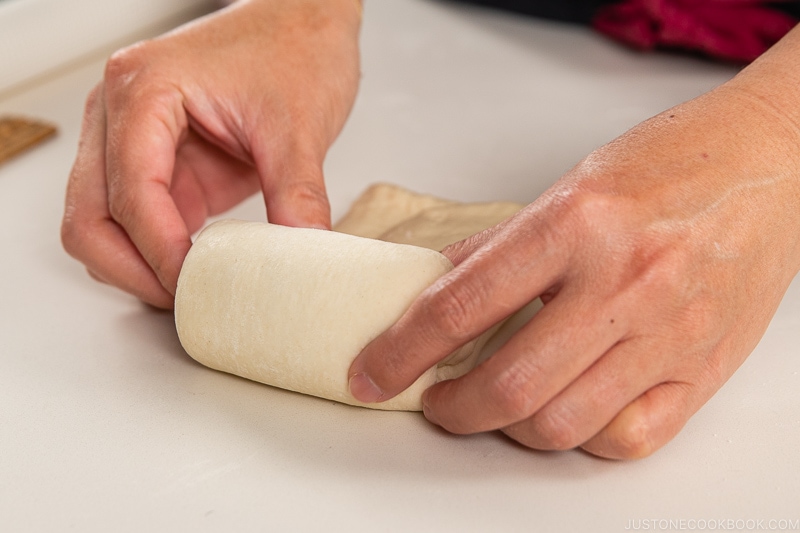
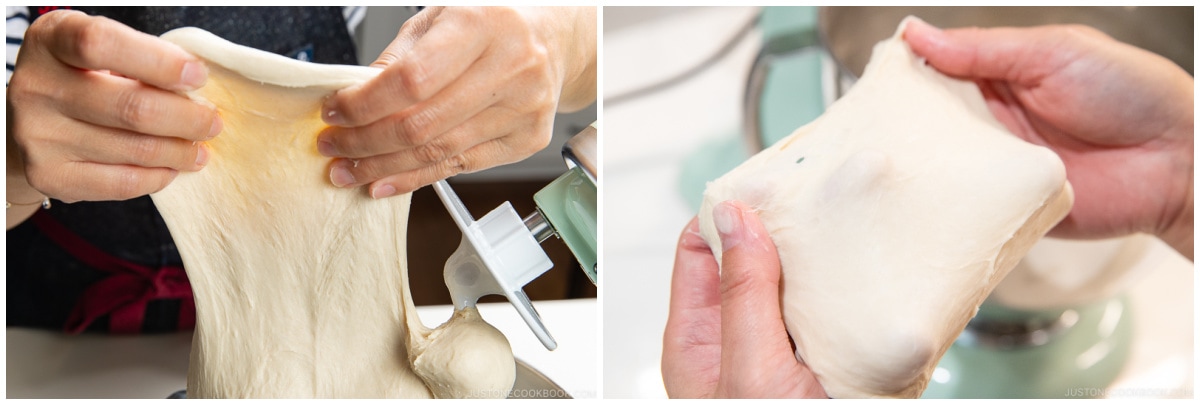
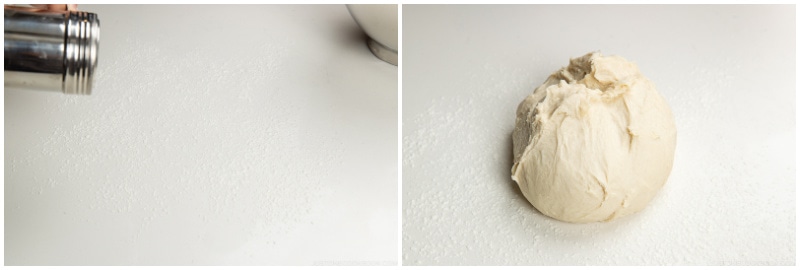
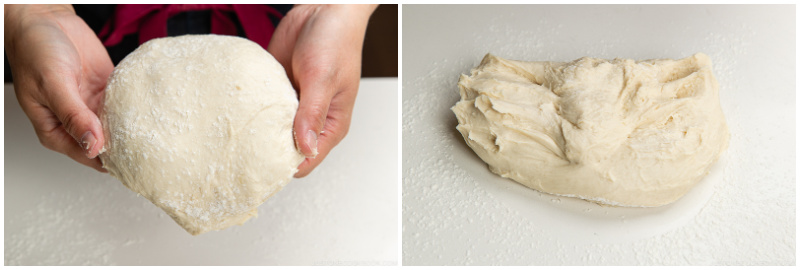
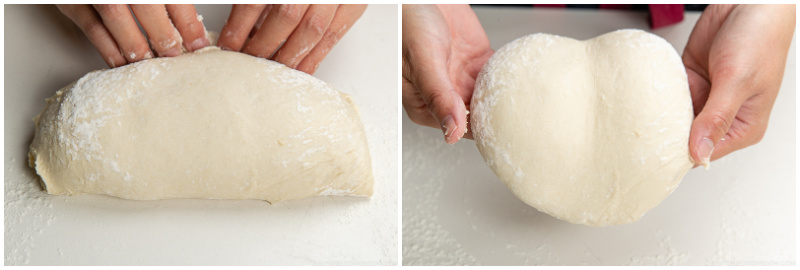
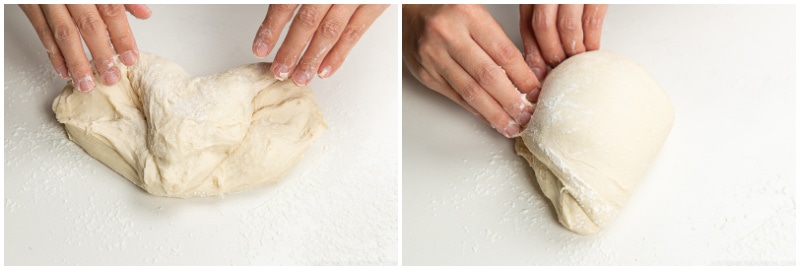
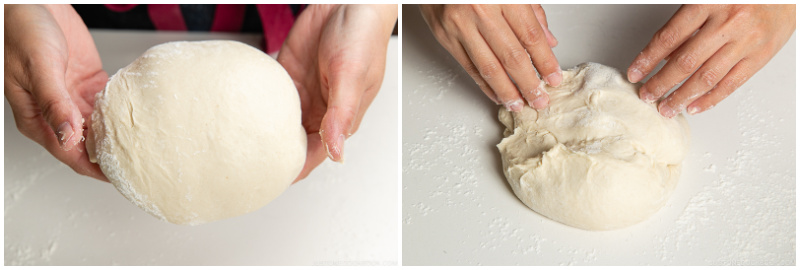
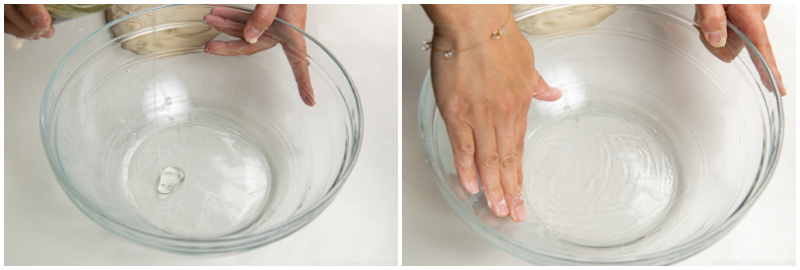
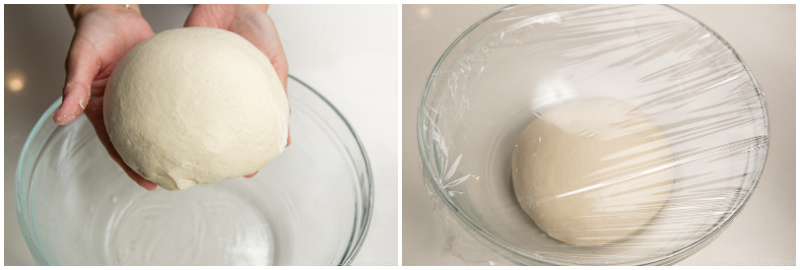
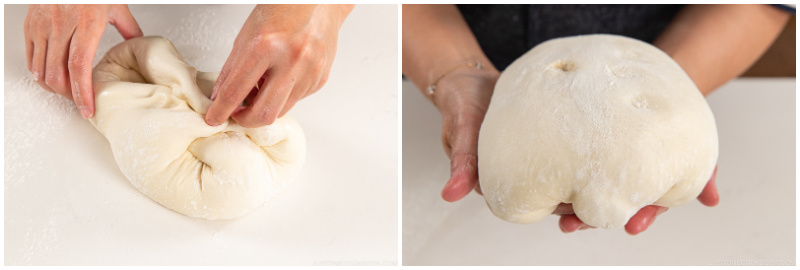
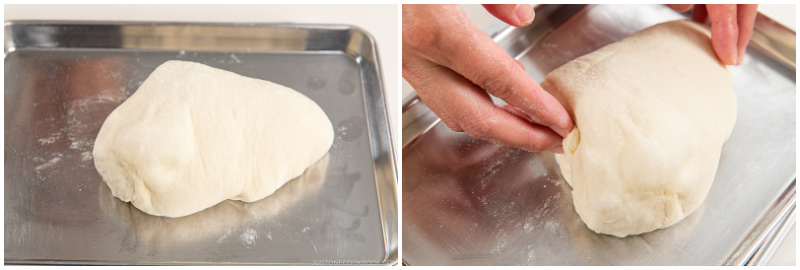
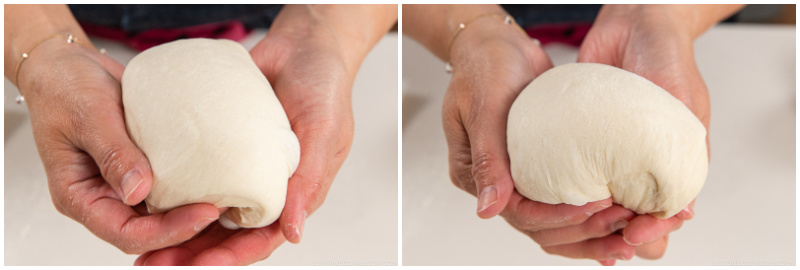
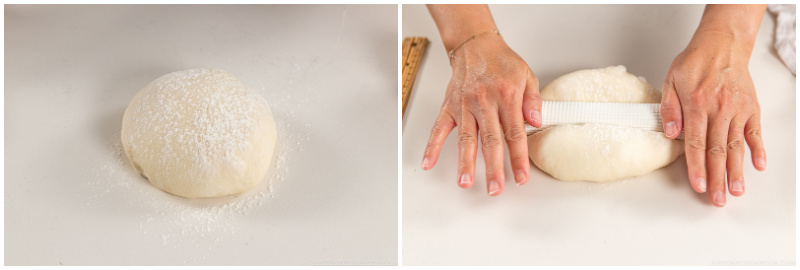
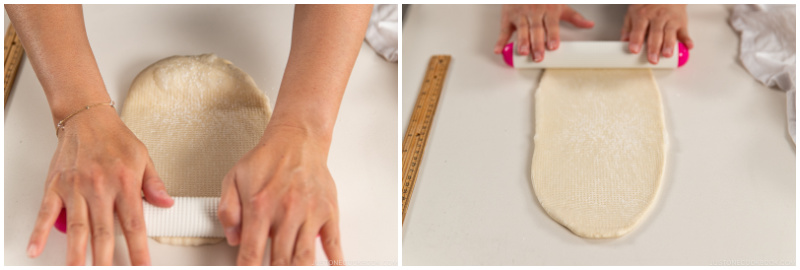
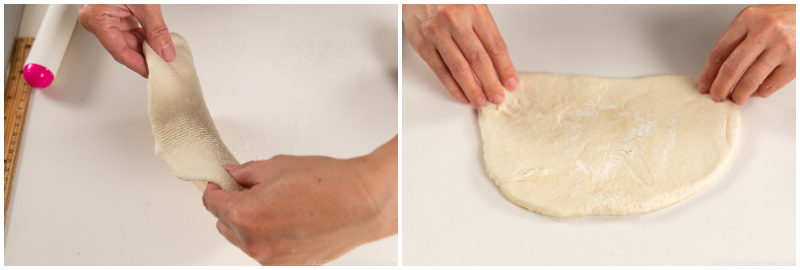
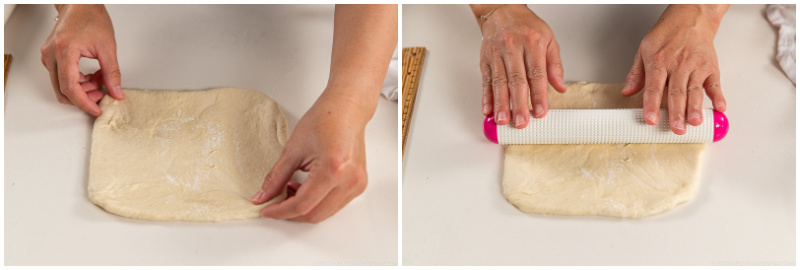
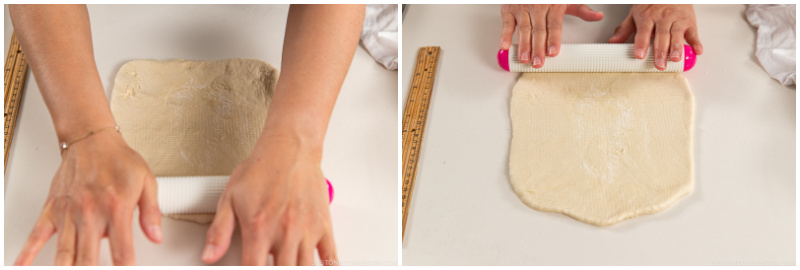
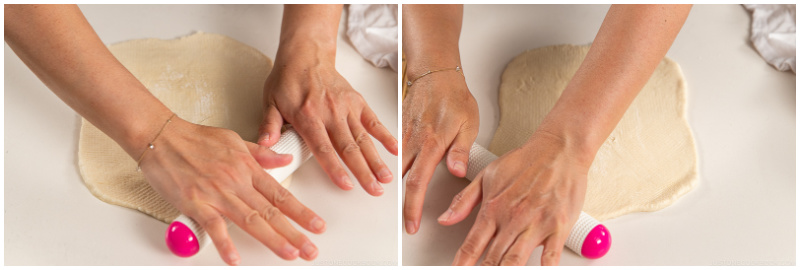
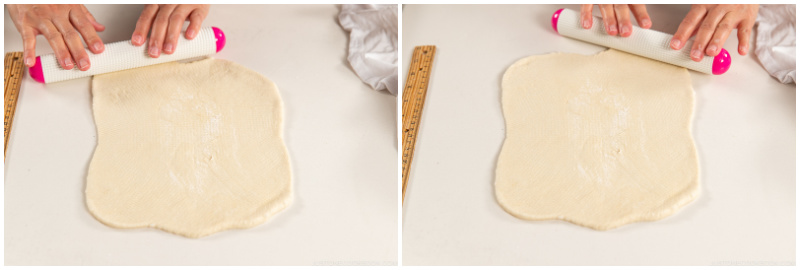
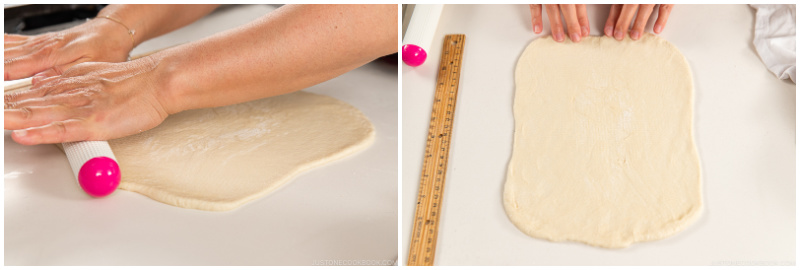
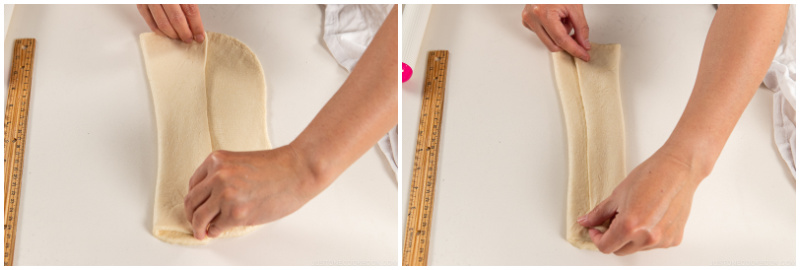
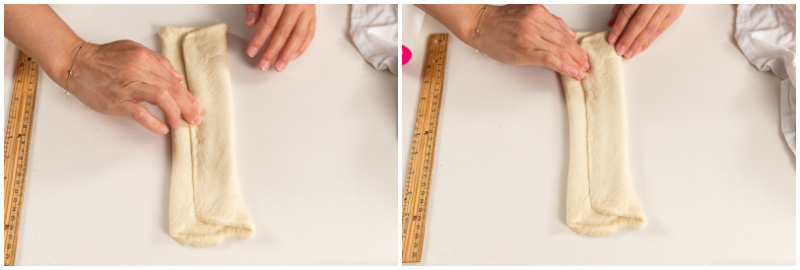
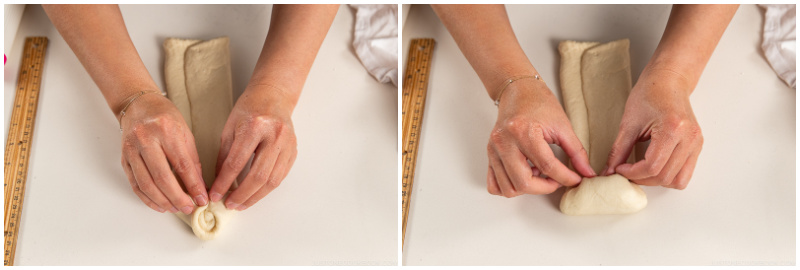
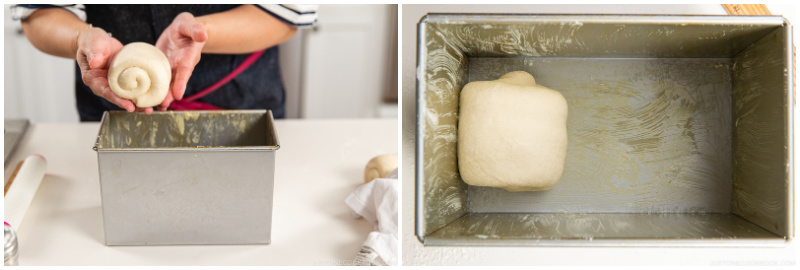
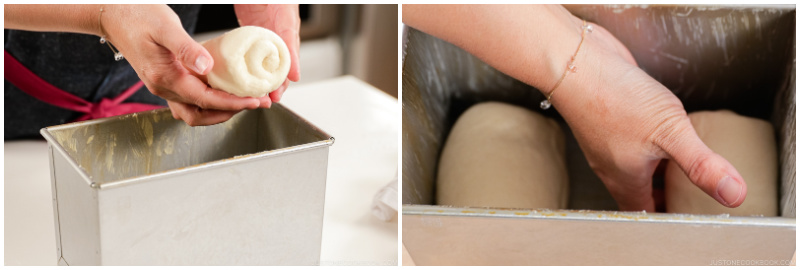
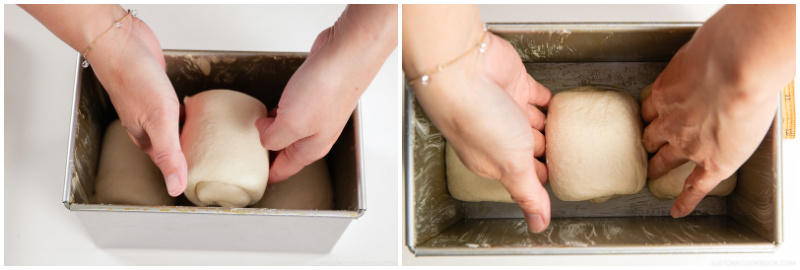
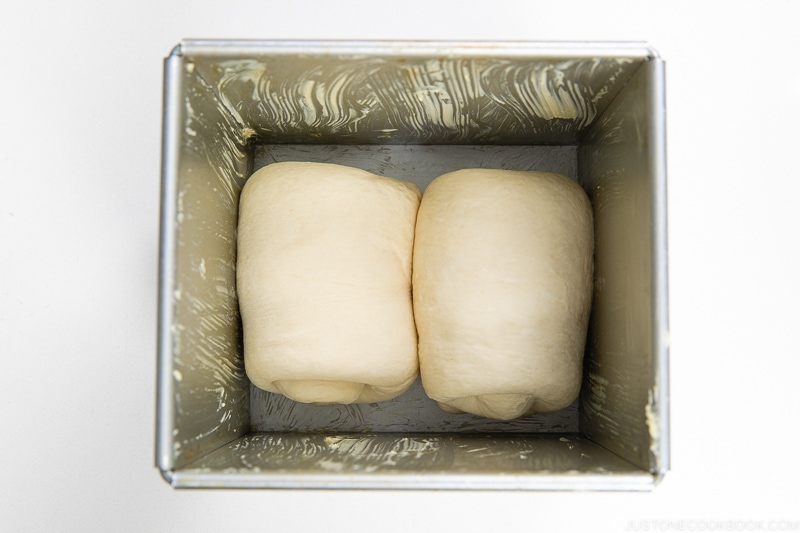
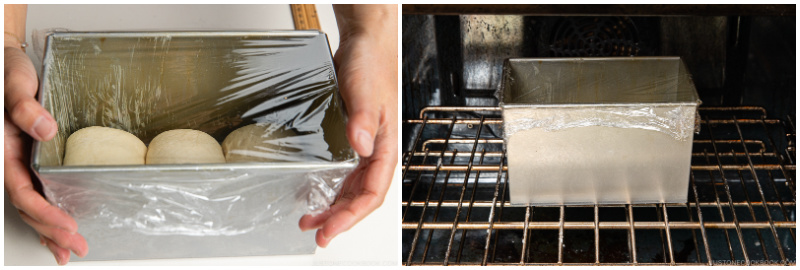
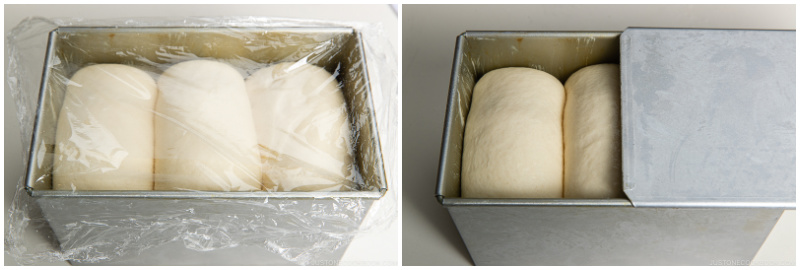
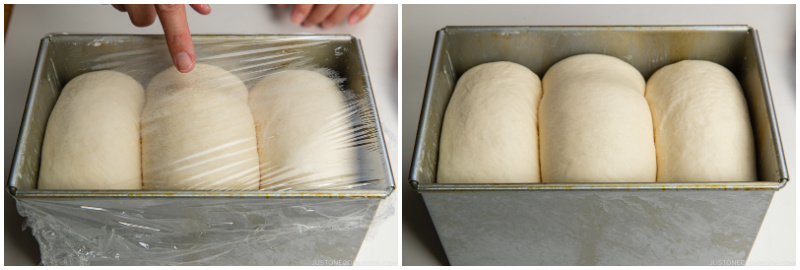
3. Create a Smooth and Taut Surface
When you roll and shape the dough, try to create a smooth, slightly taut skin on the outside (see below). When you have smooth, taut skin, the carbon dioxide generated during fermentation will not escape. As a result, the bread becomes plump and voluminous, and the baked shape is beautifully finished. Try one of these two methods for creating a smooth, taut dough ball:
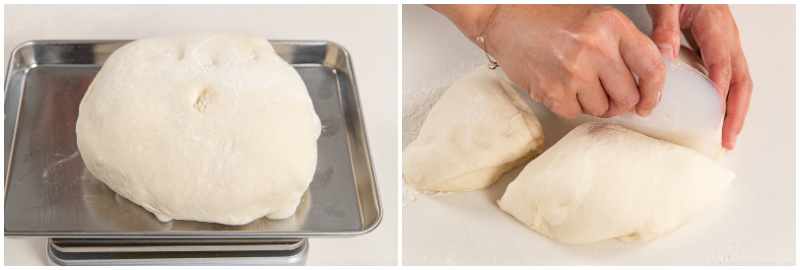
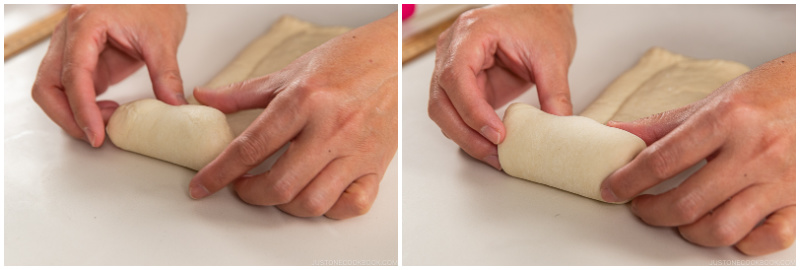
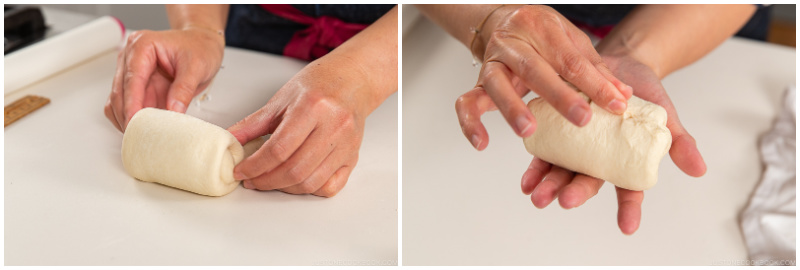
4. Gently handle the dough as if it is a baby!
Always handle the dough with slow, gentle movements. Be careful not to cause unnecessary stress to the dough. You will damage it if you pull or tear the dough while you divide, roll, and shape the dough. With your gentle care, your bread will be even more delicious.
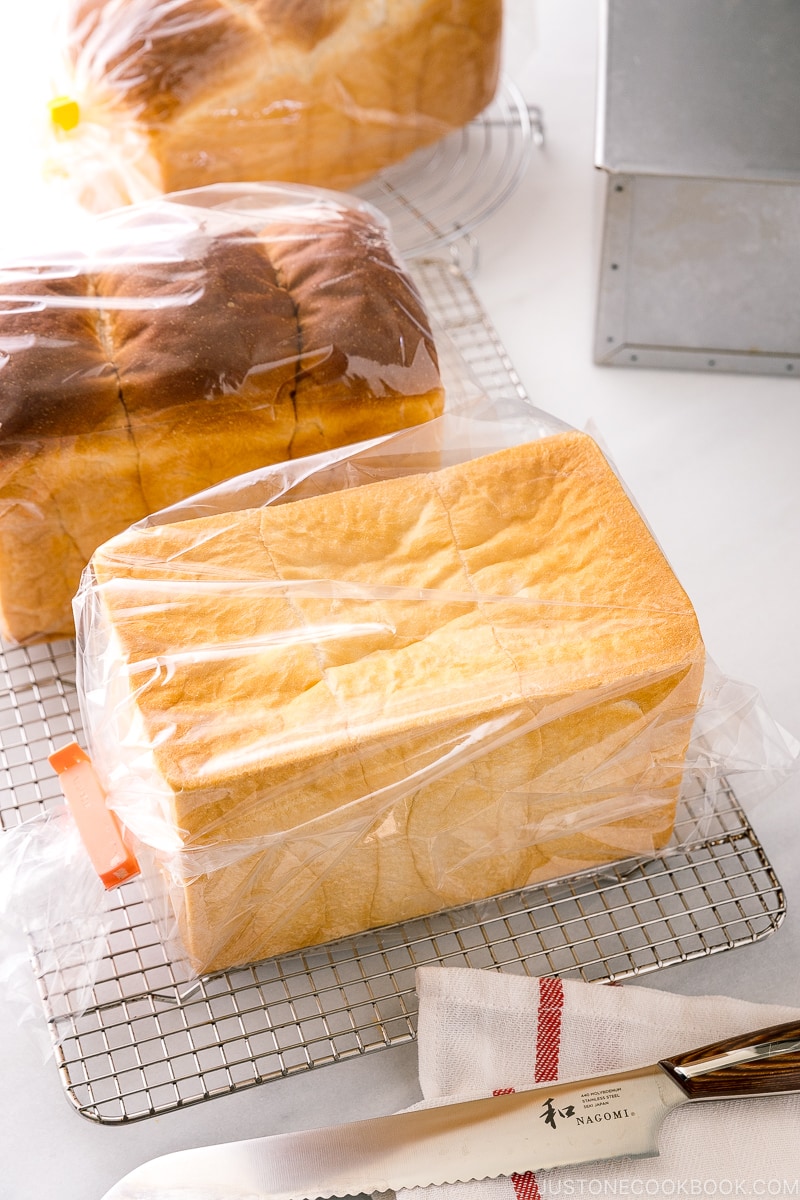
Storing Japanese Milk Bread
Let’s check out the different ways to store your baked and completely cooled shokupan:
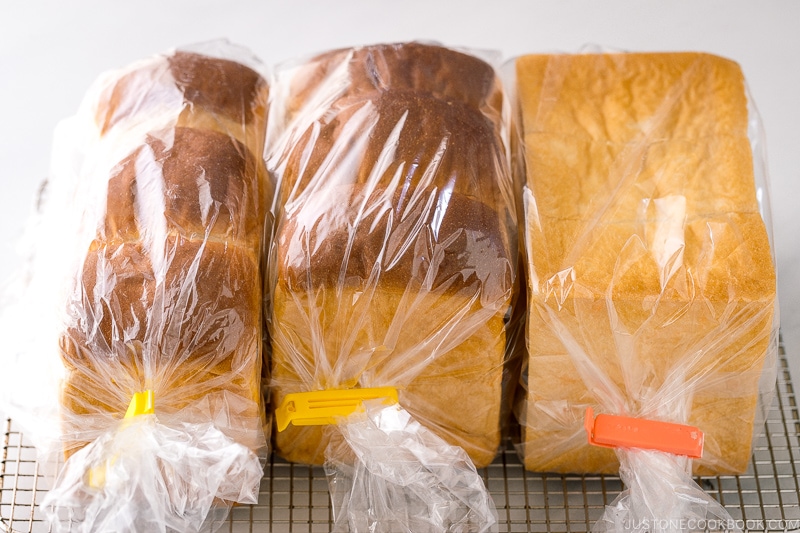
At room temperature: This is the best storage method if you consume the bread within 1-2 days. Put your loaf in this plastic bag and keep it in a cool place out of direct sunlight. I usually cut slices off the loaf as needed. On warm days, consume it within a day or store it in the freezer (make sure to slice first before freezing). In the freezer: If you can’t consume your bread within a day or two, freezing is the best choice. The bread can stay fresh for up to 2 weeks. Cut the loaf into slices before freezing. It’s typically recommended to wrap the individual slices in plastic wrap to avoid odor absorption and freezer burn; however, I try to minimize plastic use, so I do not individually wrap in plastic. It’s best to enjoy it soon. In the refrigerator: The cold air dries the bread; hence, refrigeration is not the best method.
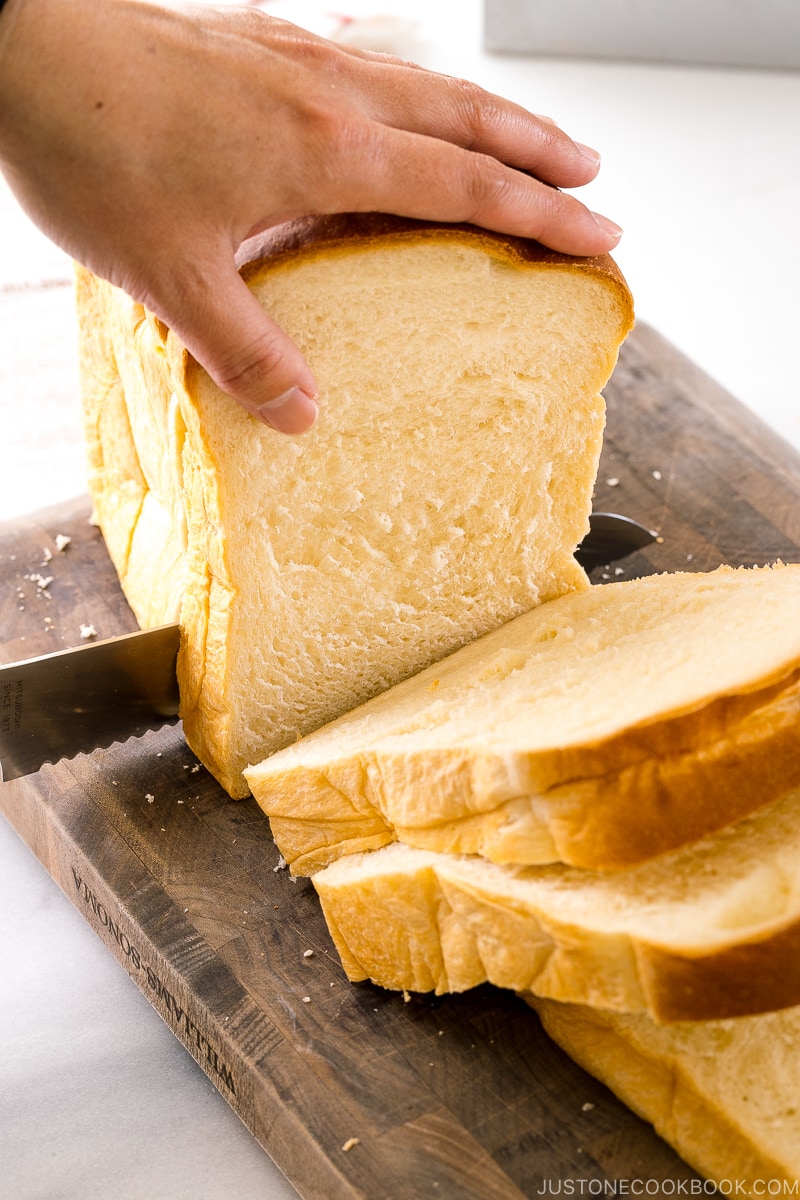
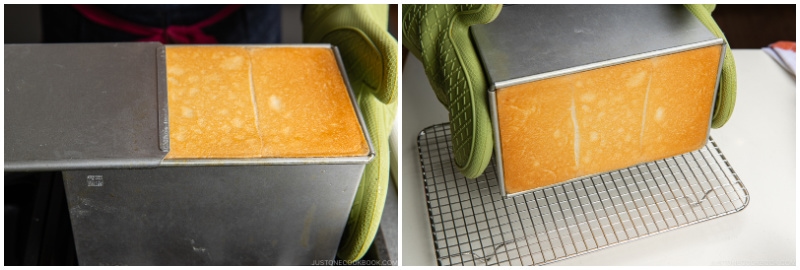
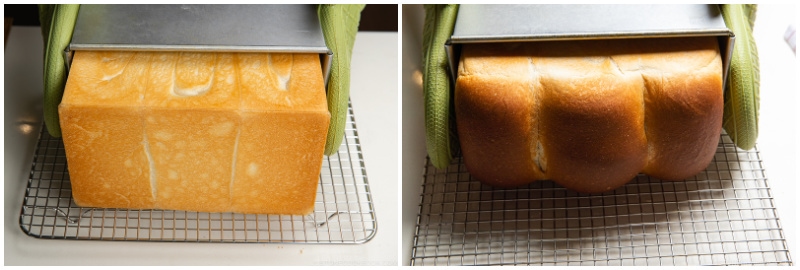
How to Slice Japanese Milk Bread
It’s essential to wait until the bread is completely cooled before slicing. Otherwise, the bread will be too soft and difficult to slice neatly. I use a Nagomi Japan bread knife, and it is incredible how easily I can slice bread without a struggle! If you’d like to know the precise thickness of toast and sandwiches in Japan, the standard square milk bread, or 1 kin shokupan, is sliced into the following thicknesses:
4 slices — 3 cm (for toast) 5 slices — 2.4 cm (for toast) 6 slices — 2 cm (for toast) 8 slices — 1.5 cm (for toast and sandwiches) 10 slices — 1.2 cm (for sandwiches) 12 slices — 1 cm (for sandwiches)
No, I don’t follow these rules, and my slices are often uneven!
Best Ways to Enjoy Japanese Milk Bread
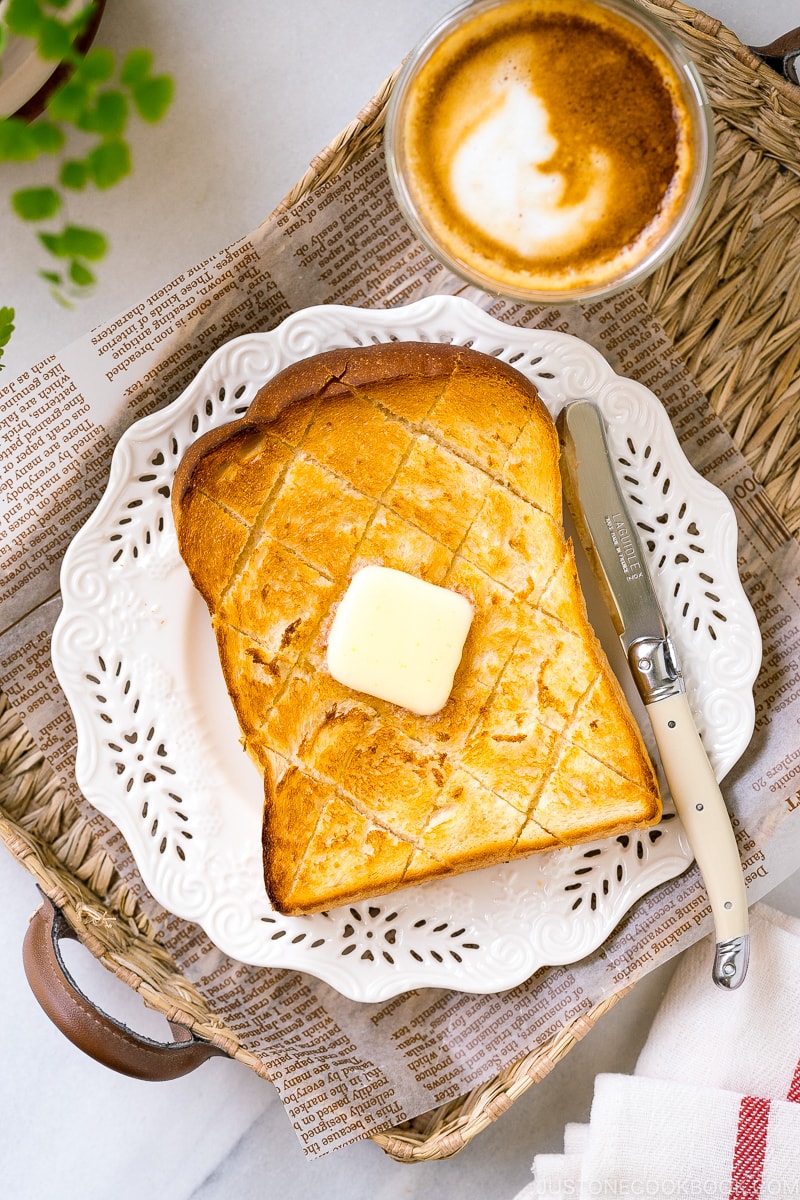
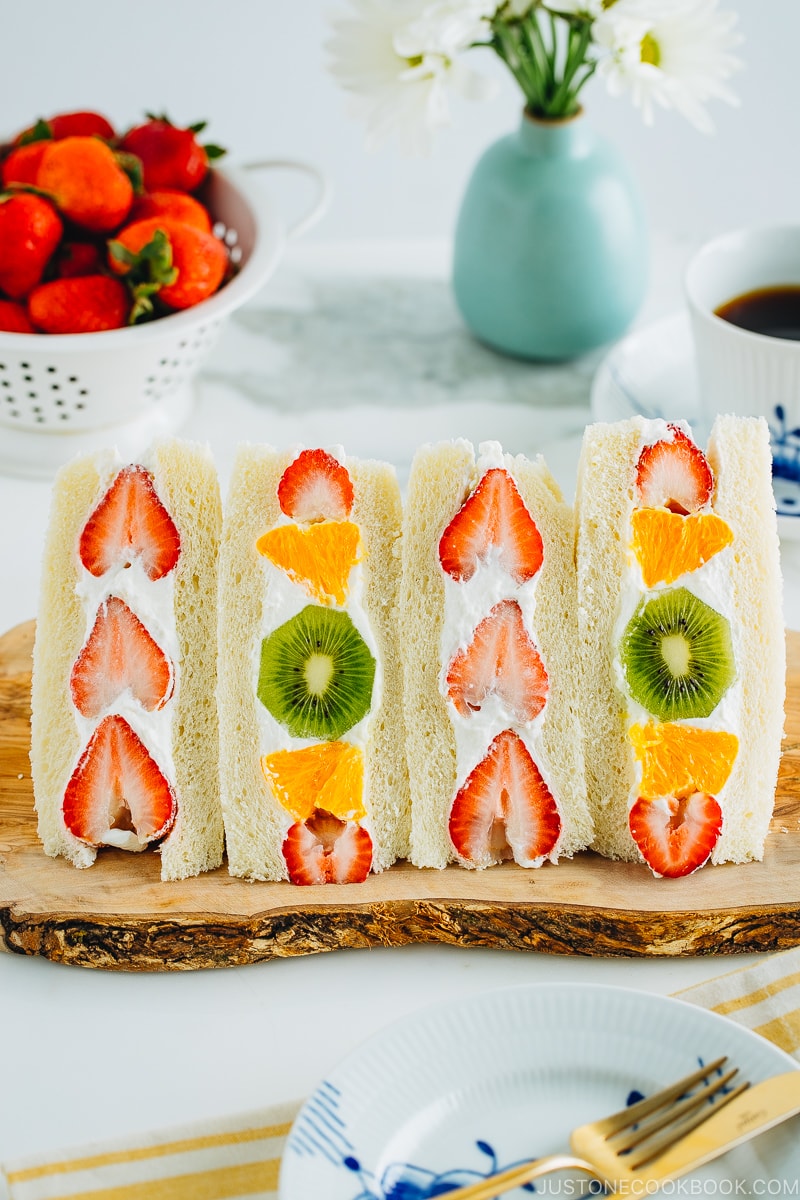
Simple toast: Score the shokupan slice in a pattern (see above) and toast it. Then, place a pat of butter on top! If your bread is frozen, mist some water on the slice and toast it in a preheated oven. Ogura Toast: This is Nagoya’s specialty breakfast. Toast a slice of shokupan and top with butter, red bean paste, and whipped cream! YUM! Sandwiches: Katsu Sando, Tamago Sando (egg sandwich), Wanpaku Sando, and Fruit Sando.
How long does it take for the bread to rise?
It depends. Different factors can affect the proofing time of your bread, such as:
the temperature and humidity of your kitchen the freshness of your yeast the water temperature.
In a warm kitchen, your dough may proof in 40-60 minutes, while it can take 2-3 hours in a cold kitchen. It’s essential to create a nice, toasty environment for your dough to rise.
How do I get the dough to rise faster?
Find a good spot where it’s nice and warm. Heat rises, so some people proof their dough on top of a running dryer machine or top of the refrigerator. My recommendation is to use an oven. Place a baking pan/dish of boiling water on a lower rack and place the bowl with dough on an upper rack. Sometimes, it gets nice and warm, even with just the light on. You can also use a microwave and place a dish of boiling water inside the microwave.
Why is my dough not rising?
Possibly out of these reasons:
Your yeast was old. (This has happened to me before!) Yeast is a microorganism, and it goes bad. Don’t waste the rest of your ingredients because of old yeast. Get brand-new yeast (and make sure it’s a good batch from the store!) Hot water killed the yeast. Read the instructions on your yeast package. Generally, the warm water temperature should be between 105ºF (40ºC) and 115ºF (46ºC) degrees. Too much salt/sugar/flour. Did you measure your ingredients with a kitchen scale? The dough was too dry. Did you cover the dough with plastic wrap? If you used a damp towel, did it dry up? The dough should be moist and elastic during proofing. Be careful not to develop a crust on the dough’s surface to prevent it from rising further. The dough was too cold. The yeast is most active at around 86-95°F (30-35°C) degrees. See my recommendation above to create a warm environment for the dough.
Can I leave my dough to rise overnight?
The short answer is yes you can. However, I highly do not recommend keeping your dough overnight (12-18 hours) in the refrigerator, especially if you are not an experienced bread maker. As I consider myself a not-so-experienced bread maker, I am sorry that I won’t be able to troubleshoot your situation if you have issues with overnight bulk fermentation. If you are going to do overnight bulk fermentation (the first rise), here are some factors to consider:
The amount of yeast — You must reduce the amount, but it’s unclear by how much. Some recipes suggest using 1/3 of the amount of yeast called for in the original recipe. The initial bulk fermentation — How long do you leave your dough for the first rise before putting it in the refrigerator? It depends on the temperature, but it should be 20-30 minutes. The refrigerator temperature — Ideally 39ºF (4ºC). Experienced eyes — You need to monitor the progress of your dough and determine what to do based on the condition of the dough.
When you resume your bread-making, allow the dough to return to a temperature of 68ºF (20ºC) degrees or higher, which may take up to an hour. Punch it down and divide the dough to continue. You must use the dough within 24 hours since you start making the dough.
What do you think of the yudane (tangzhong) method?
Both yudane and tangzhong are methods of precooking a small portion of the dough by cooking or scalding. Cooking the flour causes the starch to gelatinize, making the bread’s texture chewy (we call it mochi-mochi texture) compared to regular shokupan. Furthermore, the bread stays fresher and moister for longer due to a higher moisture content. However, the dough is stickier and harder to knead, and it is known that the dough does not rise as high as in a regular shokupan recipe. Most Japanese milk bread recipes in English use the yudane or tangzhong method, so it may seem like that’s how you have to make shokupan. However, it’s not a classic shokupan recipe used by bakeries and home bakers. It’s simply just another way of making shokupan. To be 100% honest, I love how easy and perfect this recipe is. I don’t feel the need to use the yudane or tangzhong method to achieve the best results. With the recipe that I’m sharing here, I can be spontaneous and finish making a fantastic shokupan in 3.5 hours from start to finish. I love that part and make at least one to two shokupan weekly. The yudane or tangzhong method doesn’t fit my lifestyle as a busy working mom.
Can I knead the dough with my hands?
The dough for shokupan is very wet and sticky compared to regular bread dough. You may feel doubtful, but you must trust that it will work if you continue to knead more. Moreover, kneading this type of dough by hand requires a lot of armwork. For these reasons, shokupan dough is more suitable for kneading with a stand mixer. I shared the helpful link in the recipe card.
Why does my loaf have a coarse crumb?
Does your shokupan look like the following picture?
The crumb (interior texture) is coarse and looks like a kitchen sponge. It is dense and not fluffy. It has a strong yeast smell. It did not rise tall at the proof (second rise).
The chances are:
You over-proofed the dough during bulk fermentation (the first rise). It’s important to check your dough’s progress during this step. Sometimes, the kitchen is too warm for the dough (especially in the summertime), and it rises too fast before you realize it. Your dough temperature was too high. The dough temperature increases as you knead aggressively for a period of time. This means you must put all factors into the calculation to keep the dough within an ideal temperature range. For example, using cooler water when baking bread in hot weather can make a big difference. If you use warm water to start, the dough temperature may exceed the ideal temperature during kneading. The high temperature could potentially kill or weaken the yeast. You can also refrigerate the flour, mixing bowls, and dough hook. Read the next section for more details about the desired dough temperature. You over-kneaded the dough. This is tricky to assess as you are supposed to knead the dough aggressively to achieve a pillowy and soft crumb for shokupan. When the dough starts to look smooth and shiny, do the windowpane test to check if the dough is firm enough to stretch to a super-thin membrane without tearing. When your dough passes the test, stop kneading. If you miss this stage, you will break the gluten strands and continue kneading. The dough becomes gooey and taffy-like and will lose its strength and structure.
Expert’s Tip: The Desired Dough Temperature (DDT)
The dough’s temperature affects the fermentation rate and, in turn, the flavor and texture of the finished product. When the season changes, the temperature in your kitchen also changes. Even if you’re doing everything the same, the temperature difference could affect the result of your bread. Therefore, the key to achieving consistently great results in your bread baking is to bring your dough to the desired dough temperature (DDT), no matter what season or kitchen condition you are in. At professional bakeries, measuring the temperature of the ingredients is as important as weighing the ingredients. The DDT varies depending on the type of bread. For shokupan, the DDT range at the end of kneading is 79-82ºF (26-28ºC). Maintaining the temperature range will produce the best flavor and rise in your shokupan. The yeast activity slows at around 113ºF (45°C) and dies when the temperature rises above 140ºF (60°C). Professional bakers use a simple mathematical formula to calculate the temperature of the one variable they can control: the water. Because water accounts for a large proportion of the ingredients in making shokupan, having the right water temperature to start is the most important factor in bringing the dough to the DDT. The formula is: (DDT x 3*) – room temperature – flour temperature – friction factor** = water temperature Examples at my kitchen in San Francisco:
Summer in ºF: (80 x 3*) – 72 – 70 – 14** = 84ºF (29ºC) Winter in ºF: (80 x 3) – 65 – 70 – 14 = 91ºF (33ºC) Summer in ºC: (27 x 3) – 22 – 21 – 8** = 30ºC (86ºF) Winter in ºC: (27 x 3) – 18 – 21 – 8 = 34ºC (93ºF)
*The number of variable temperatures (room, flour, and friction) other than water temperature that affect dough temperature **The friction factor in baking represents the heat transferred to bread dough during mixing and kneading. Friction can raise the temperature of your dough significantly, so it needs to be considered when making dough temperature calculations. The amount of heat generated by the specific mixing method varies.
For stand mixer kneading, use a temperature between 11ºF and 18ºF (6°C-10°C) – I used 14ºF (8ºC) as the friction factor. Use a temperature between 0ºF and 9ºF (0°C-5°C) for hand kneading.
I used the professional bakers’ friction factor for shokupan, which I found on multiple Japanese resources. The range was given because it varies depending on the machine, the temperature of your palm, and the amount of time you knead. For a temperature difference conversion, you multiply ºC by 1.8 (9/5) to get ºF, or you multiply ºF by 0.55 (5/9) to get ºC. Thus, a mixer friction factor of 14°F is equivalent to 8°C, not -10°C. How to Troubleshoot
If the dough temperature is lower than DDT: Let the dough rise for a little longer than the time specified in the recipe in a warm place. If the dough temperature is higher than DDT: You can either let the dough rise in a cool place for a short time or lower the dough temperature by putting it in the refrigerator for about 1-2 minutes, then taking it out and re-rolling it so that the temperature of the dough is uniform. When the dough temperature is high, it is easy to over-proof, resulting in bad flavor and fast deterioration.
Baking in Summertime
When you bake in hot summer weather, you must ensure the dough will not over-proof. The bread will have a good smell, taste, and texture when the dough rises properly. When the dough over-rise, it will not yield tasty bread. Here are five ways to prevent the DDT (Desired Dough Temperature) from rising too high on a hot summer day.
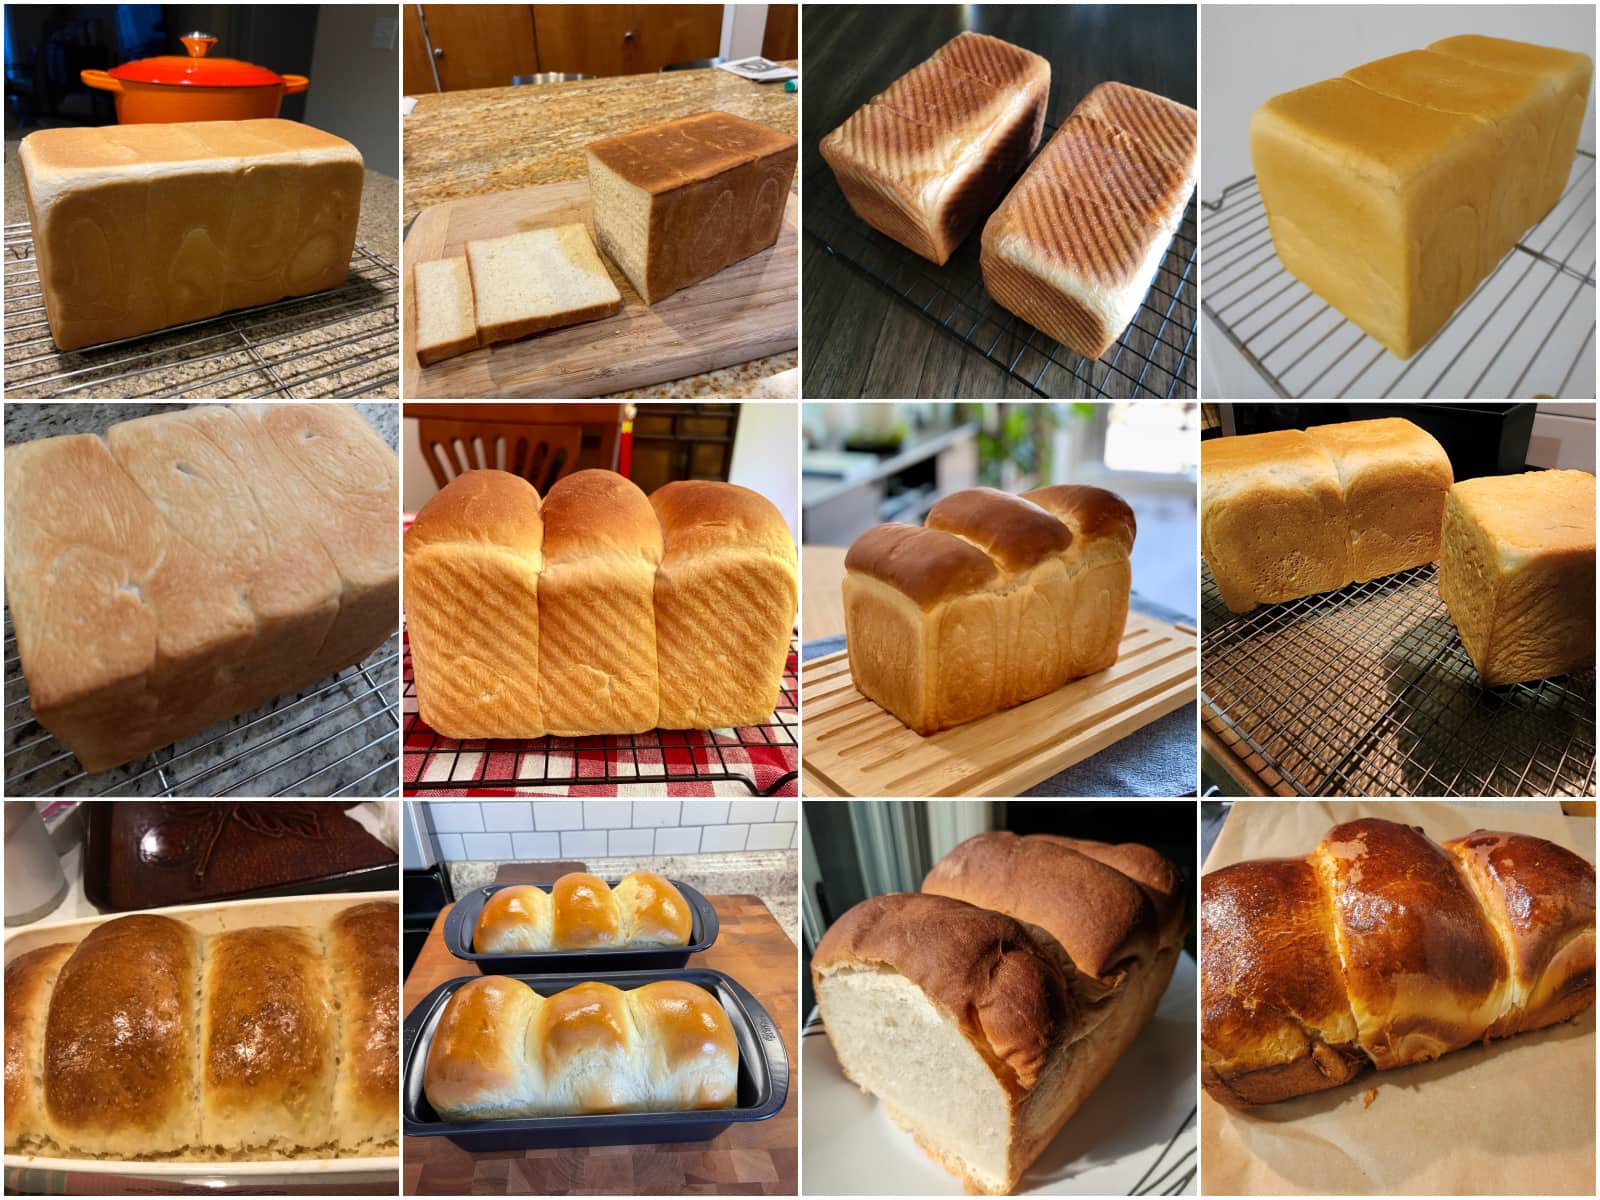
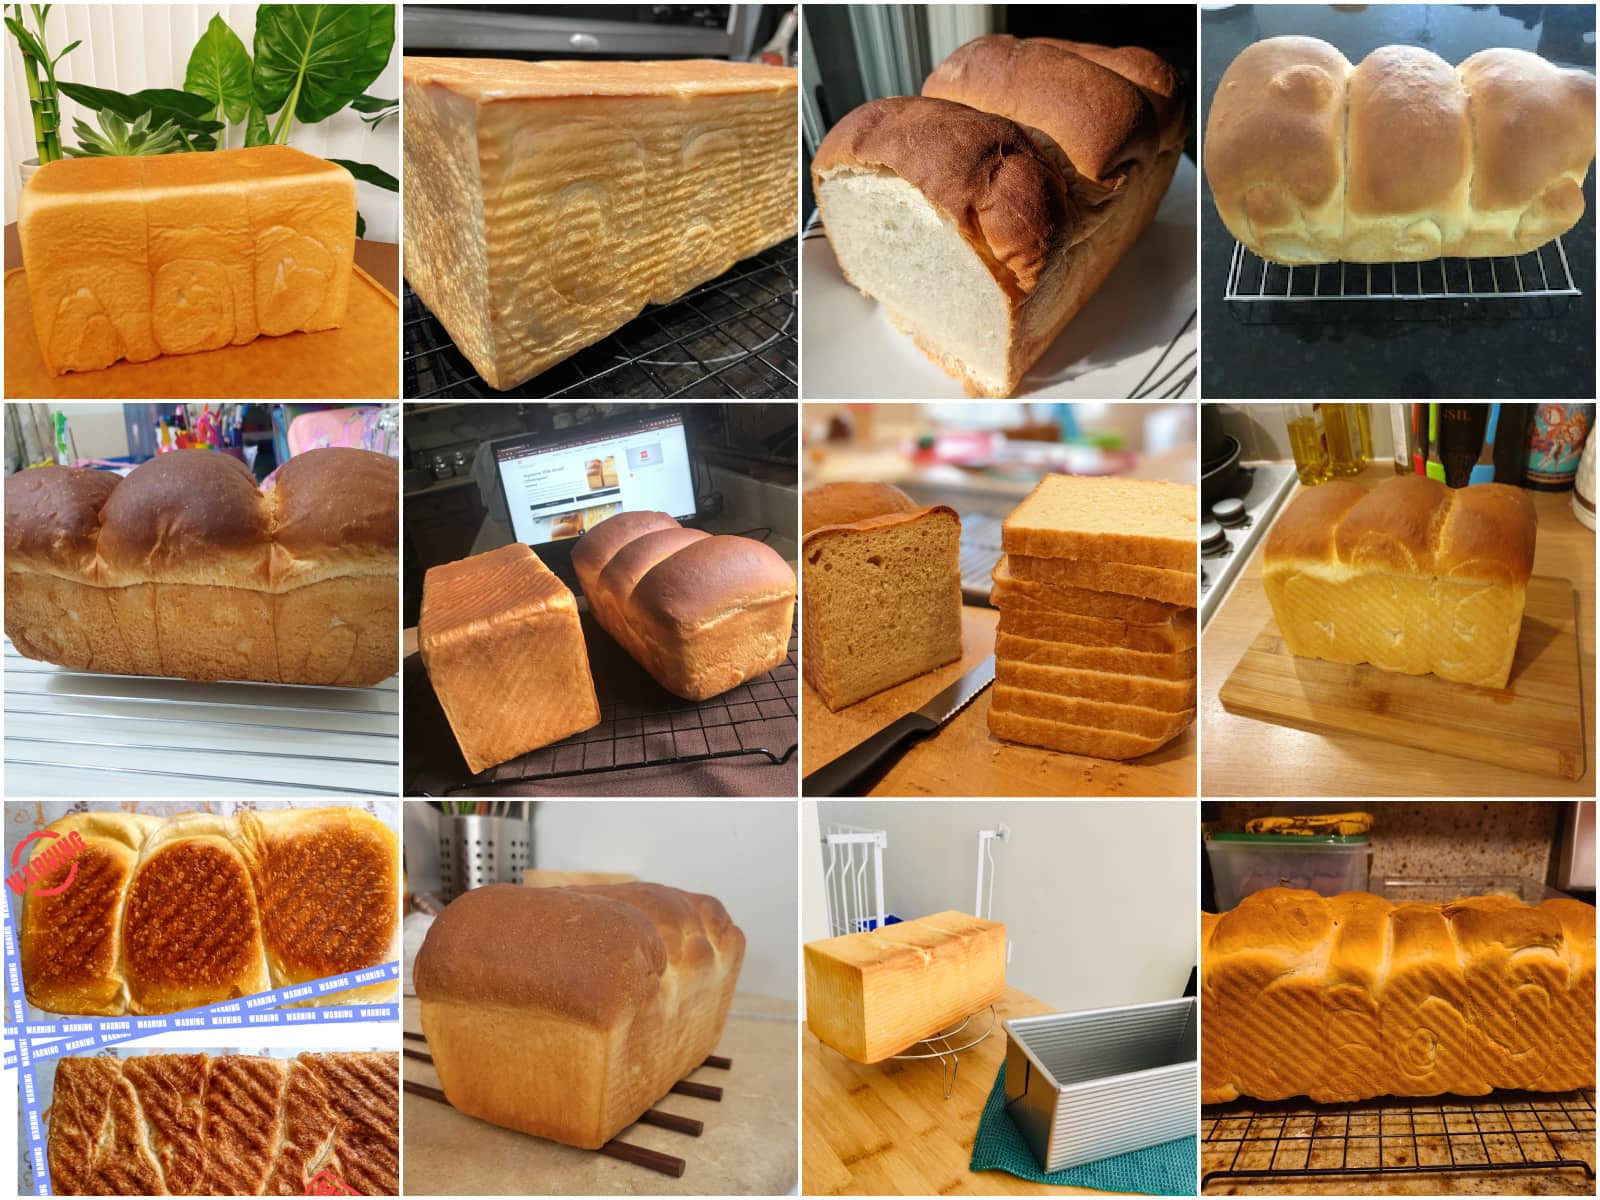
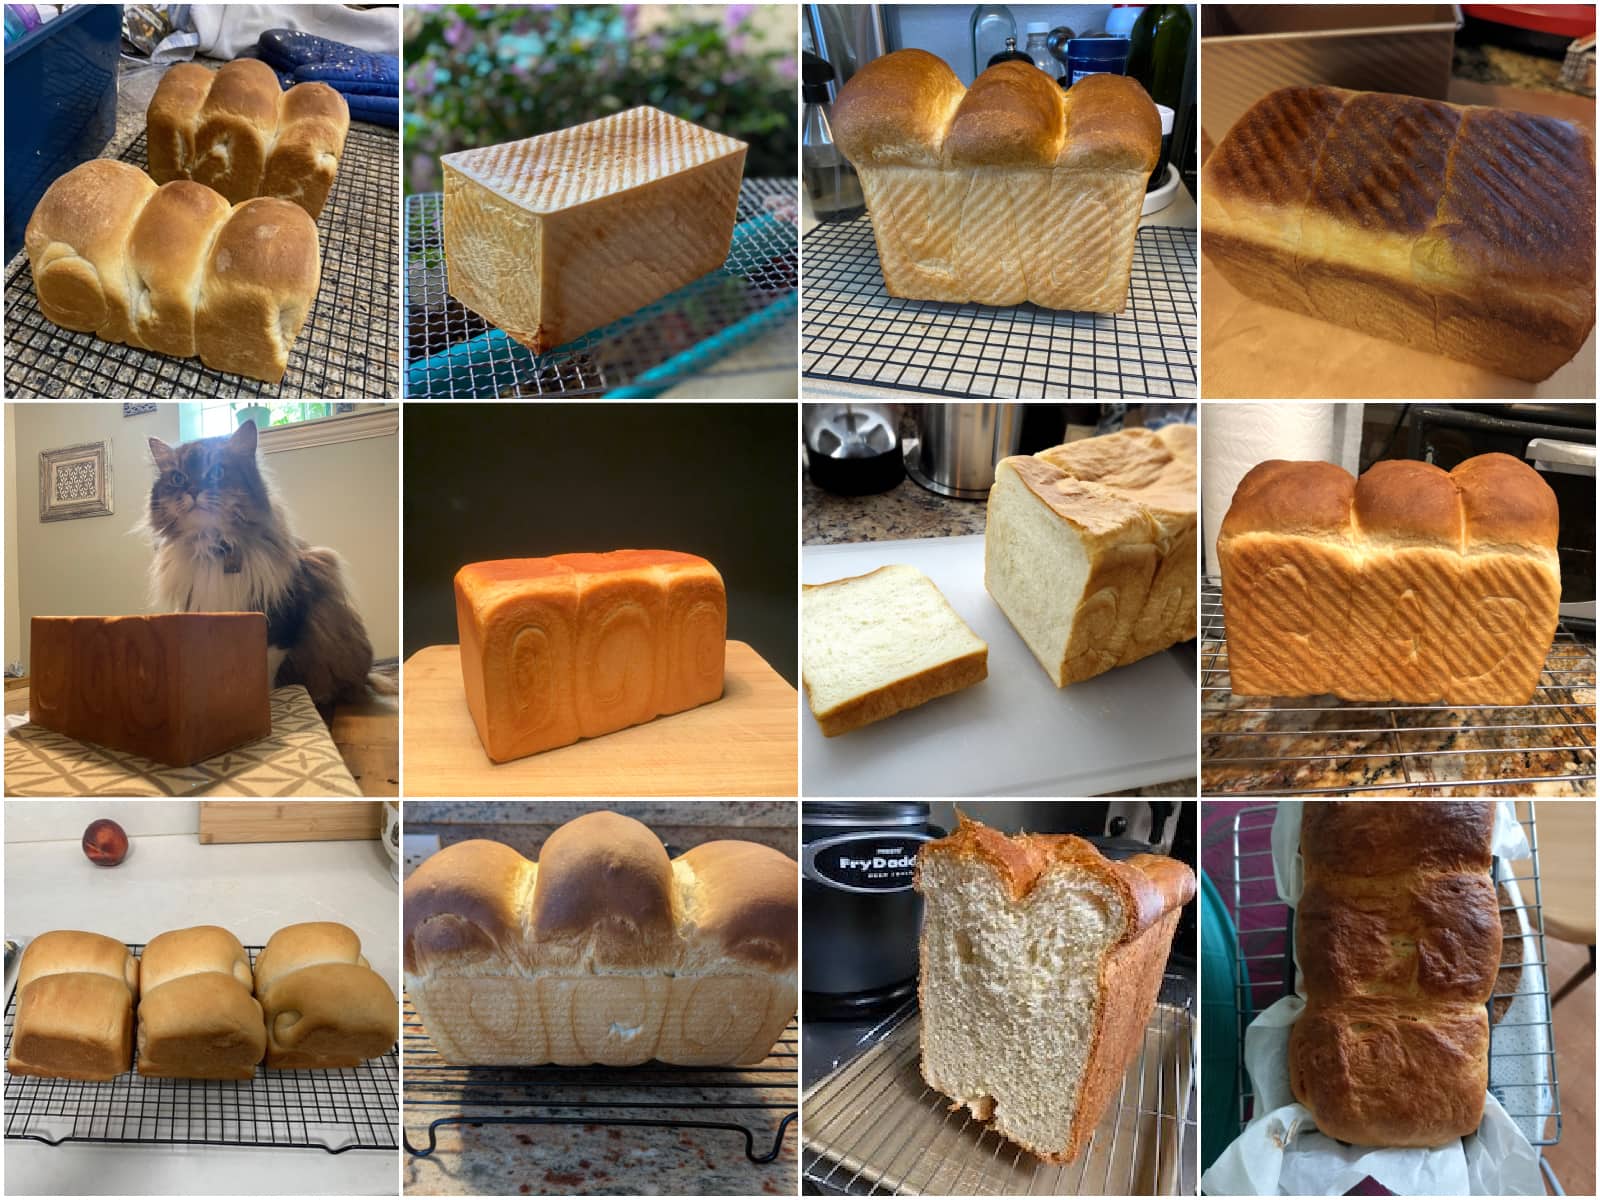
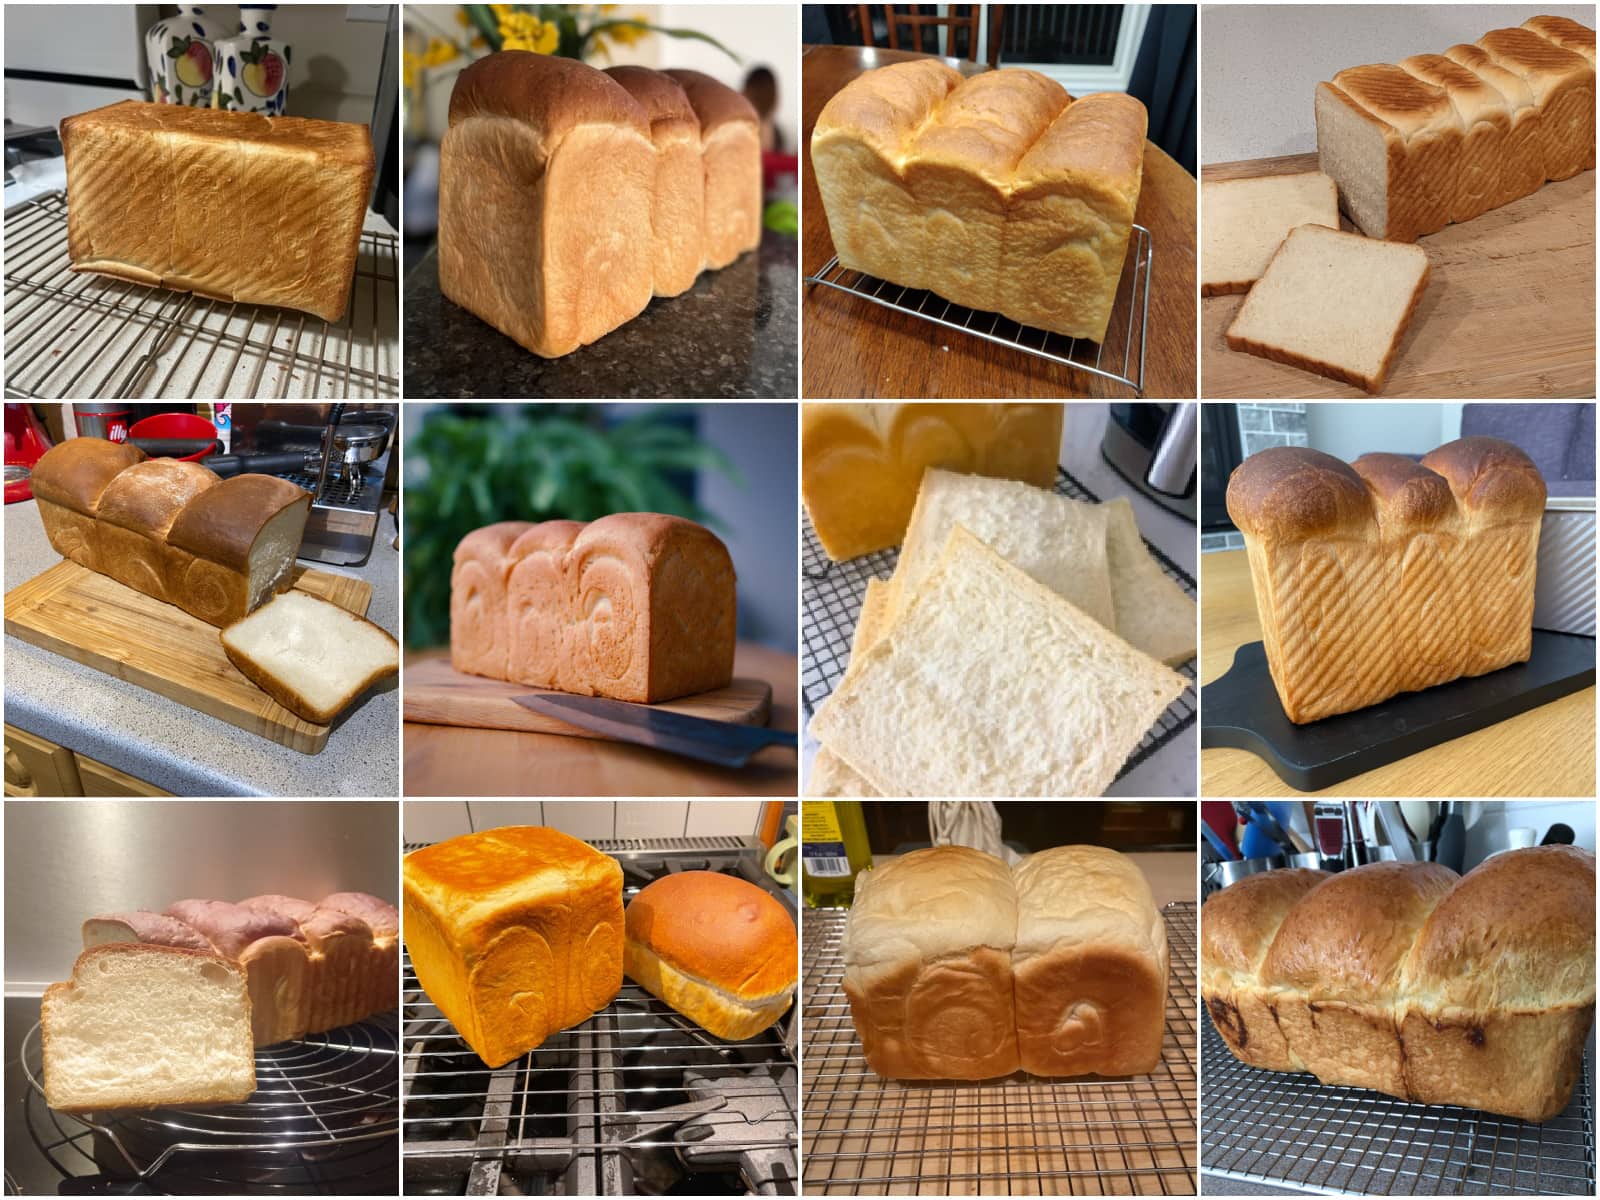
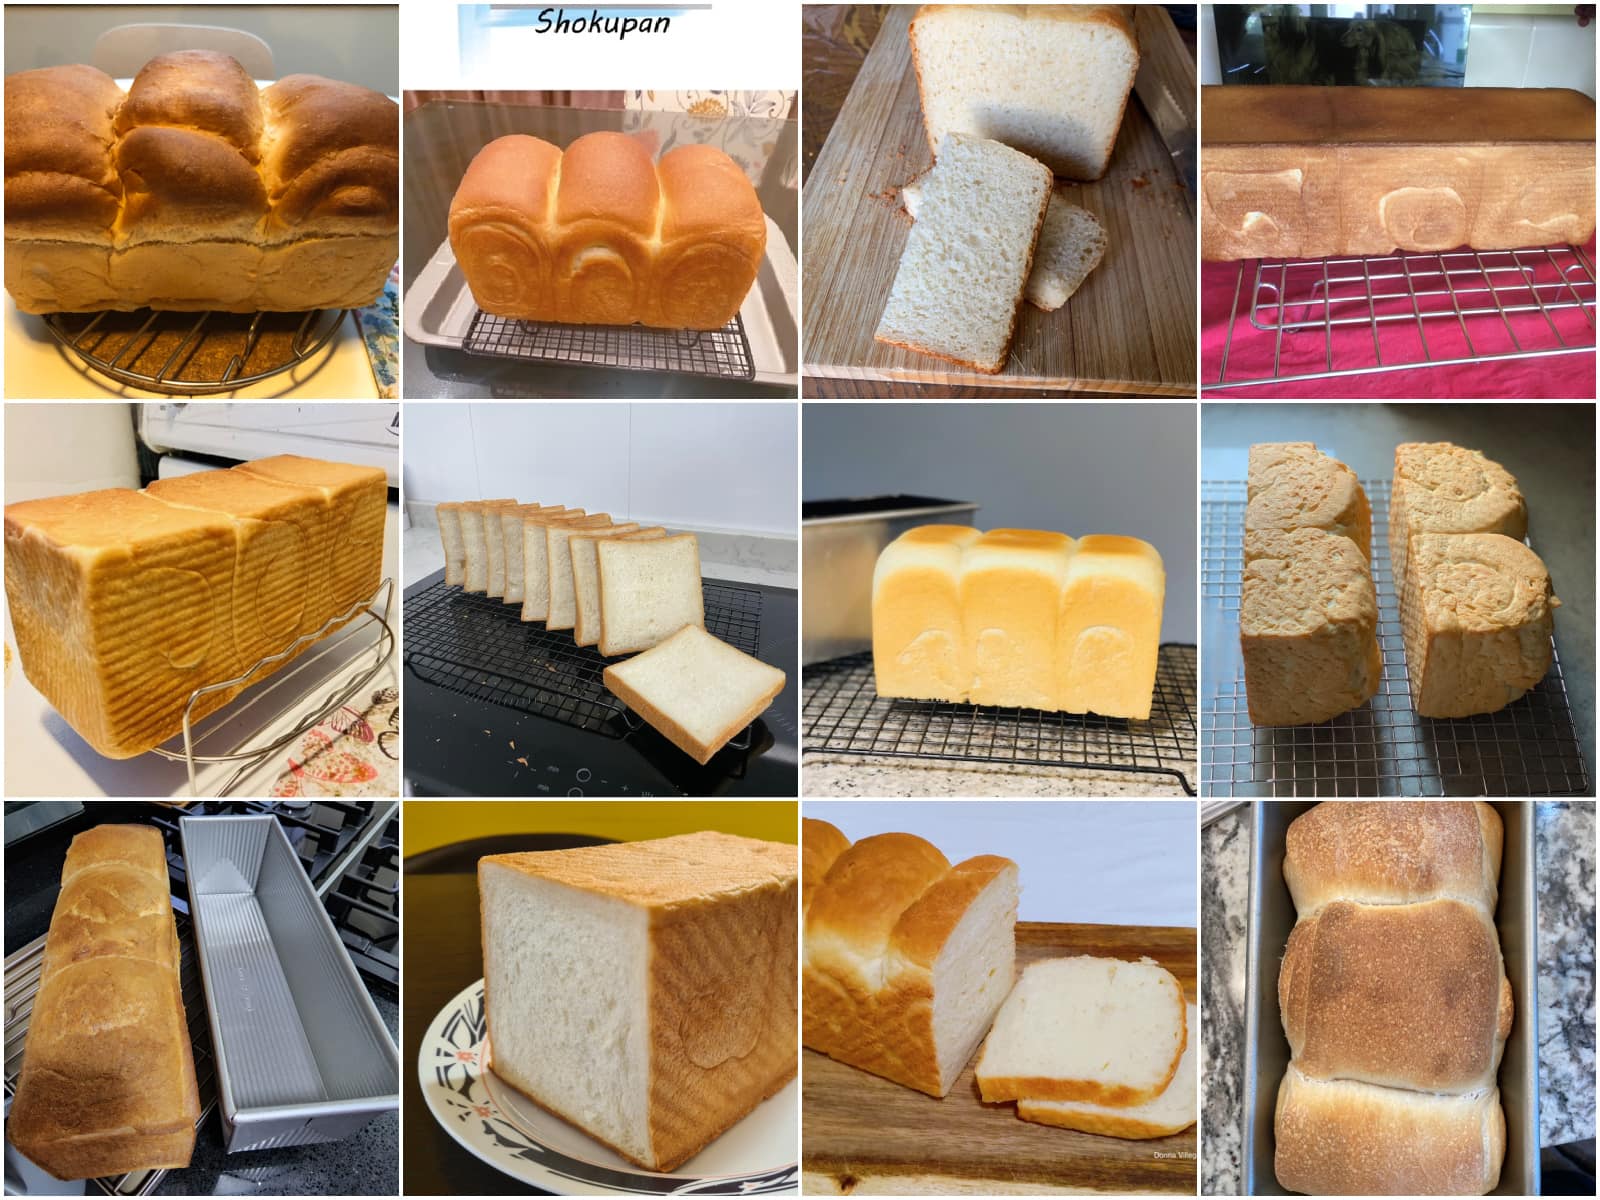
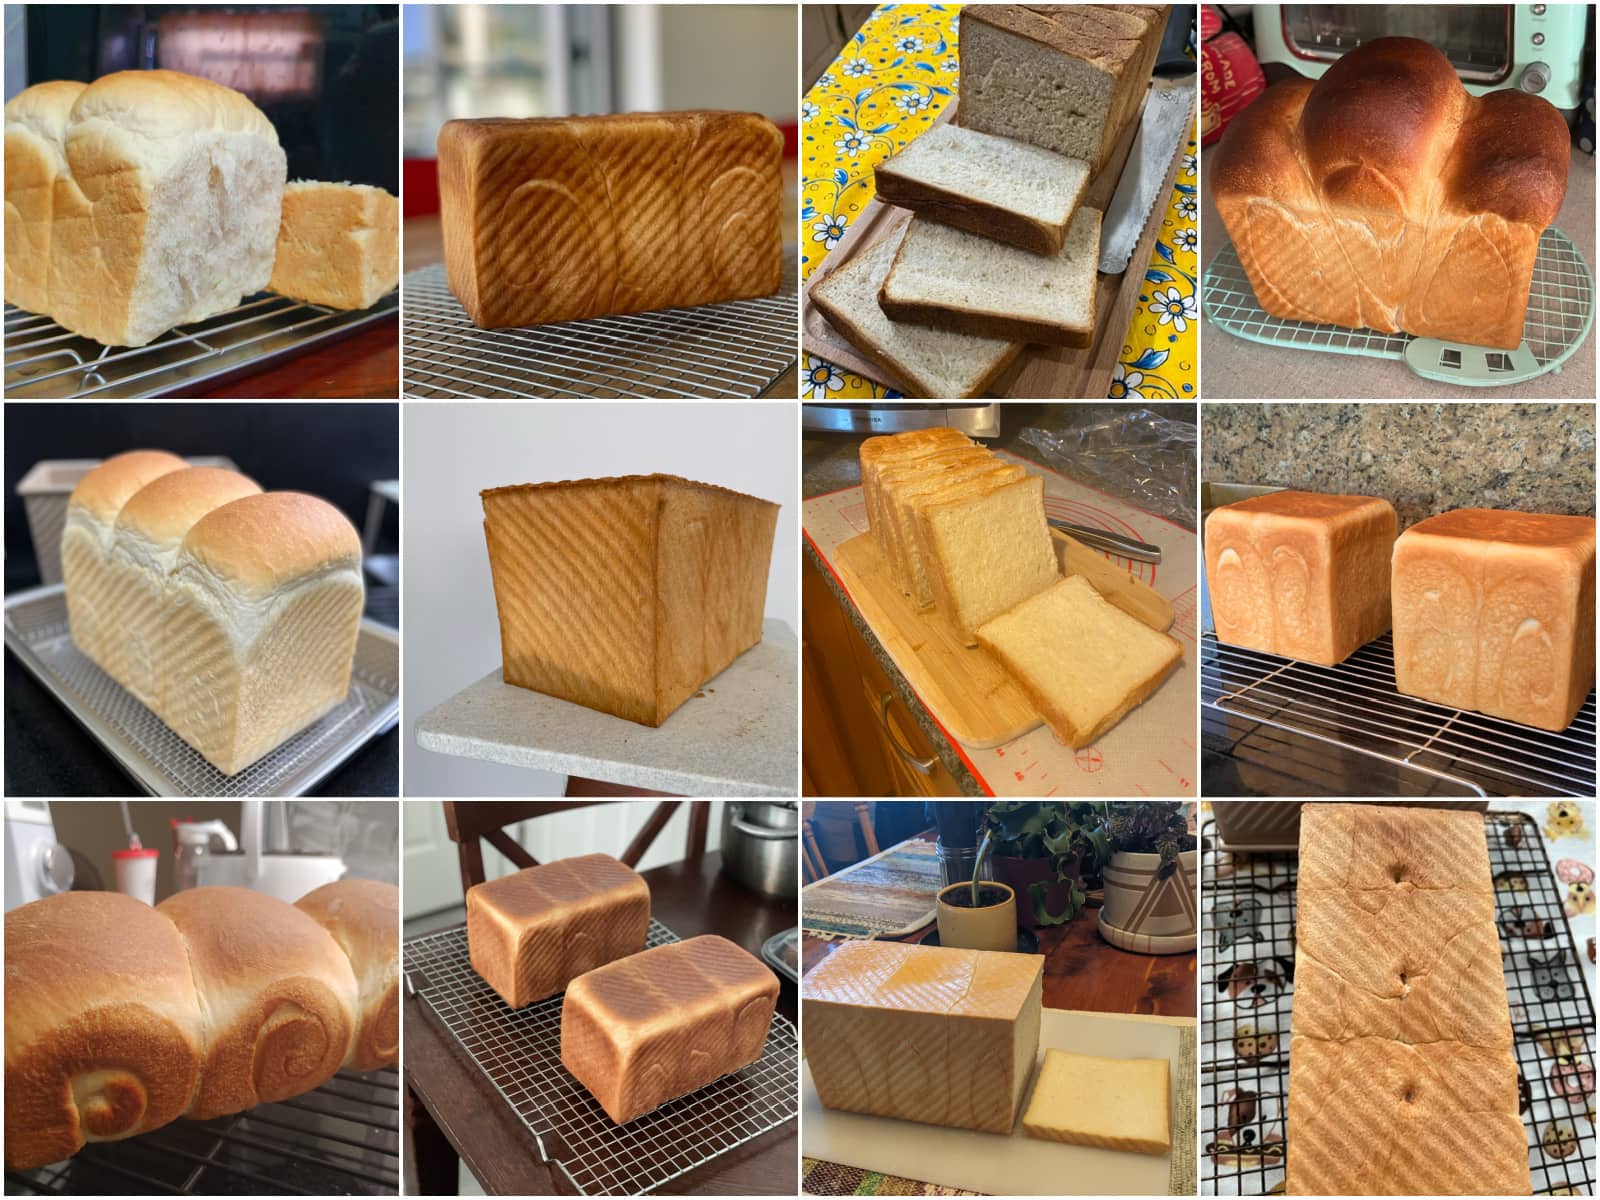
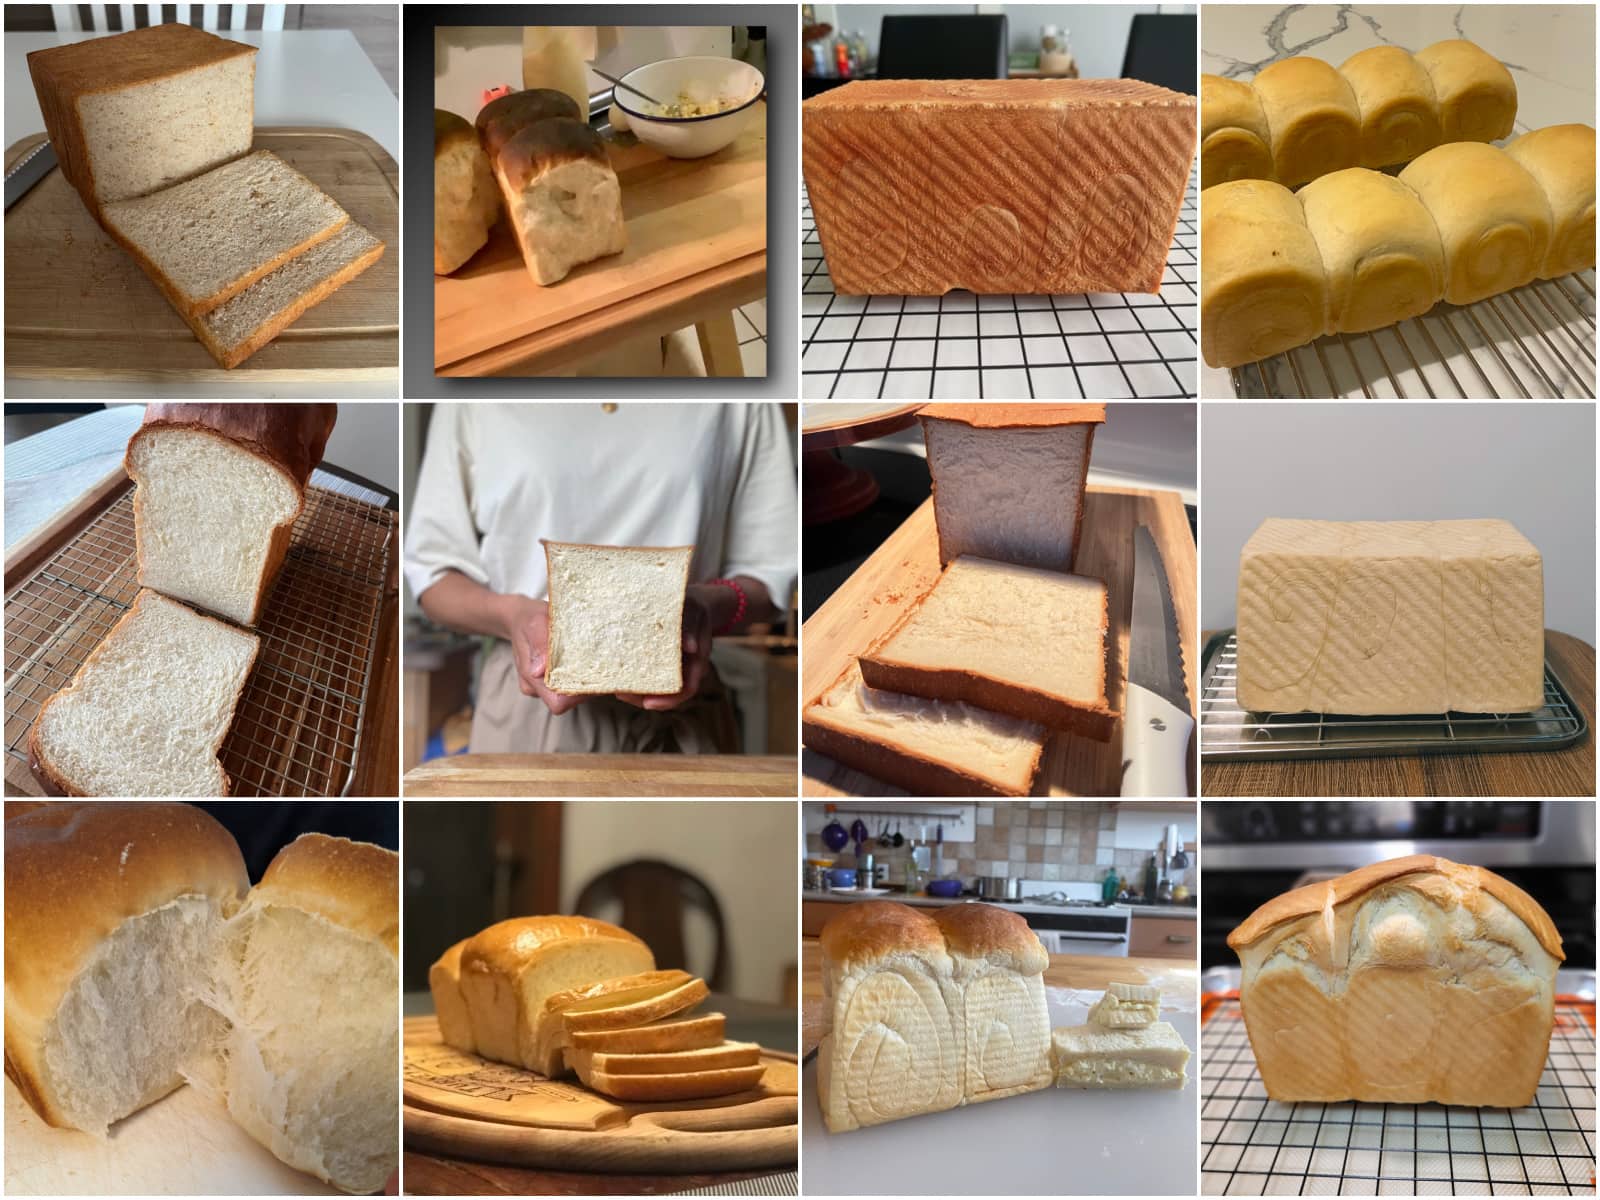
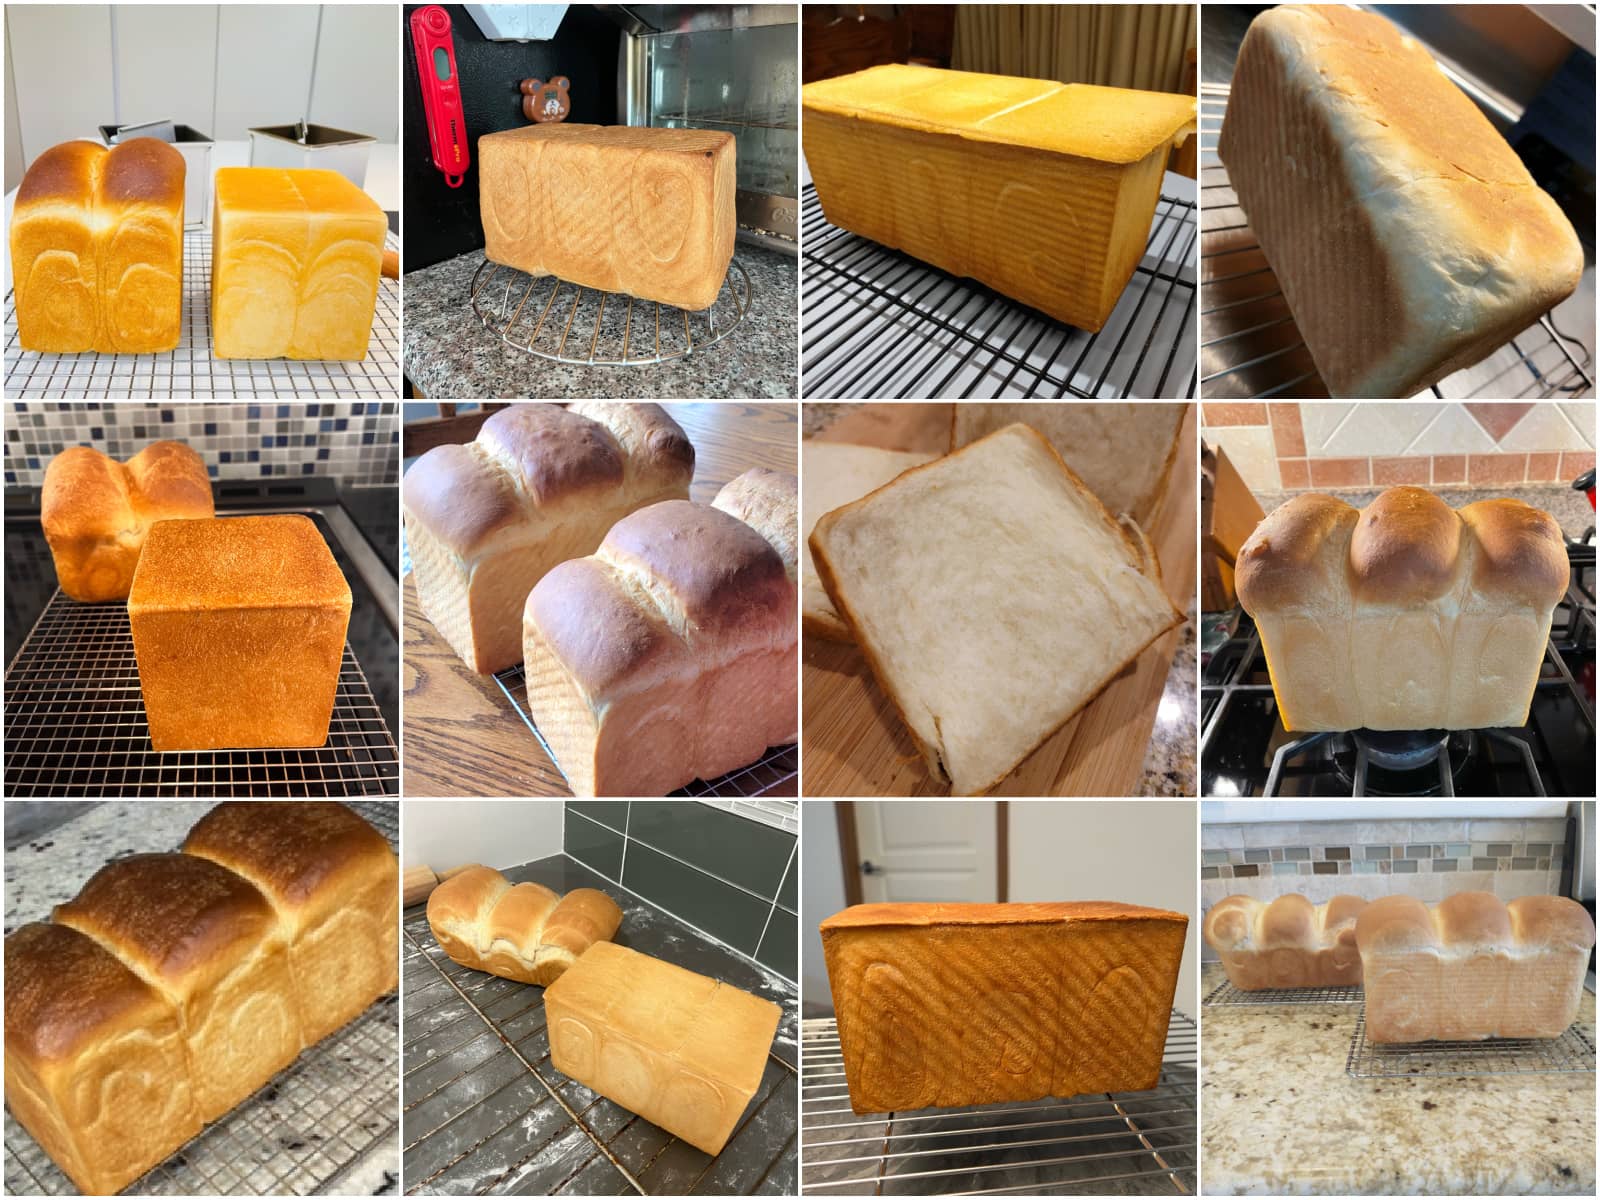
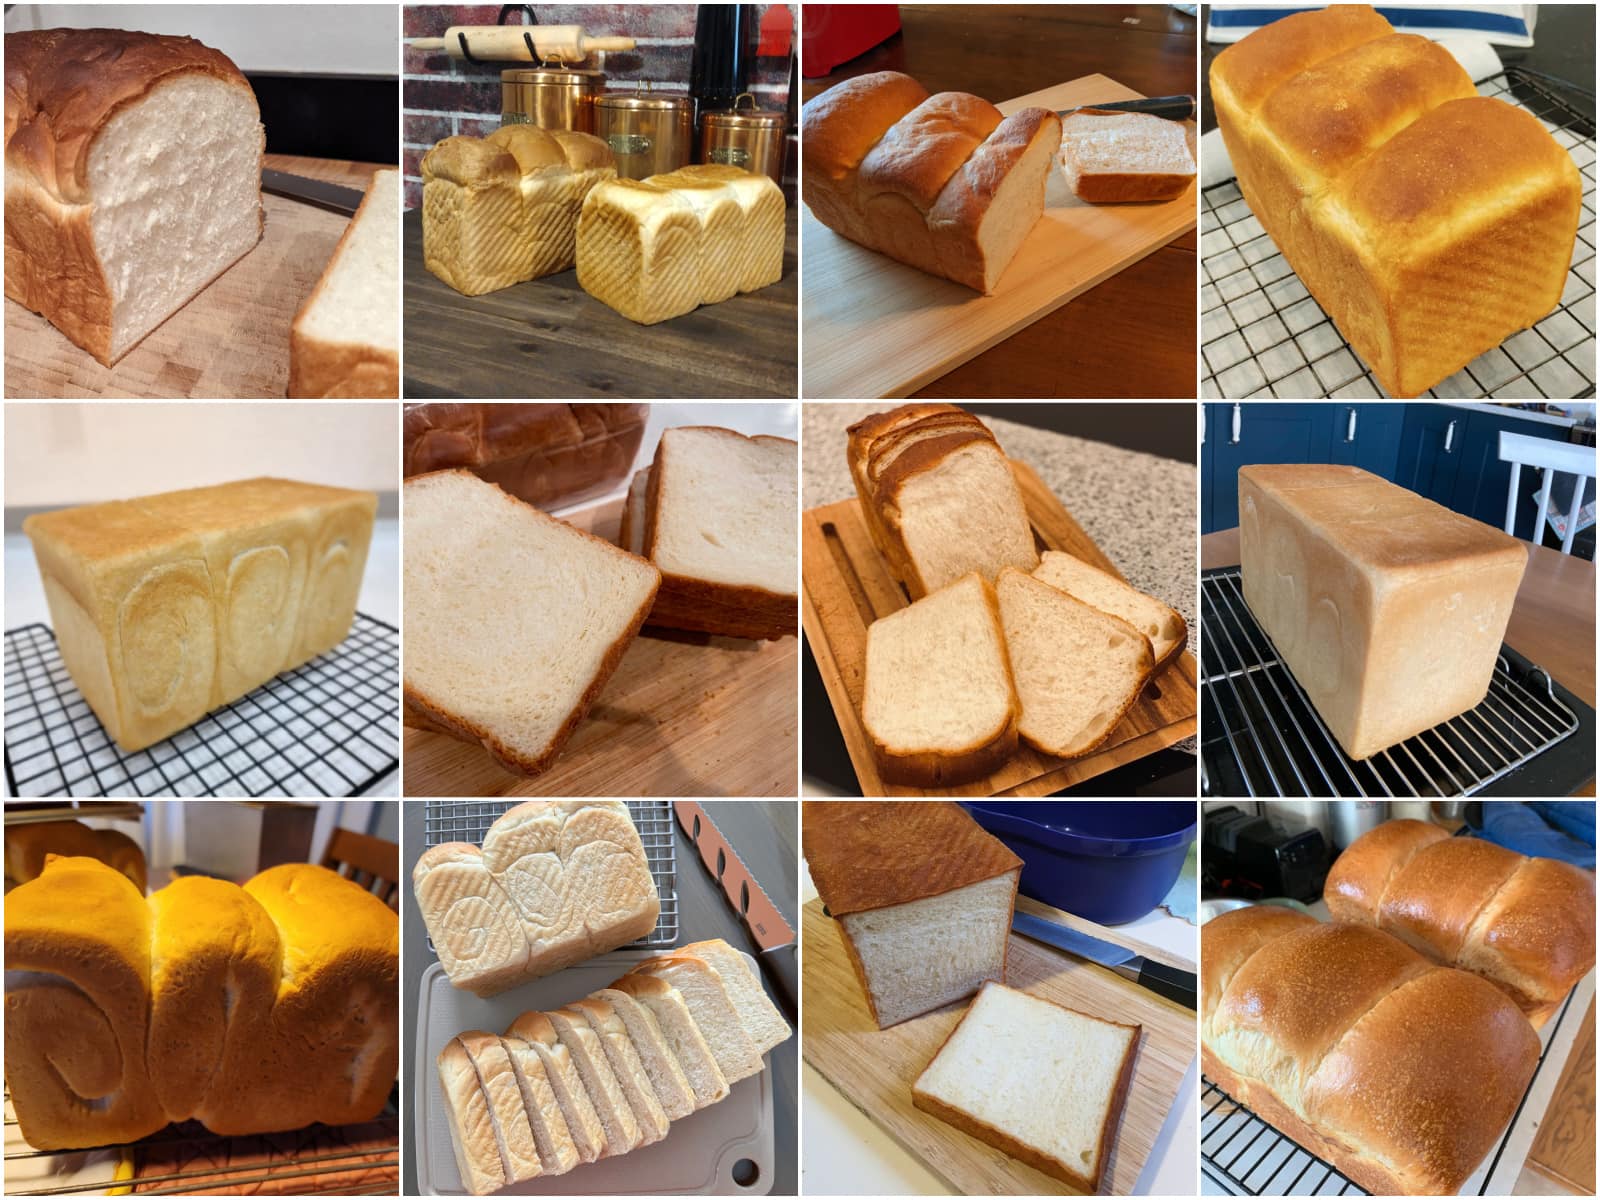
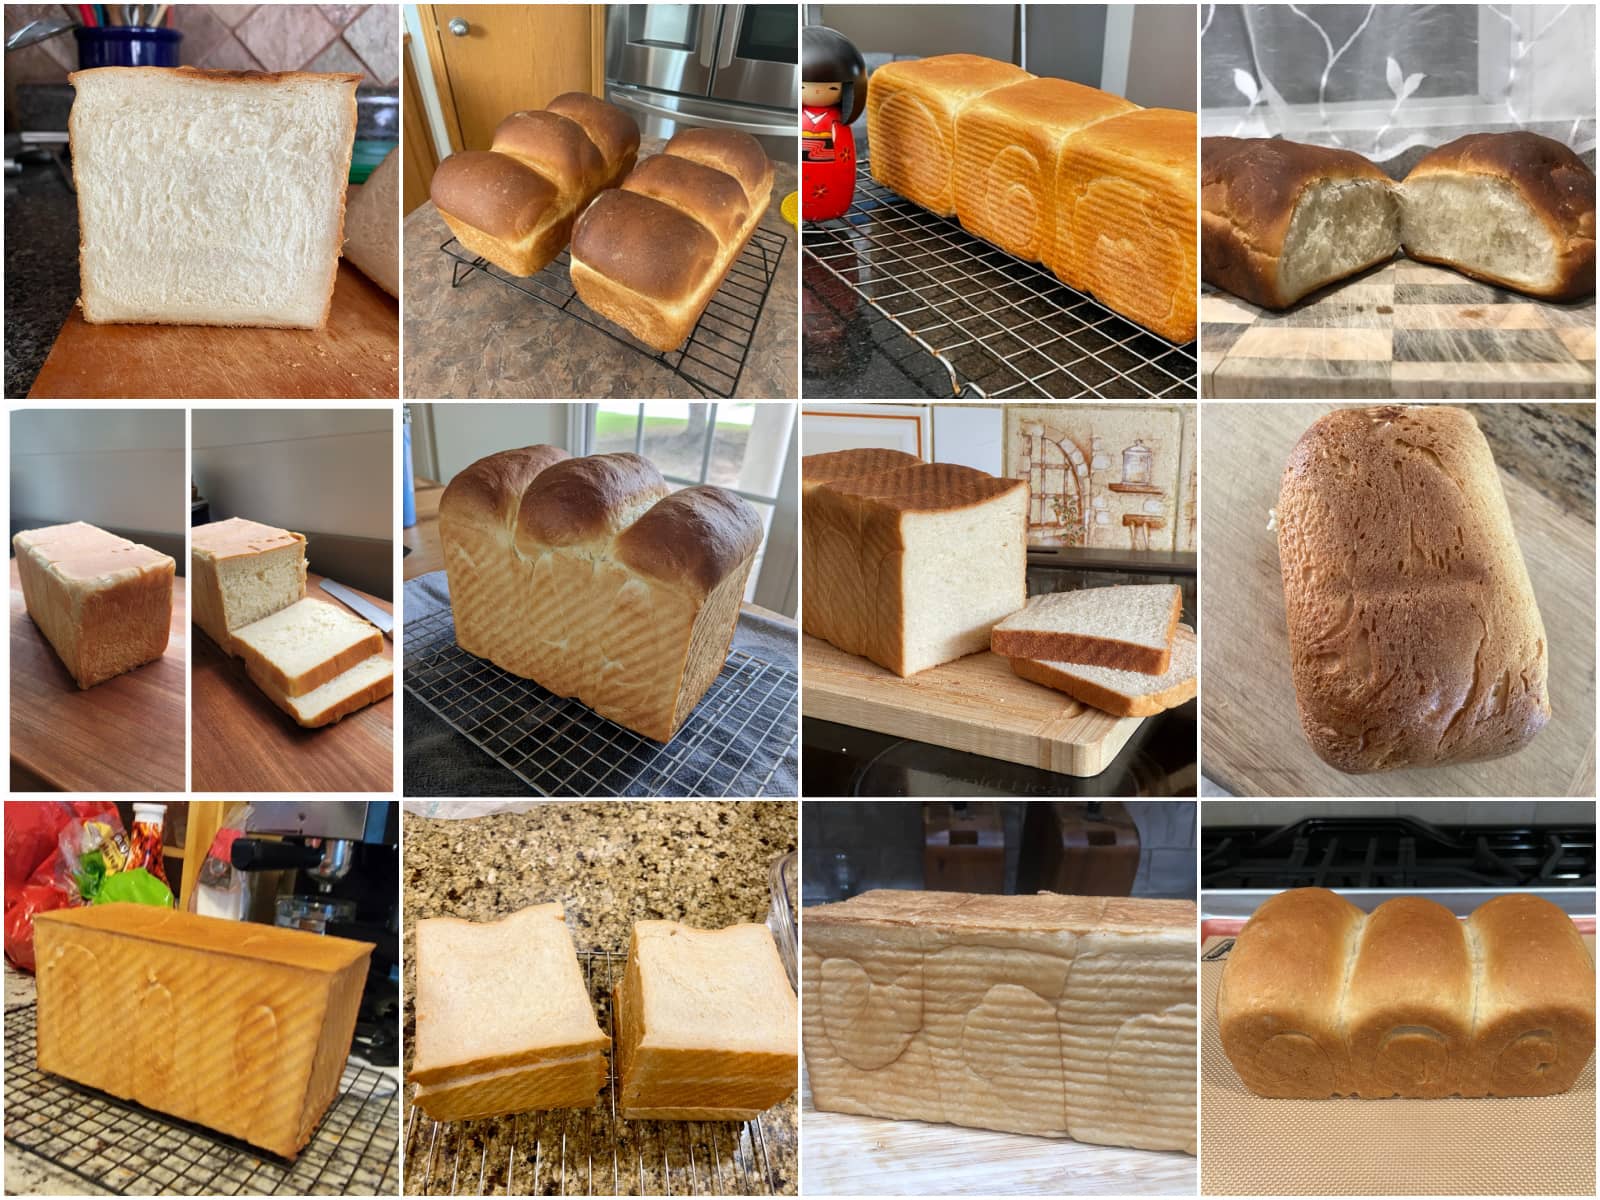
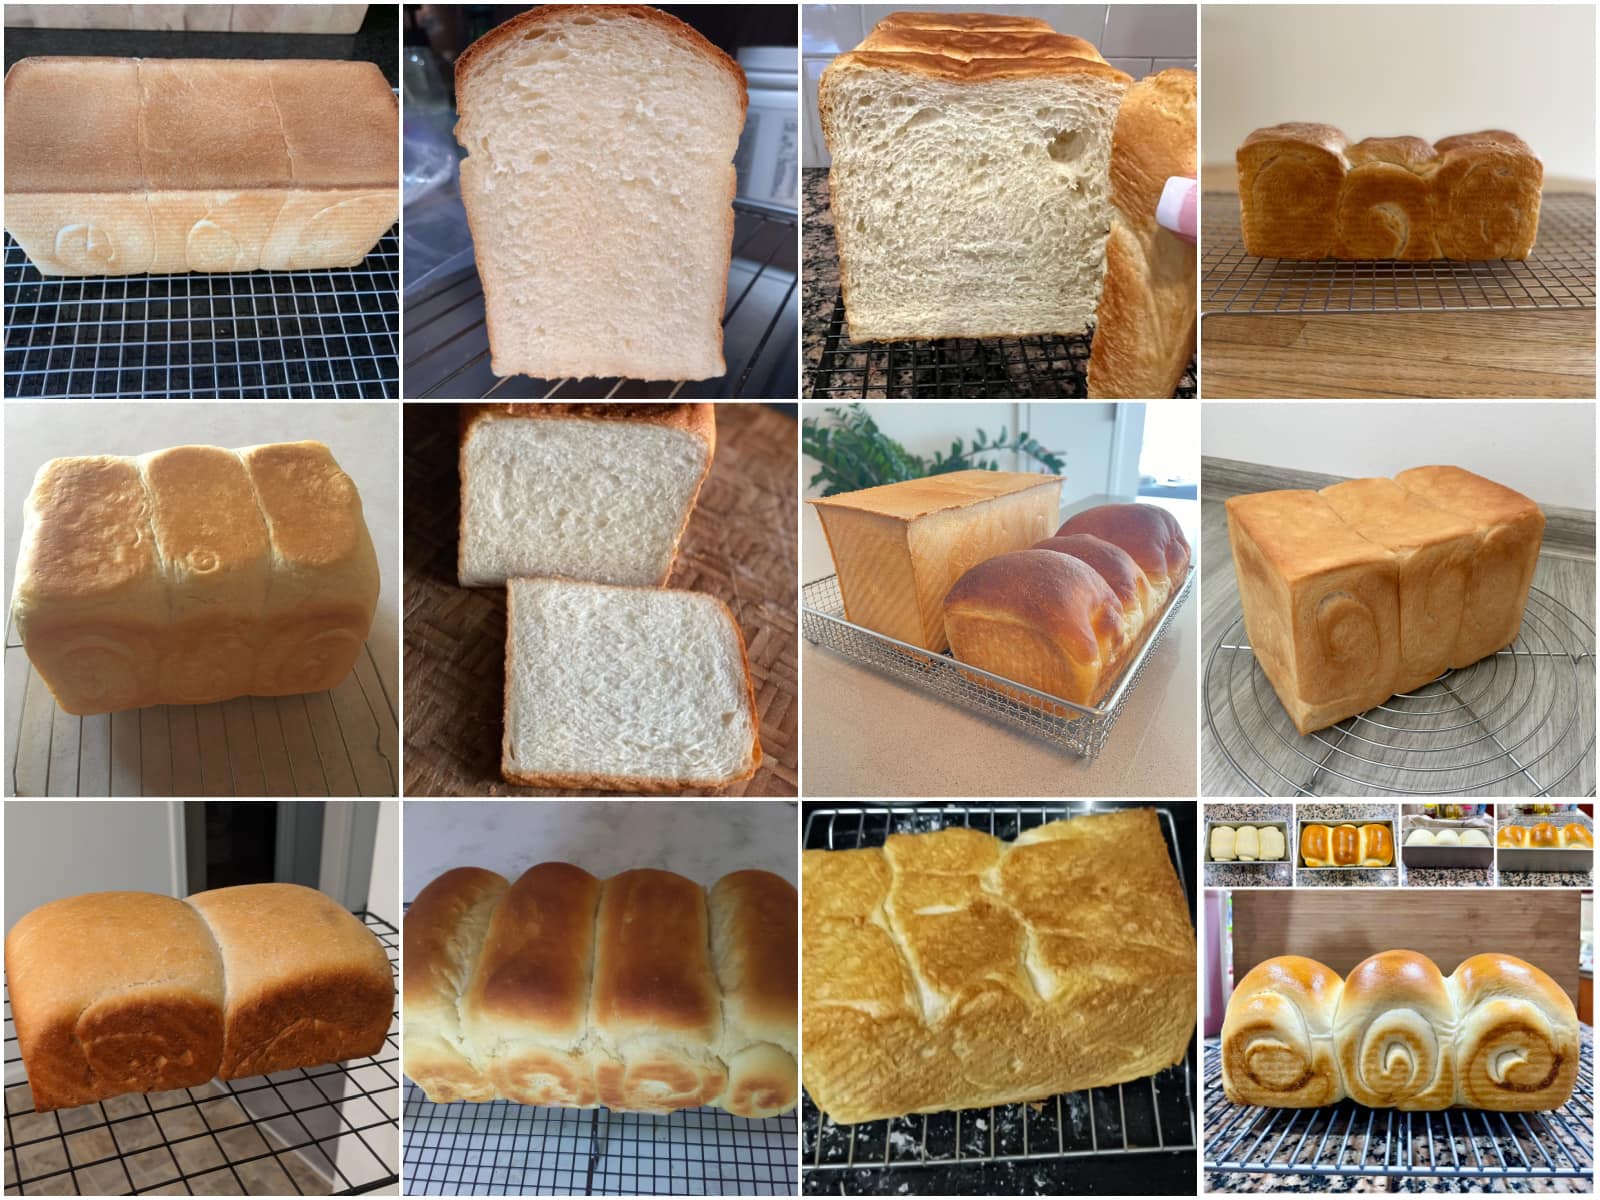
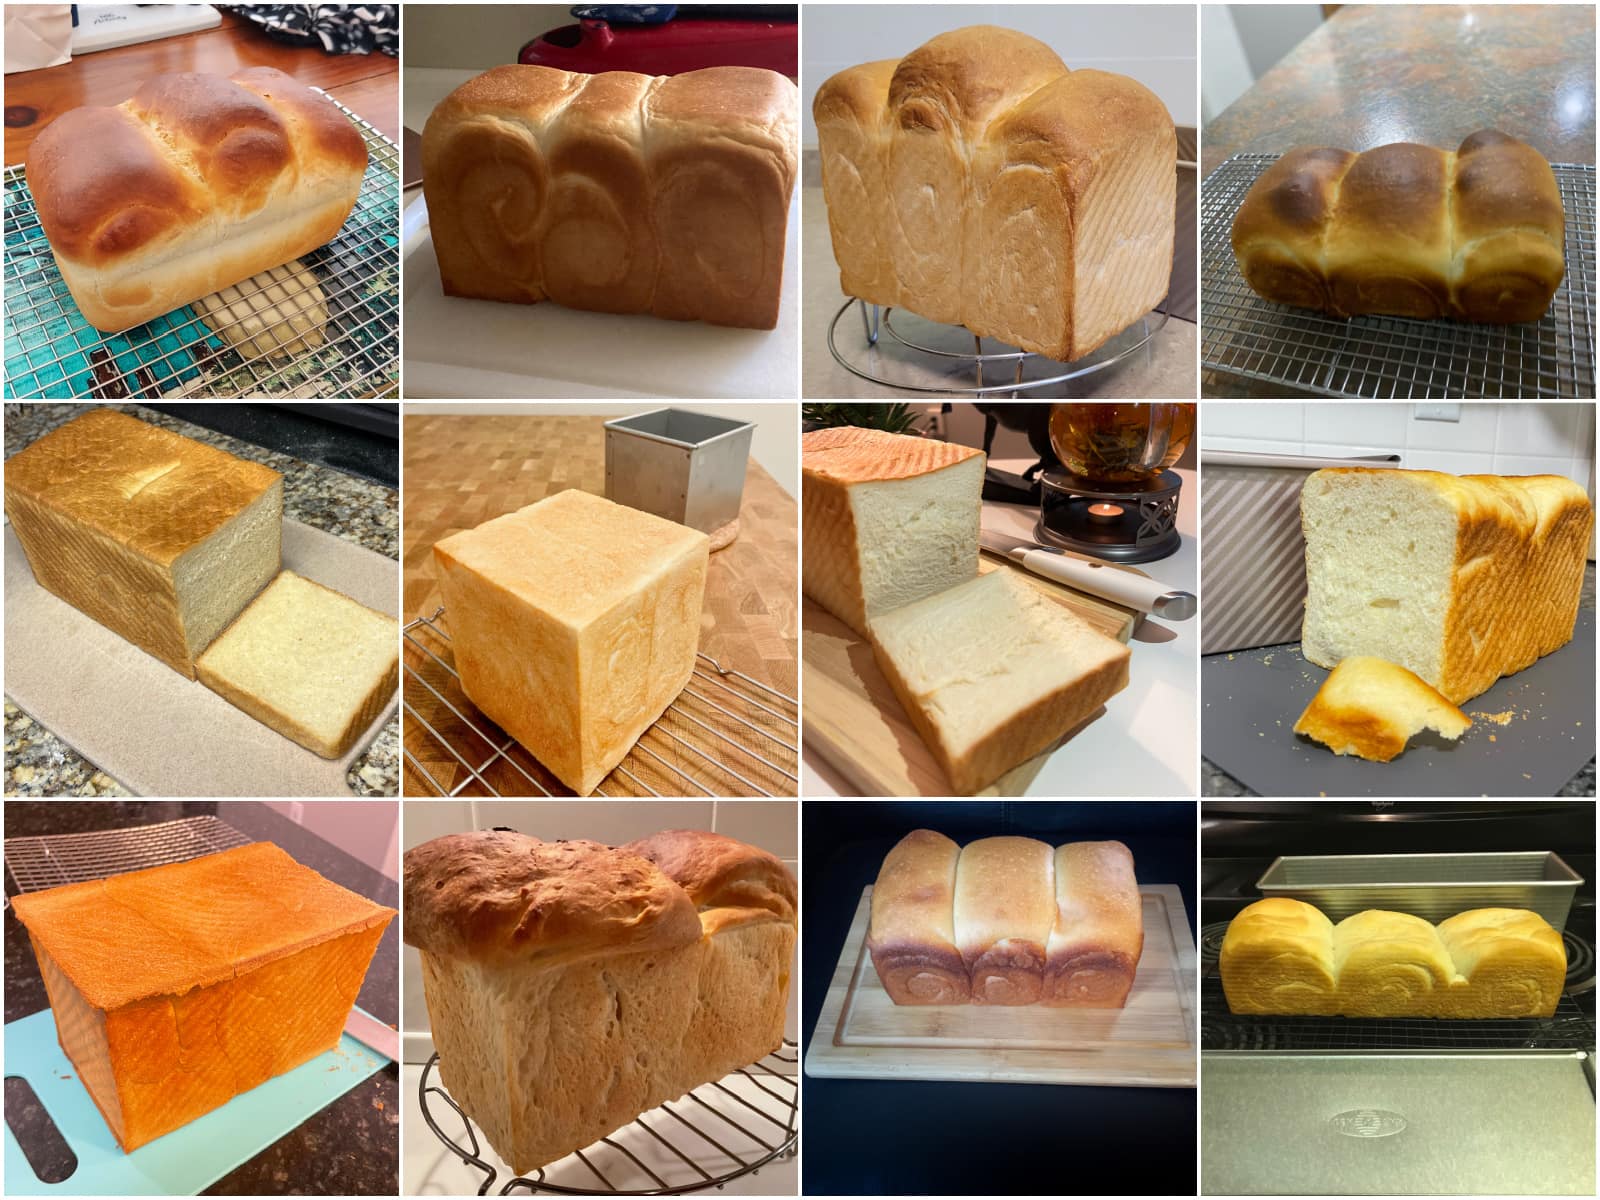
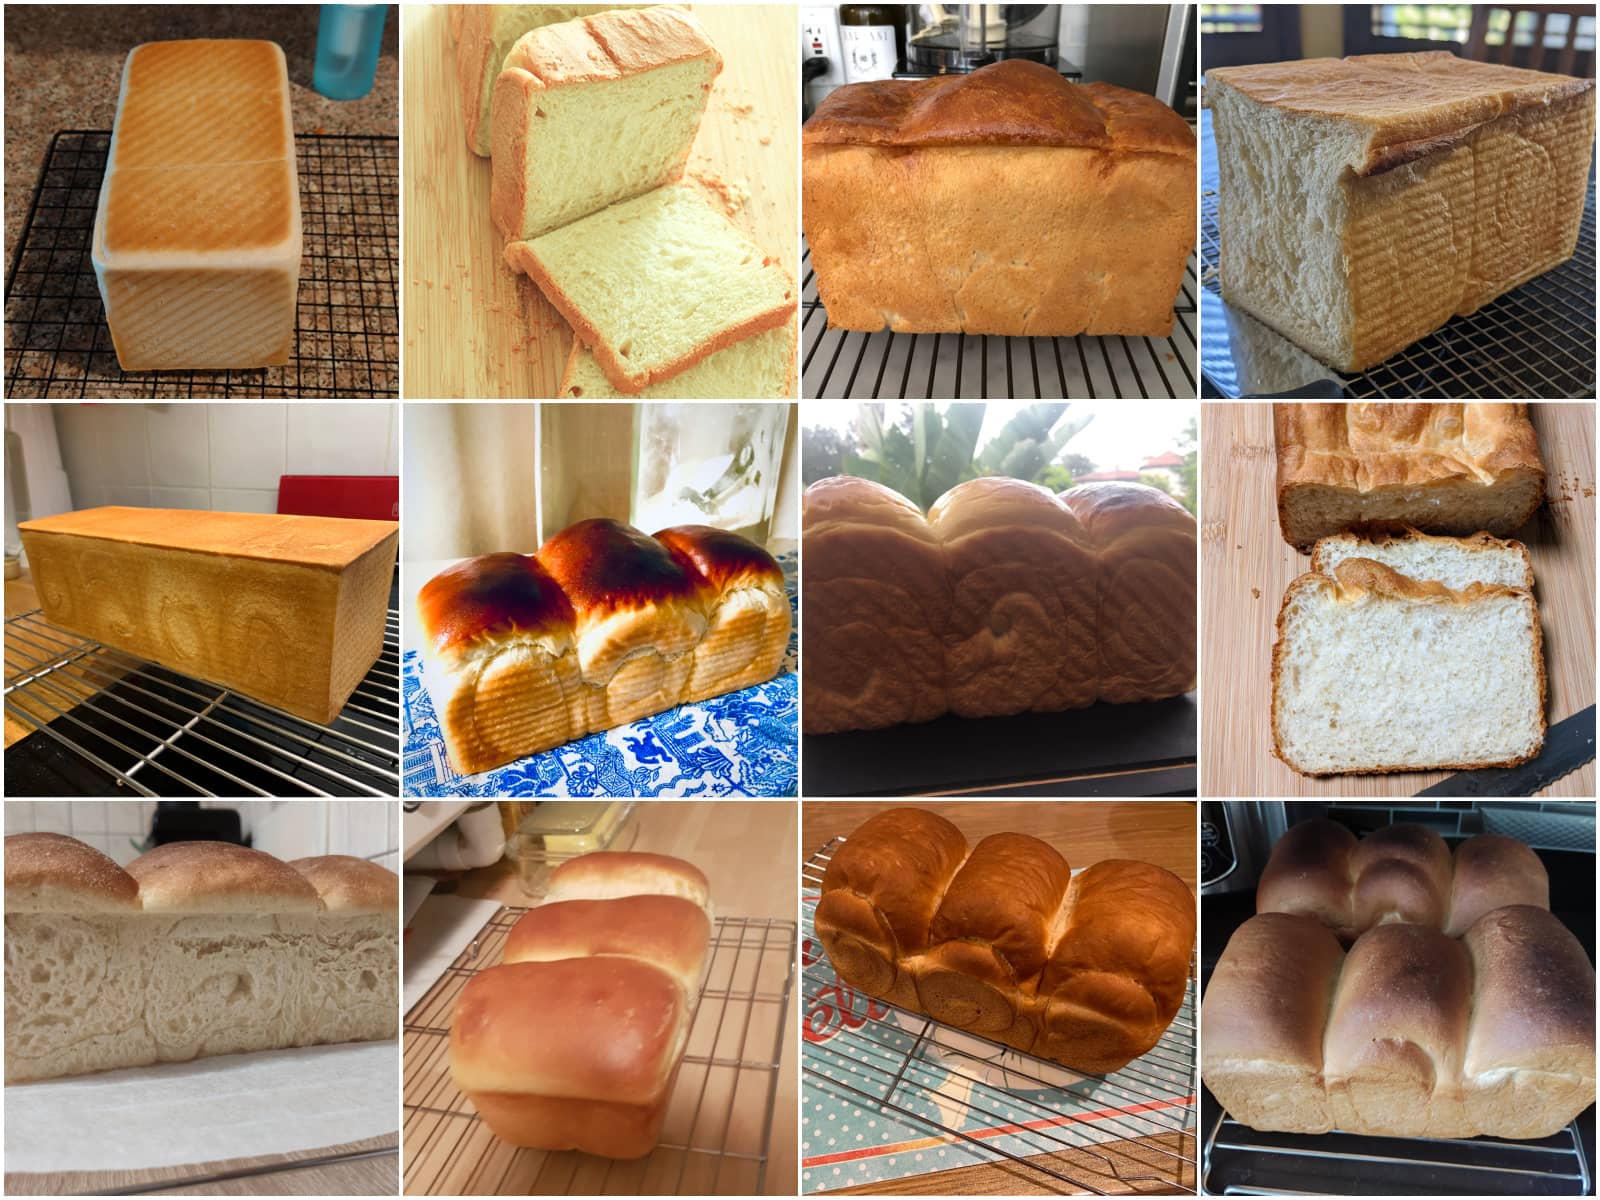
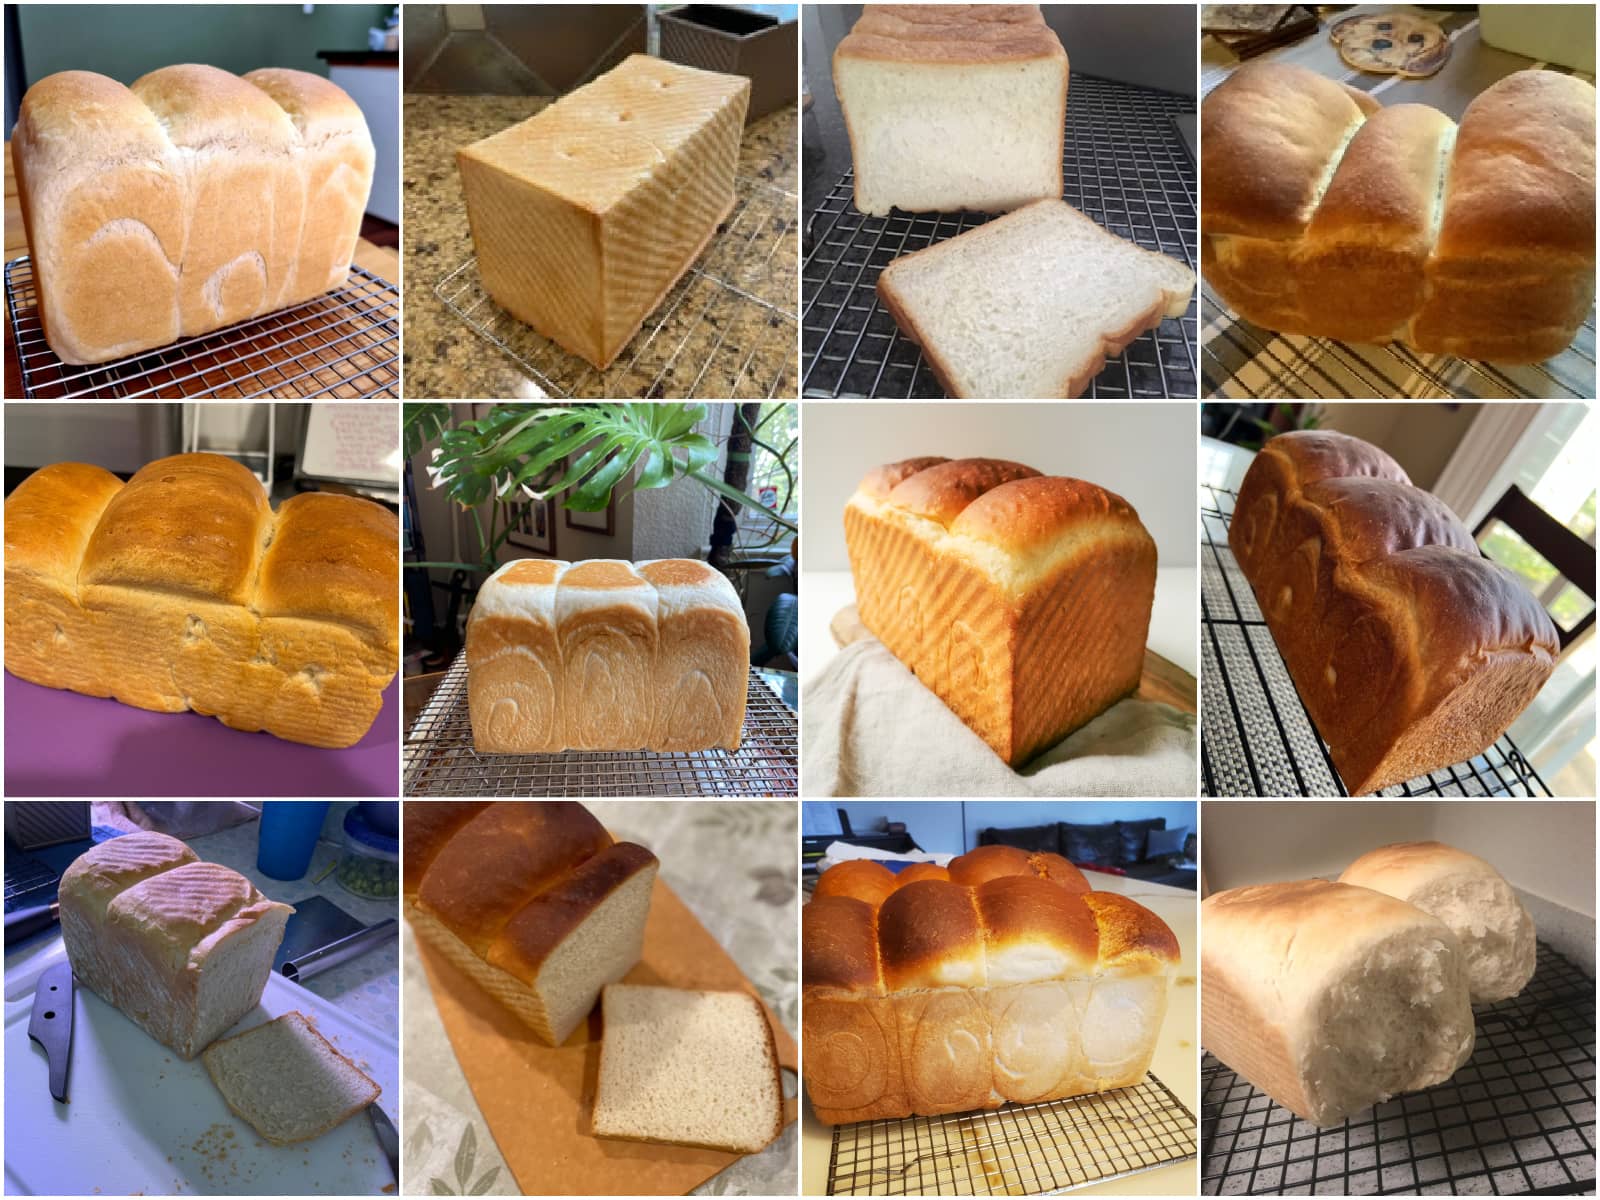
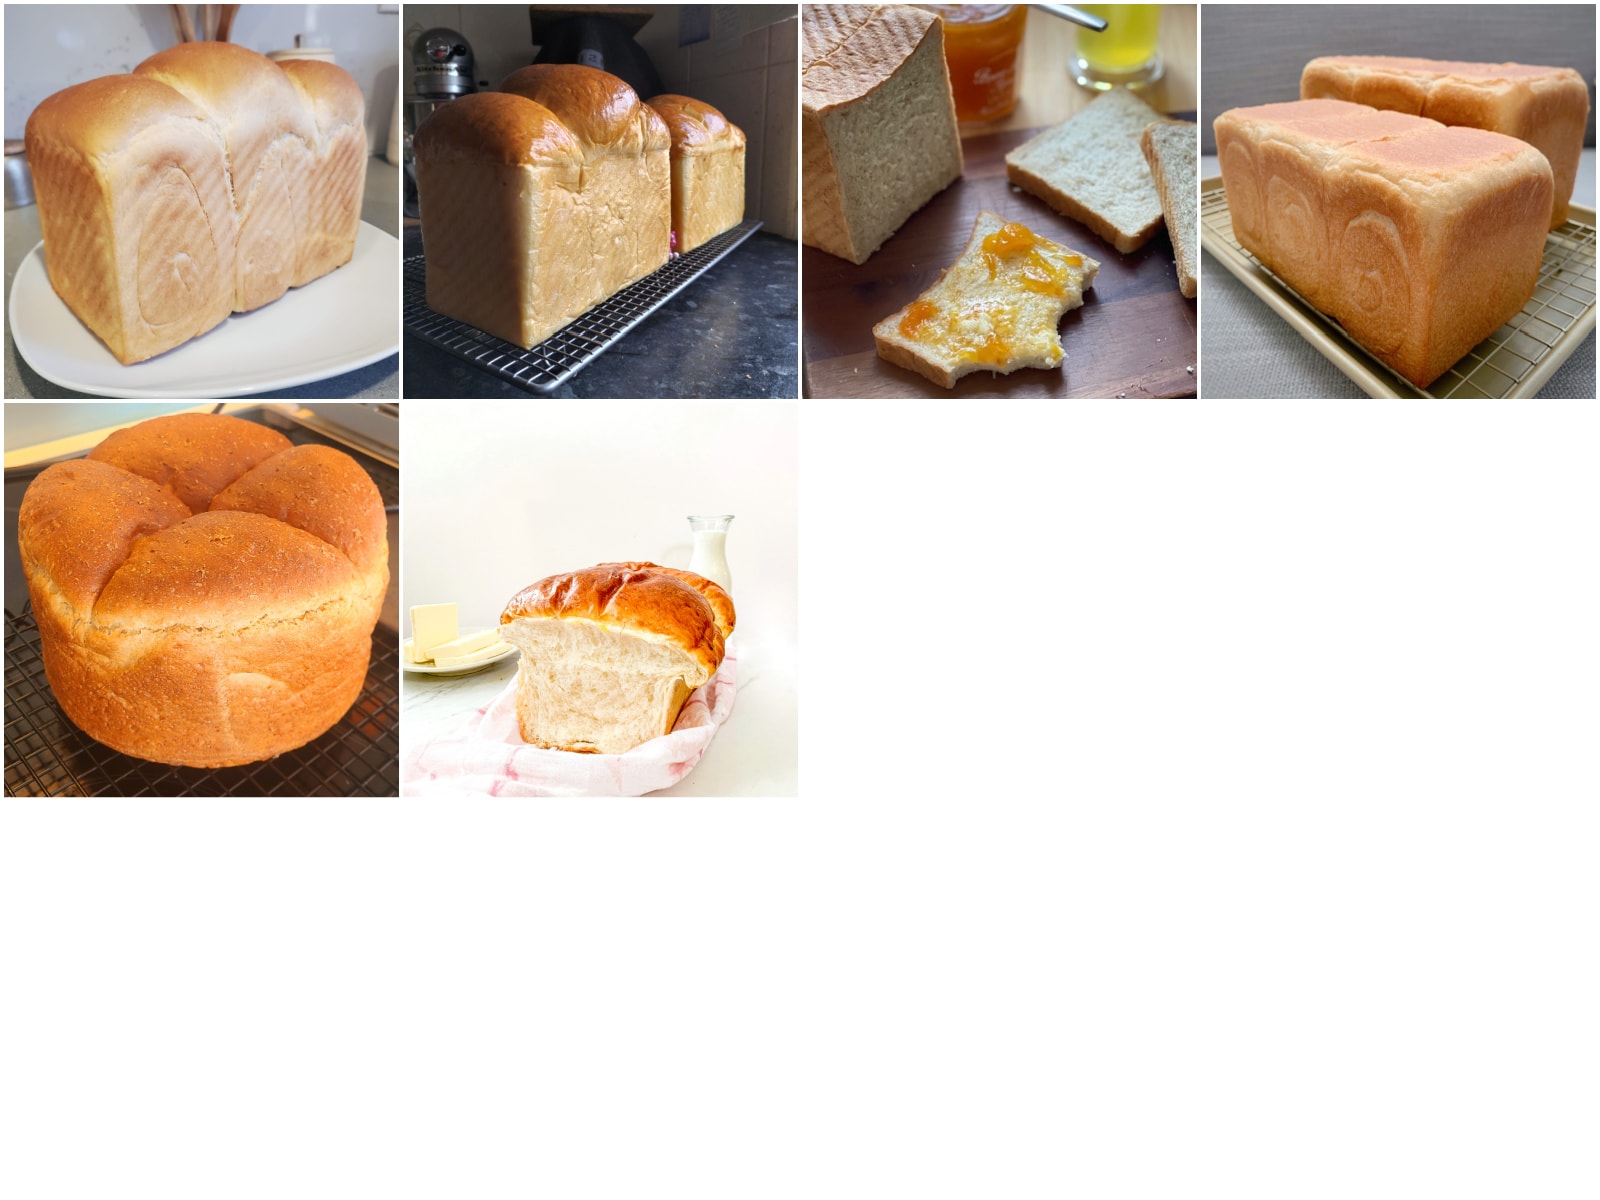
Readers’ Japanese Milk Bread (Shokupan)
Japanese Milk Bread (Shokupan) was the challenge recipe for JOC Cooking Challenge June/July 2022. Check out the beautiful shokupan created by JOC readers!
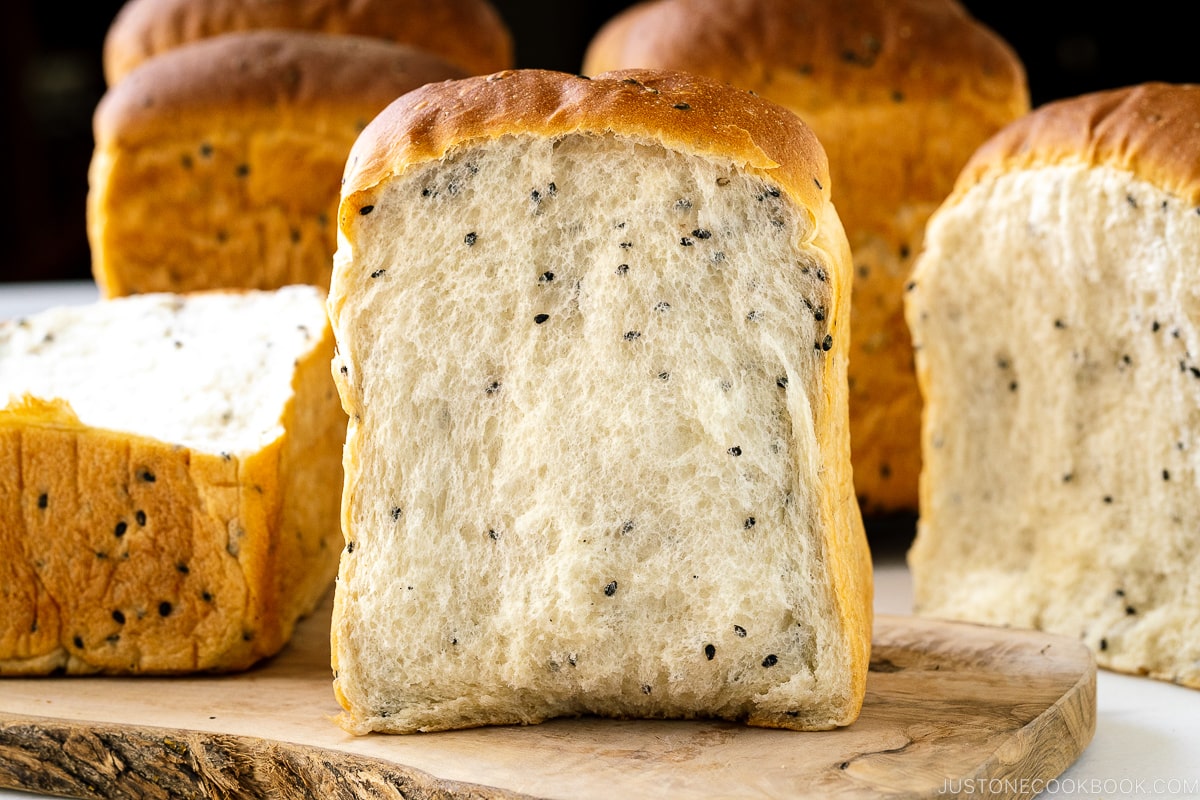
Variations of Japanese Milk Bread
Black Sesame Milk Bread (Shokupan)
Wish to learn more about Japanese cooking? Sign up for our free newsletter to receive cooking tips & recipe updates! And stay in touch with me on Facebook, Pinterest, YouTube, and Instagram.