How are you handling your children’s back to school? This time of year I often receive questions from parents about their struggles on packing lunches for their children. But I love that you are all eager to learn how to pack a kid’s lunch like a Japanese-style bento! If you’re feeling:
overwhelmed with the whole idea of packing lunch… at lost and don’t know where to start… discouraged because bento making looks time-consuming and difficult…
I hear you, and many JOC readers feel the same way. 🤗 I started packing my own lunch in junior high school (middle school) and continued throughout high school and college in Japan. My mom prepared the majority of the dishes and I was responsible to pack them into the bento box myself. After I came to the US, I sometimes packed my own bento for work and now I’ve been making kids’ bento since they were in elementary school. It’s a long time of bento making, yet I still feel overwhelmed sometimes. The good news is I’ve learned to count on a formula that works, and I’m excited to share it with you. Once you get the hang of it, bento-making will become second nature to you. In this post, I’ll go through my bento planning, prepping, and actual packing process. As a bonus, I’ll show you 6 real-life bento boxes using Zojirushi Vacuum Insulated Lunch Jars that I use for my children. Ready to jump into the bento-making journey? Let’s begin!
Chapter 1: Plan Bento Menus
Plan what to put in the bento box (Lunch Jar). Since I mostly cook Japanese food at home and this website focuses on Japanese recipes, I will be focusing on packing Japanese dishes here. If you cook non-Japanese dishes, that’s okay. This post still gives you general ideas and tips on how to pack your own dishes.
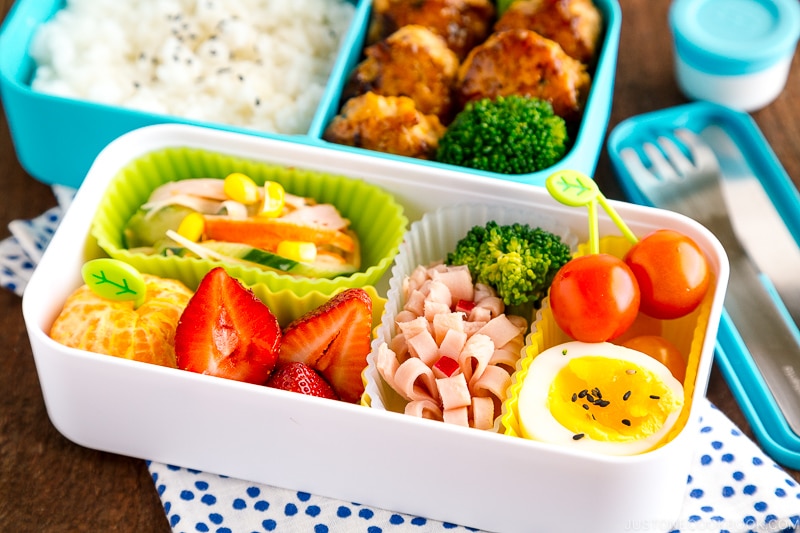
📝 Prepare 5 Types of Foods
First, you will need a broad imagination of how your bento should look like. Let’s say this is just an ideal version. There are 5 types of foods you want to pack in your bento.
Chapter 2: Meal Prep for Bento
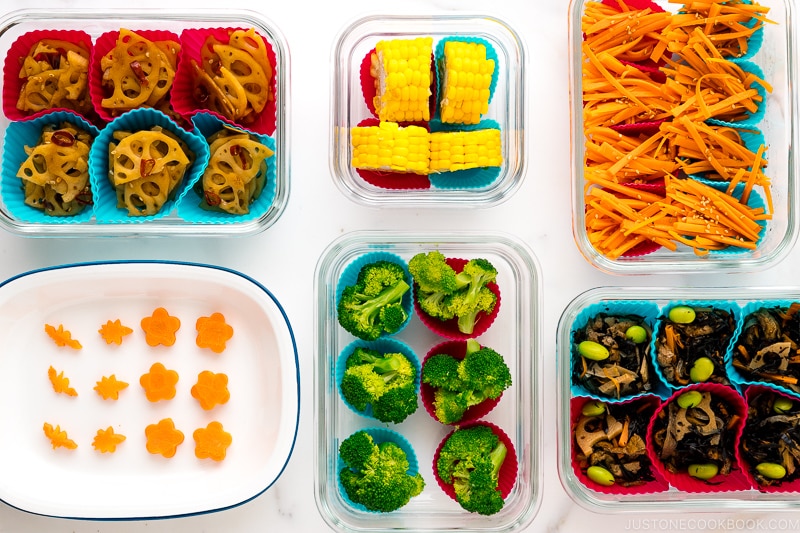
A nice-looking bento doesn’t magically appear without you putting in the effort. So it comes down to when and how to do this efficiently. For me, I don’t want to wake up early… so I make sure to use my effort strategically. Here’s How to Freeze Food for Bento and keep this List of Meal Prep Freezer-Friendly Dishes for bento-friendly dish ideas!
Chapter 3: Food Safety
But before we start packing, let’s talk quickly about food safety (or read more here).
Food Safety Tips:
Wash your hands and make sure your lunch jars are clean and dry. Use clean utensils (chopsticks etc) or plastic gloves when you handle the food. Your hands have germs and it’s better to avoid touching them with your hands. Reheat pre-cooked/leftover food/frozen food to eliminate bacteria before packing. The longer the food has been lying around, the less fresh it gets, even when you keep it in the refrigerator or freezer. Use less power on the microwave and heat it thoroughly so it’s reheated properly inside and out. Quickly let cool completely. Bacteria love a warm and moist environment, so it’s important to cool the foods from hot to cold as soon as possible. You can use an ice pack underneath the plate or silicone cups so the hot food gets cool fast. If you have an insulated lunch container, pack the hot food immediately and close the lid. Pack ice packs in the lunch bag to keep food fresh and safe till lunchtime.
It’s better to take extra safety precautions, especially during the summer months or if you live in a humid or hot climate.
Chapter 4: Pack Bento in the Morning
Now your freezer is packed with an assortment of bento dishes and you are aware of all the food safety tips. What do you do when you wake up? Your freezer is like a buffet or cafeteria. You can find what you want to pack in the bento and get started.
Morning Timeline
Bento Packing Tips
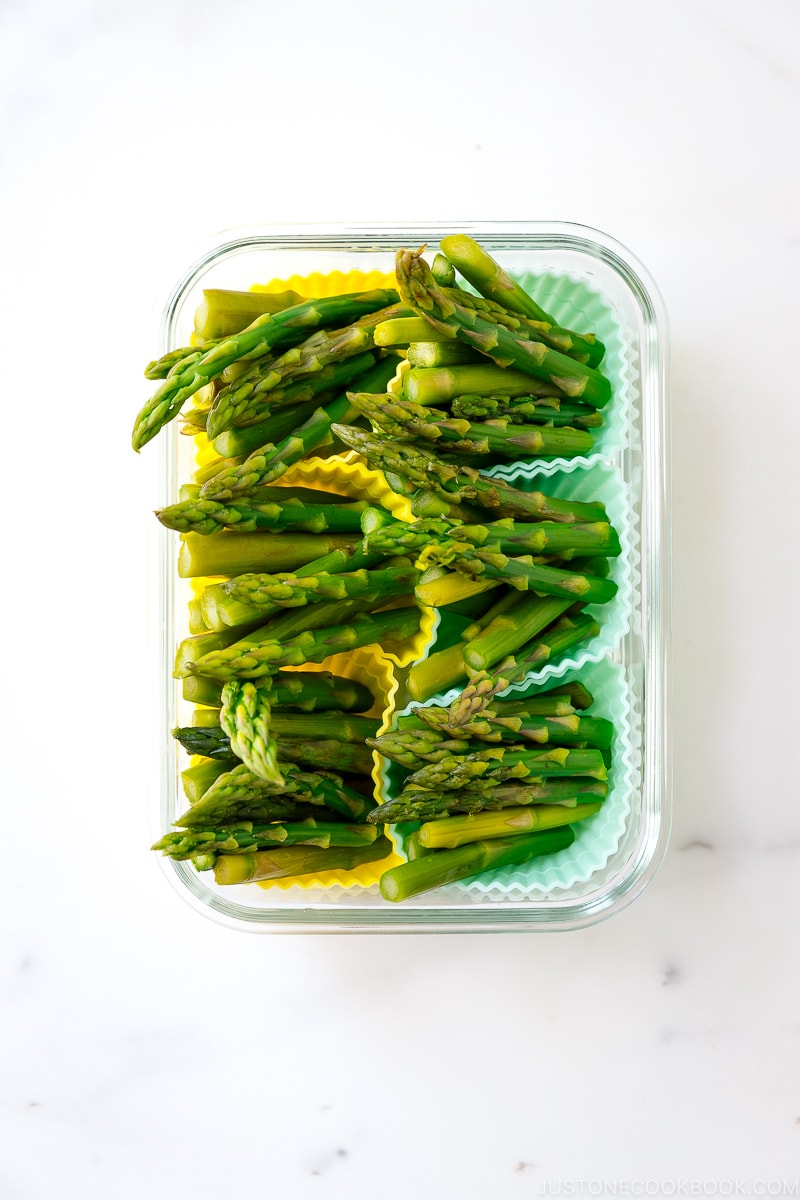
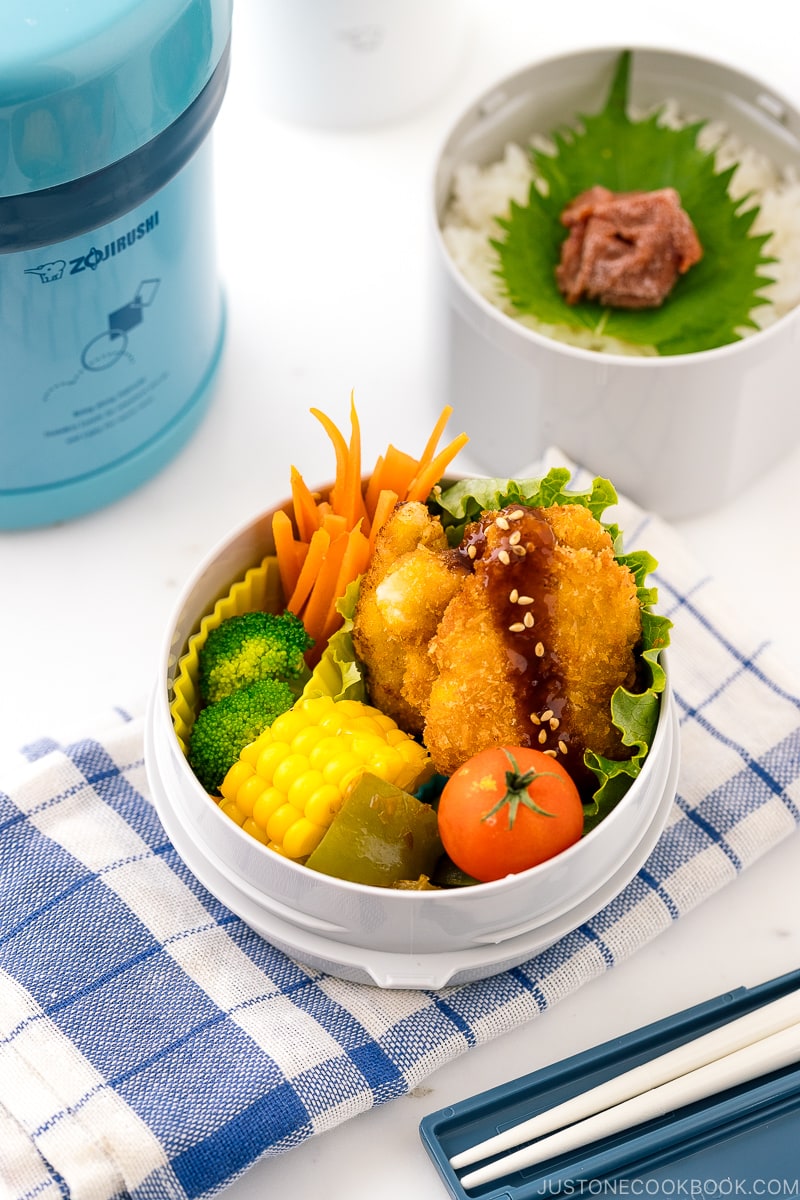
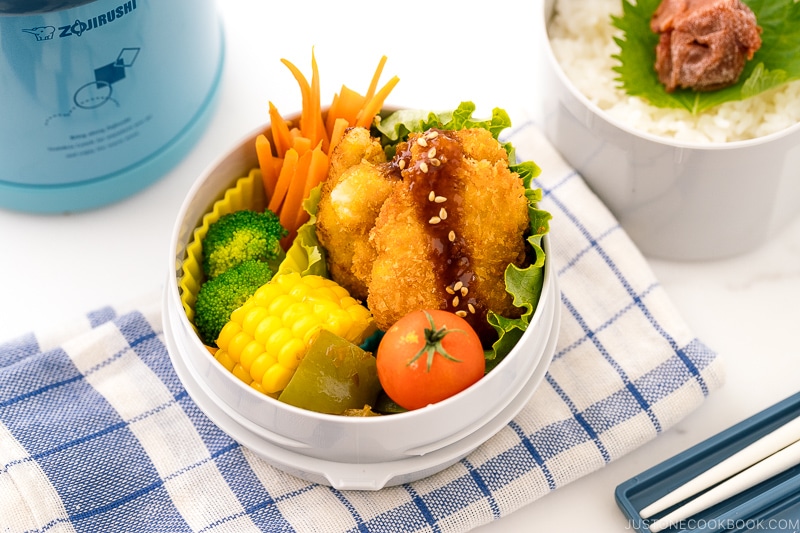
Use colorful and microwave-safe silicone cups. They are the easiest way to keep dishes portioned (not stuck to each other), reheated, and packed. Plus, they make bento a more appealing lunch by adding a nice pop of color, especially when you lack colorful veggies. You can purchase these silicone cups and mini ones. Pack bulky and big dishes first. The main dish tends to be the biggest item that goes into the bento box. So start with that, followed by the side dish(es) in a silicone cup. Any gap can be filled with vegetable “fillers” such as cherry tomato and blanched broccoli. Pack tightly! Otherwise, the dishes would be shifting left and right or up and down! Remove liquid. The liquid may go into another dish and mix up all the flavors. Also, the liquid could spoil the food faster, so it’s best for food safety as well.
Chapter 5: Six Real-Life Beonto Examples
I usually pack Japanese-style bento on Monday, Wednesday, and Friday, and pack sandwiches on Tuesday and Thursday to mix things up. But here I made 6 Japanese-style bento.
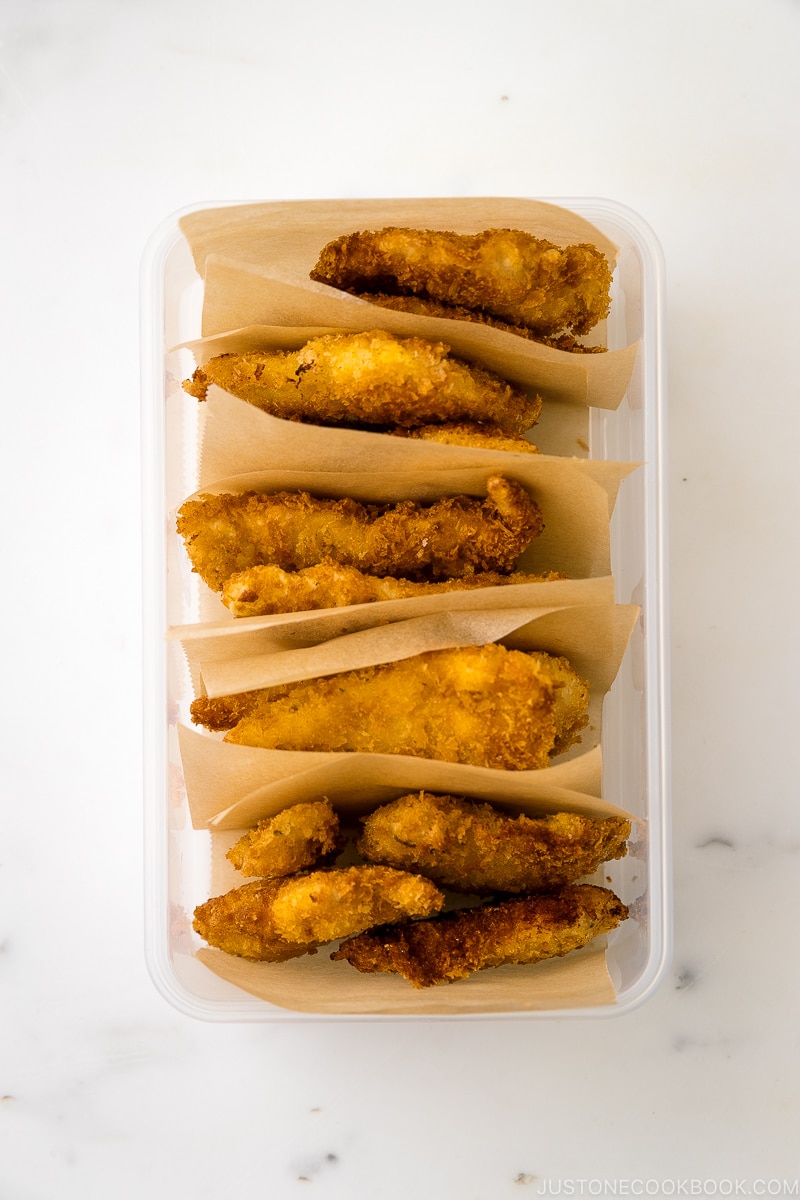
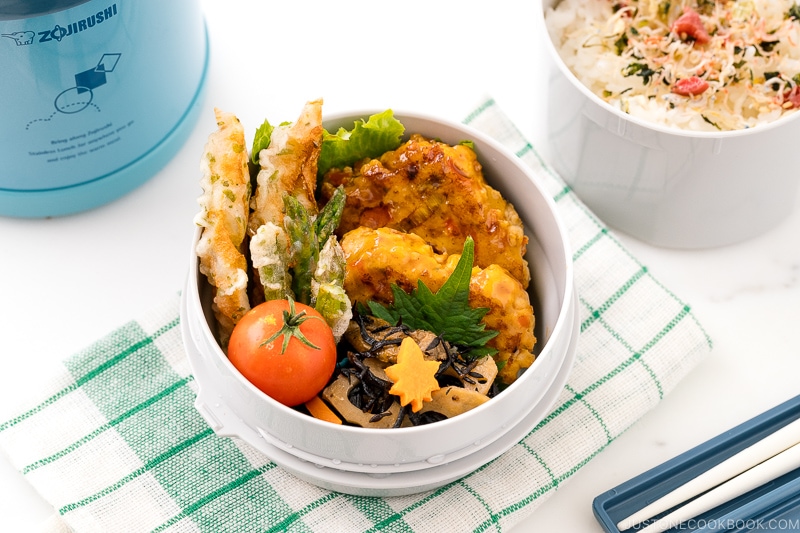
Monday: Chicken Katsu Bento
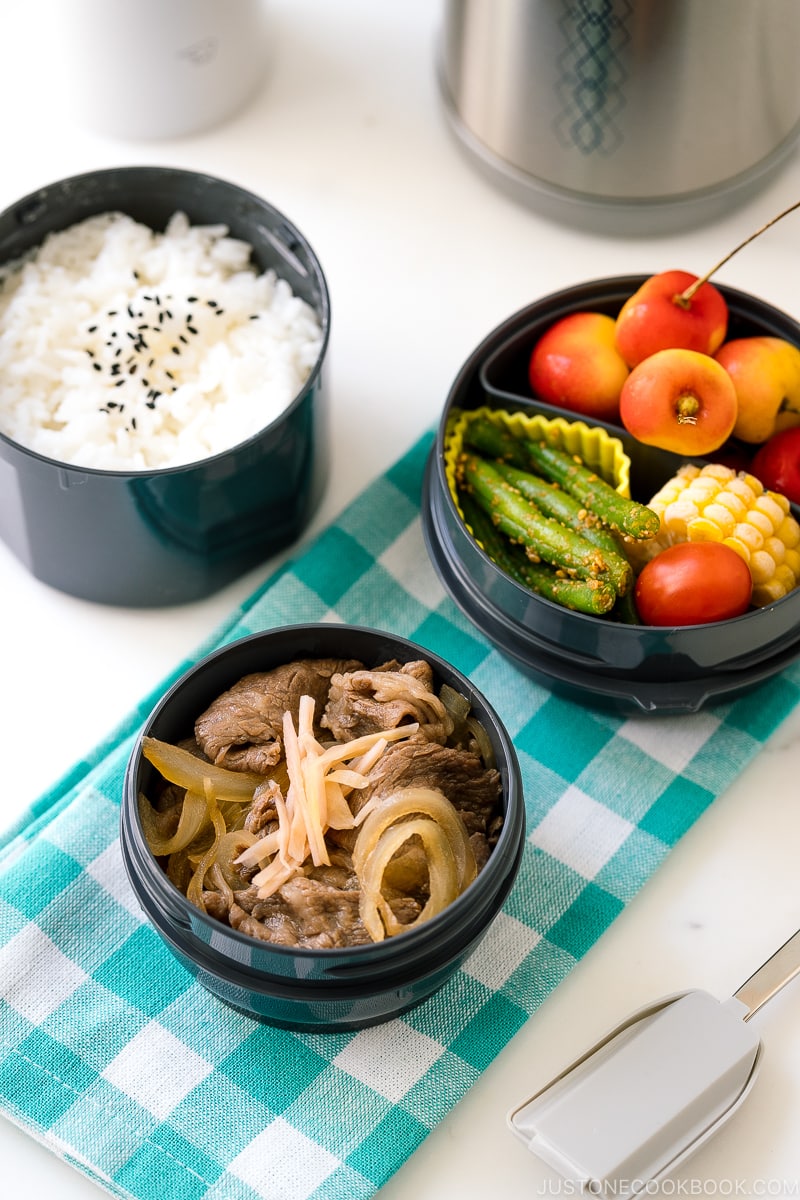
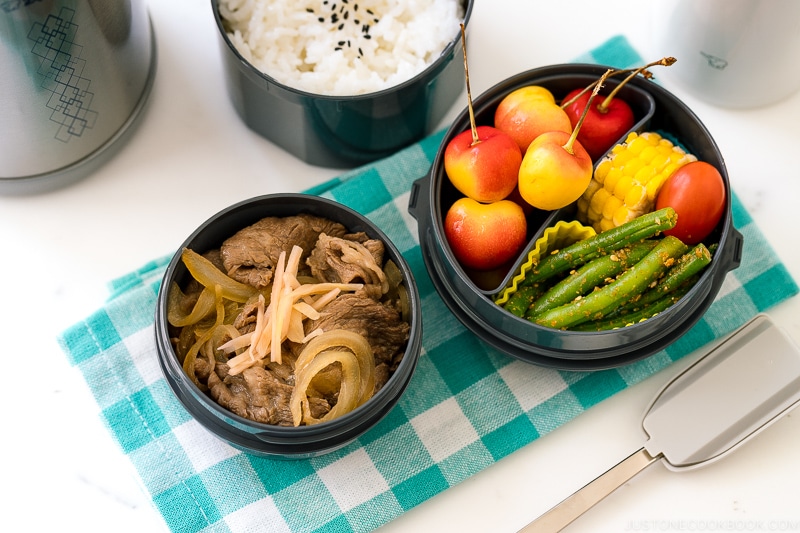
Tuesday: Gyudon Bento
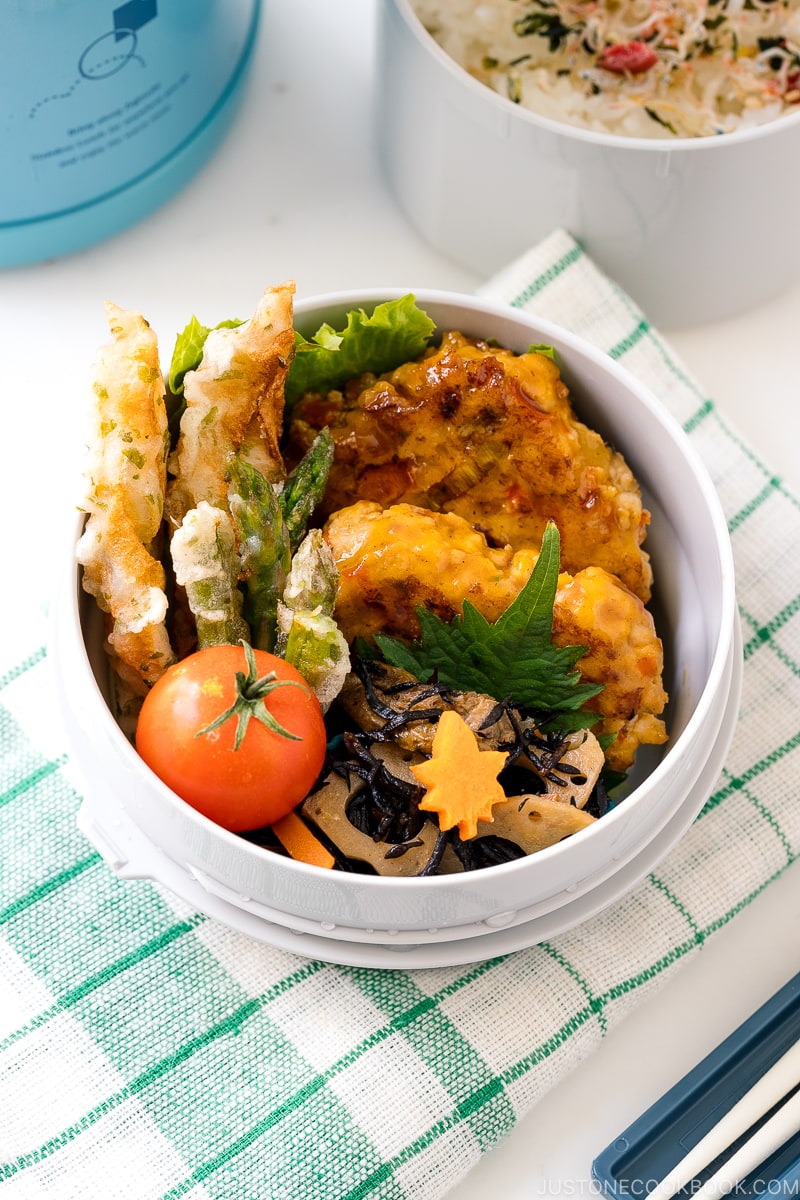
Wednesday: Teriyaki Chicken Meatball Bento
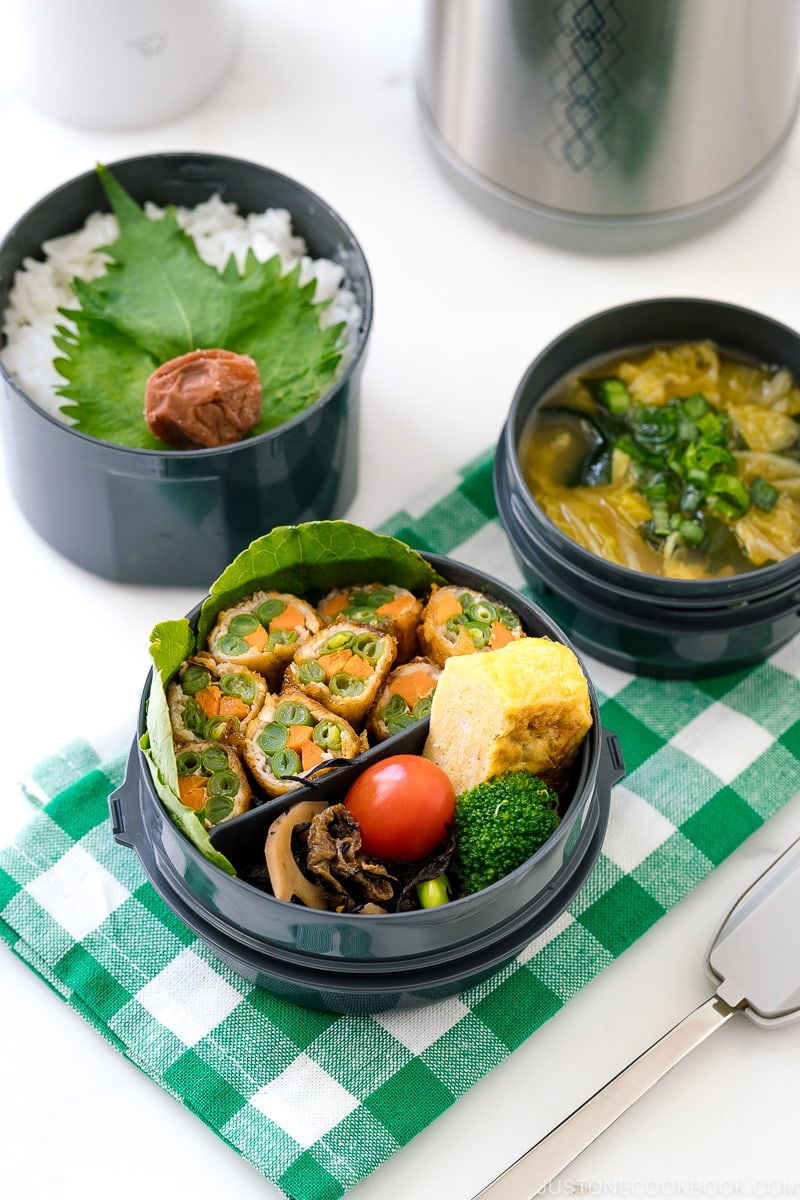
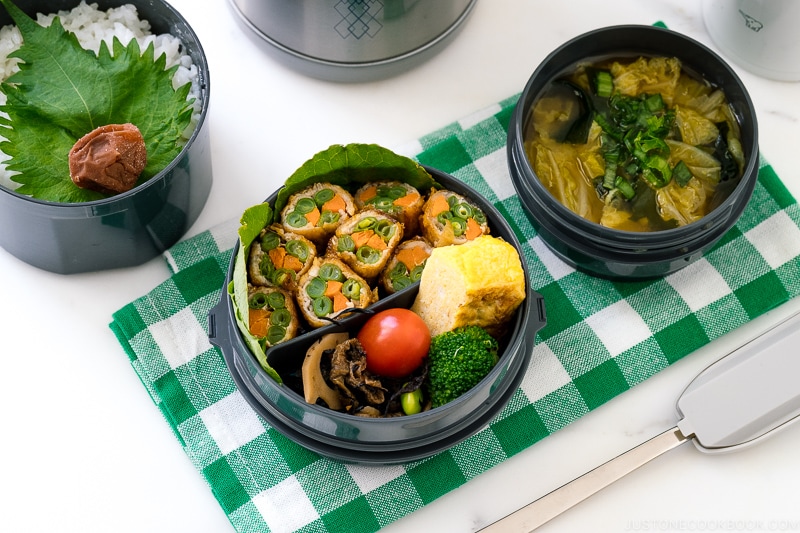
Thursday: Pork Roll Bento
Carbs: Steamed Rice (frozen → reheat in the microwave) with shiso leaf and umeboshi Main: Teriyaki Pork Rolls (frozen → reheat in the microwave) Sides: Miso Soup (leftover → reheat in the microwave), Tamagoyaki (frozen → thaw in bento box), Hijiki Salad (frozen → thaw in fridge overnight), Fillers: Blanched broccoli (frozen → thaw in bento box), a cherry tomato Fruits: In another container
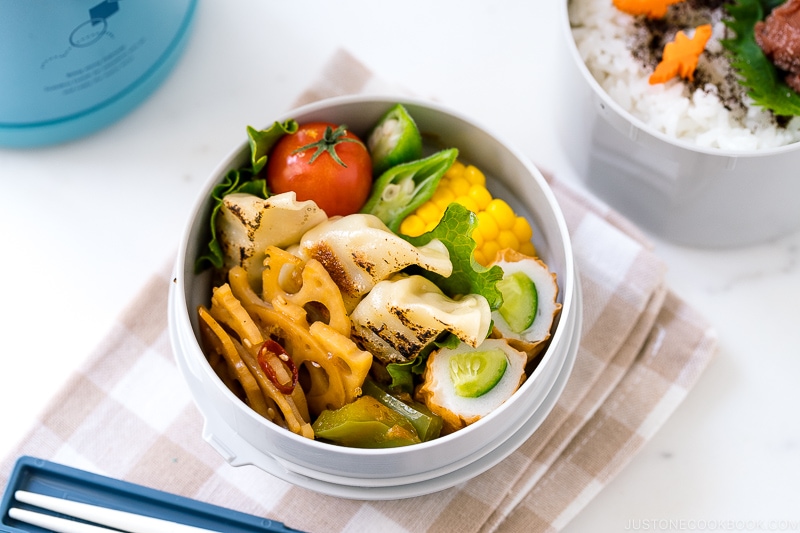
Friday: Gyoza Bento
Carbs: Steamed Rice (frozen → reheat in the microwave) with yukari rice seasoning, shiso leaf, and umeboshi Main: Frozen store-bought gyoza (pan-fried in the morning) Sides: Kinpira Renkon (frozen → thaw in fridge overnight), green bell pepper with okaka (frozen → thaw in bento box) Fillers: Chikuwa Cucumber (freshly made in the morning), blanched okra (refrigerated), boiled corn (frozen → thaw in bento box), cherry tomato Fruits: In another container
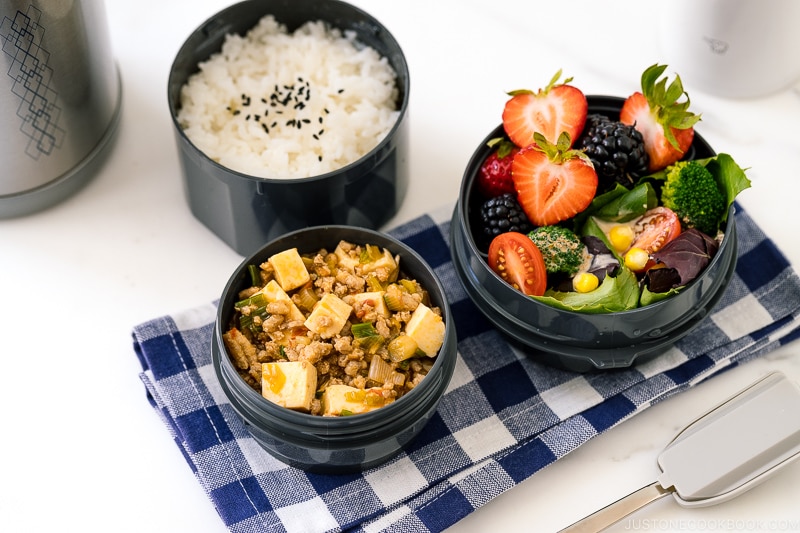
Bonus/Saturday: Mapo Tofu Bento
Carbs: Steamed Rice (frozen → reheat in the microwave) with black sesame seeds Main: Mapo Tofu (leftover → reheat in the microwave) Sides: Salad with store-bought sesame dressing (put together in the morning) Fillers: Blanched broccoli (frozen → thaw in bento box), cherry tomato Fruits: Berries
To Wrap Up: 5 Important Take Aways
I hope this tutorial will help to get you started. Here are 5 important takeaways. Don’t try to make a perfect bento. Start with 2 days a week and make sandwiches on the other 3 days!
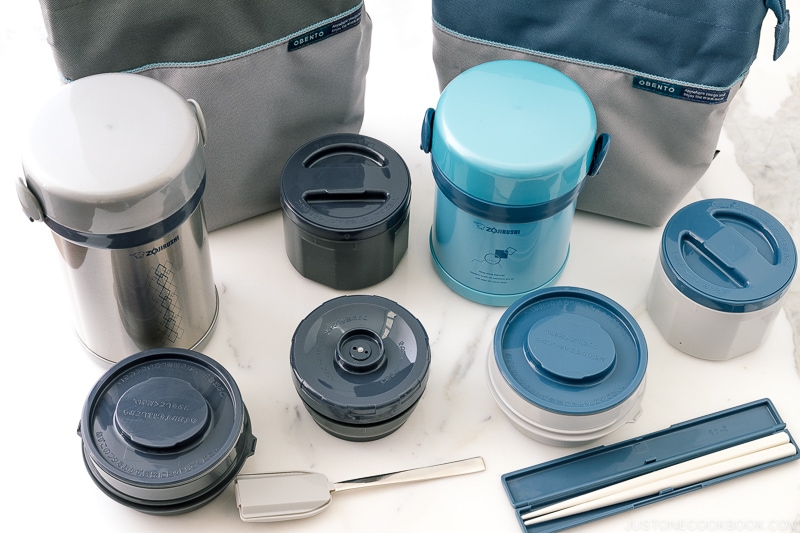
Zojirushi Vacuum Insulated Lunch Jars Review
This post was sponsored by Zojirushi to feature two of the Zojirushi lunch jar series, which I’ve been using for my children. These cylinder lunch jars are slightly different from the typical bento boxes, but they are designed for the classic Japanese meal format.
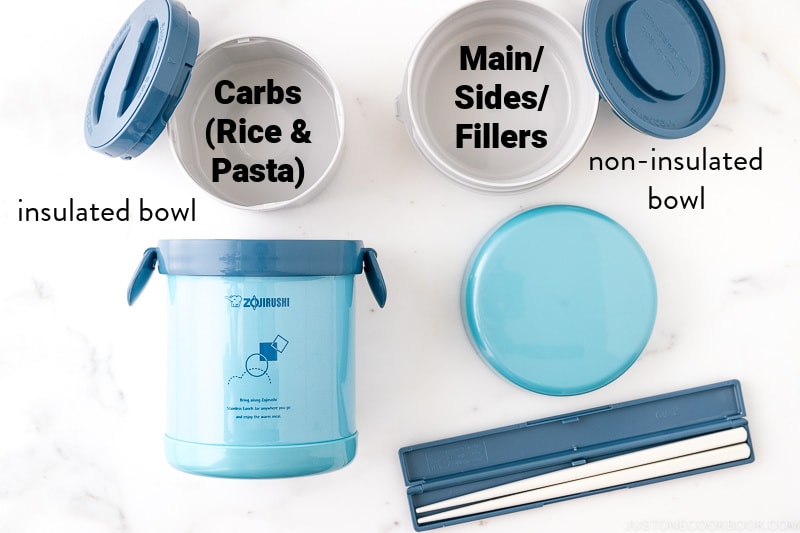
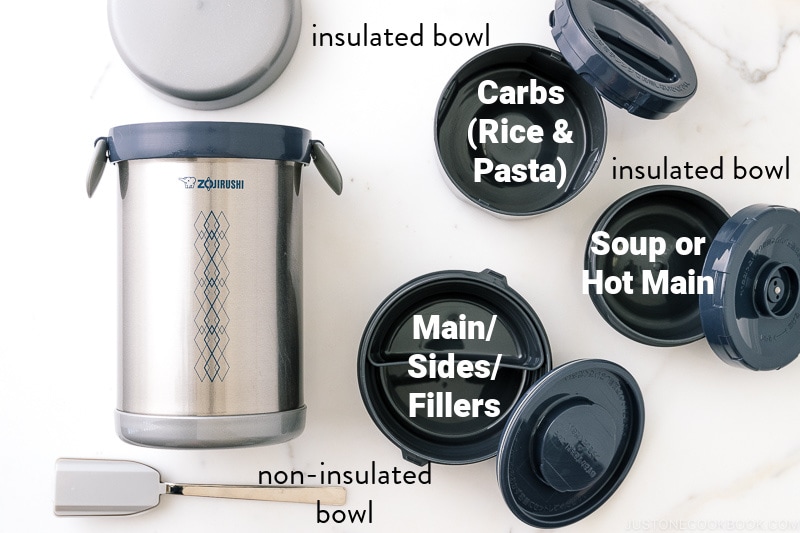
Ms. Bento® Stainless Lunch Jar SL-MEE07 (2 inner bowls) Ms. Bento® Stainless Lunch Jar SL-NCE09 (3 inner bowls)
Features
The features of Ms. Bento® Stainless Lunch Jar include:
Durable stainless steel construction with excellent heat retention Its vacuum insulation keeps foods hot or cold for hours. Microwaveable inner bowls Washable nonstick-coated outer container Includes chopsticks/chopsticks holder (or forked spoon) and easy-to-carry tote bag Made of BPA-free plastic and stainless steel
The main difference between the two is one comes with 2 tiers and the other comes with 3 tiers which allows you to pack soup or hot food with gravy or sauce. For Zojirushi Ms. Bento® Stainless Lunch Jar SL-MEE07 (2 inner bowls), pack the rice in the bottom insulated bowl, and the rest in the upper un-insulated bowl. For Zojirushi Ms. Bento® Stainless Lunch Jar SL-NCE09 (3 inners bowls), pack your soup/ hot dish in the bottom insulated bowl, followed by rice (or other carbs) in the middle insulated bowl, then the other cold dishes in the top non-insulated bowl.
Our Honest Reviews (Me + The Kids)
I also asked my kids what they like and don’t like about these bento jars and here are our honest reviews: Pros:
Kids: It’s SO nice to eat warm food (especially warm rice)! Kids: I like that it’s packed nicely in one jar. Mom doesn’t have to pack in different size containers. Kids: My friends think my lunch is really cool. Mom: I don’t have to wait until the rice is cool before packing, so it saves time on prepping!
Cons:
Kids: A bit heavier than other bento boxes but not a big deal. Mom: Hand wash only… but I don’t mind.
Useful Bento Resources on JOC
Basics
Helpful Tips
How to Pack Bento in 15 Minutes How To Freeze Food for Bento Meal Prep Freezer-Friendly Bento Dishes Meal Prep Bento Recipes Ideas: 3 Dollar Bento Challenge
Menu Ideas
Bento Menus for Inspiration Back to School Easy Bento Box Ideas Back to School Easy Bento Ideas & Recipes How to Make Cute Bento (Video)
Wish to learn more about Japanese cooking? Sign up for our free newsletter to receive cooking tips & recipe updates! And stay in touch with me on Facebook, Pinterest, YouTube, and Instagram.