If you love pie as much as us, don’t miss some of our favorites like Dutch Apple Pie, Pecan Pie, Strawberry Pie, Mini Chocolate Peanut Butter Pies, Butterfinger Pie, Mini Caramel Apple Pies, Pear Pie, Mud Pie, Million Dollar Cookie Pie and S’mores Pie.
How to Make Chocolate Cream Pie Video
Chocolate Cream Pie Ingredients
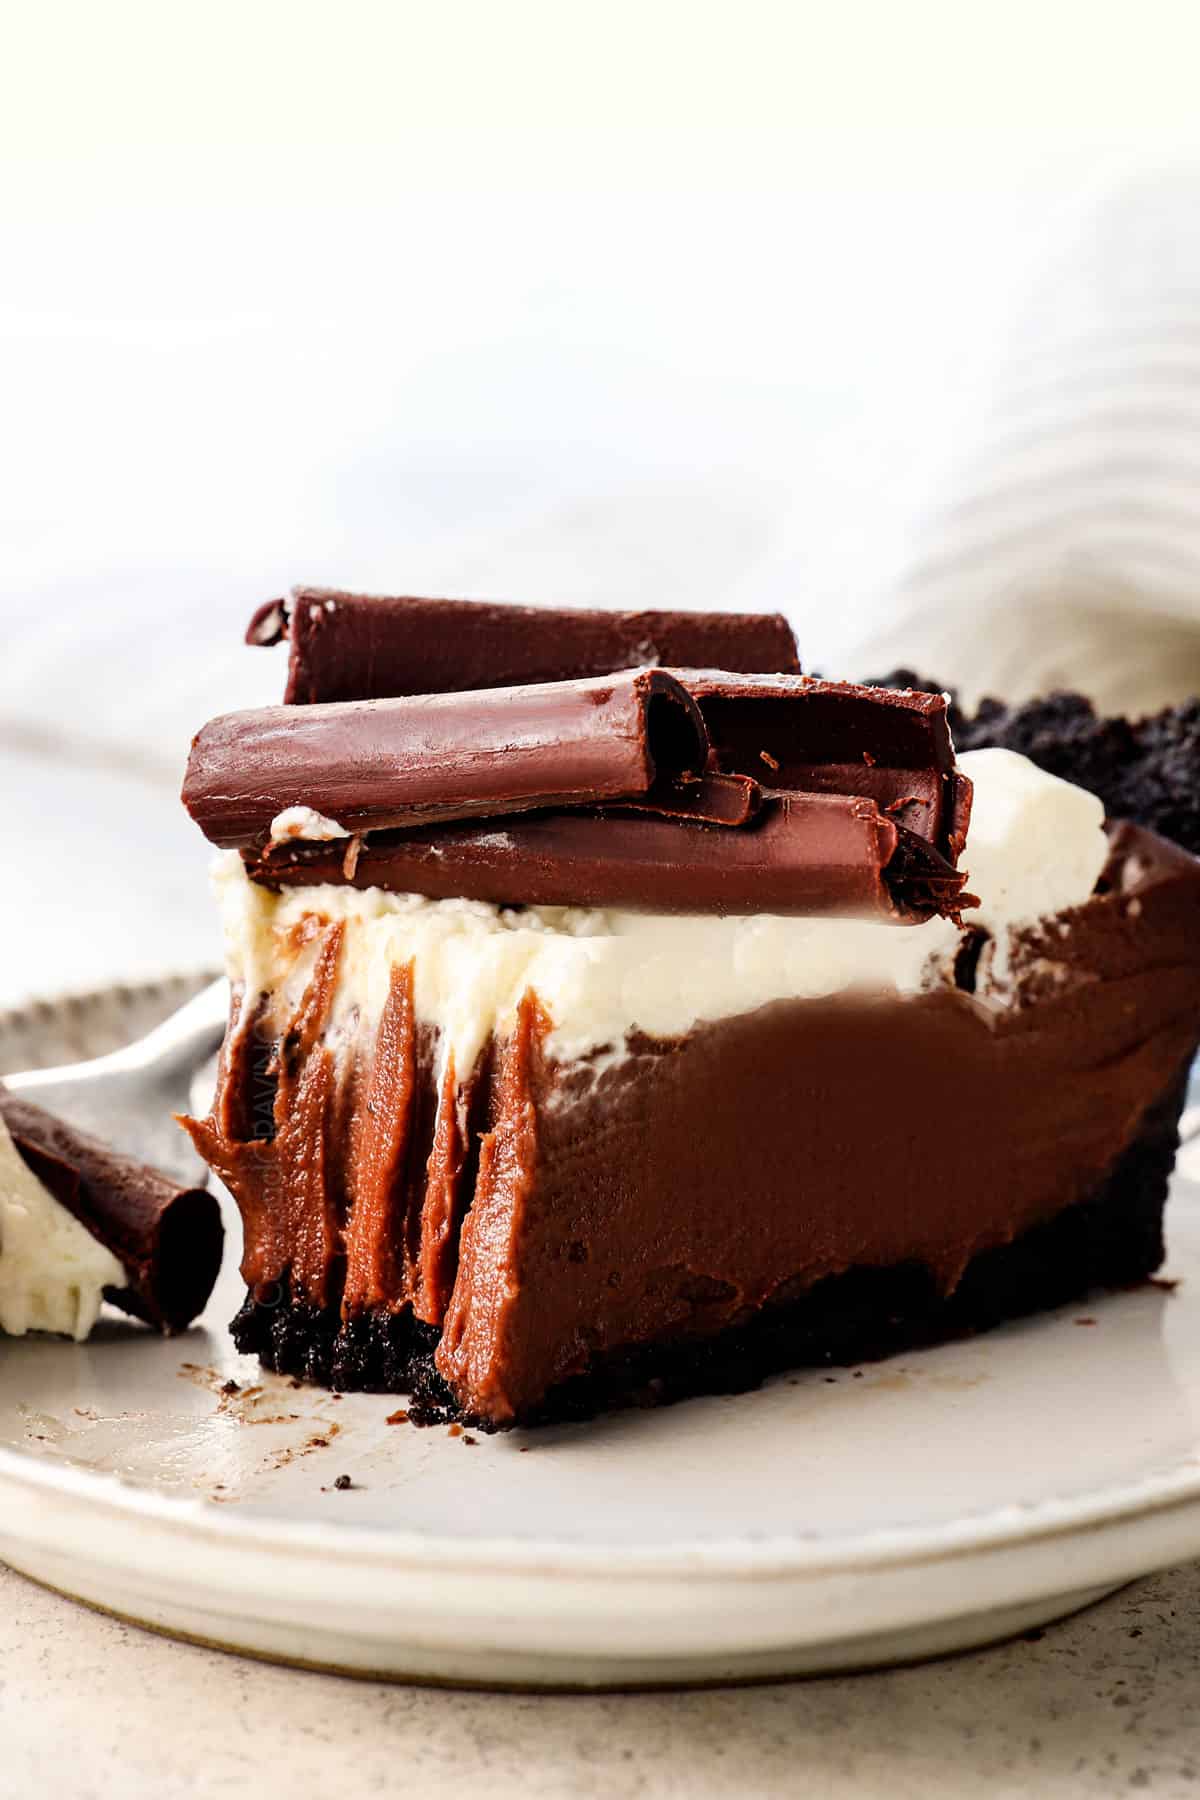
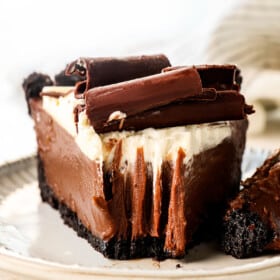
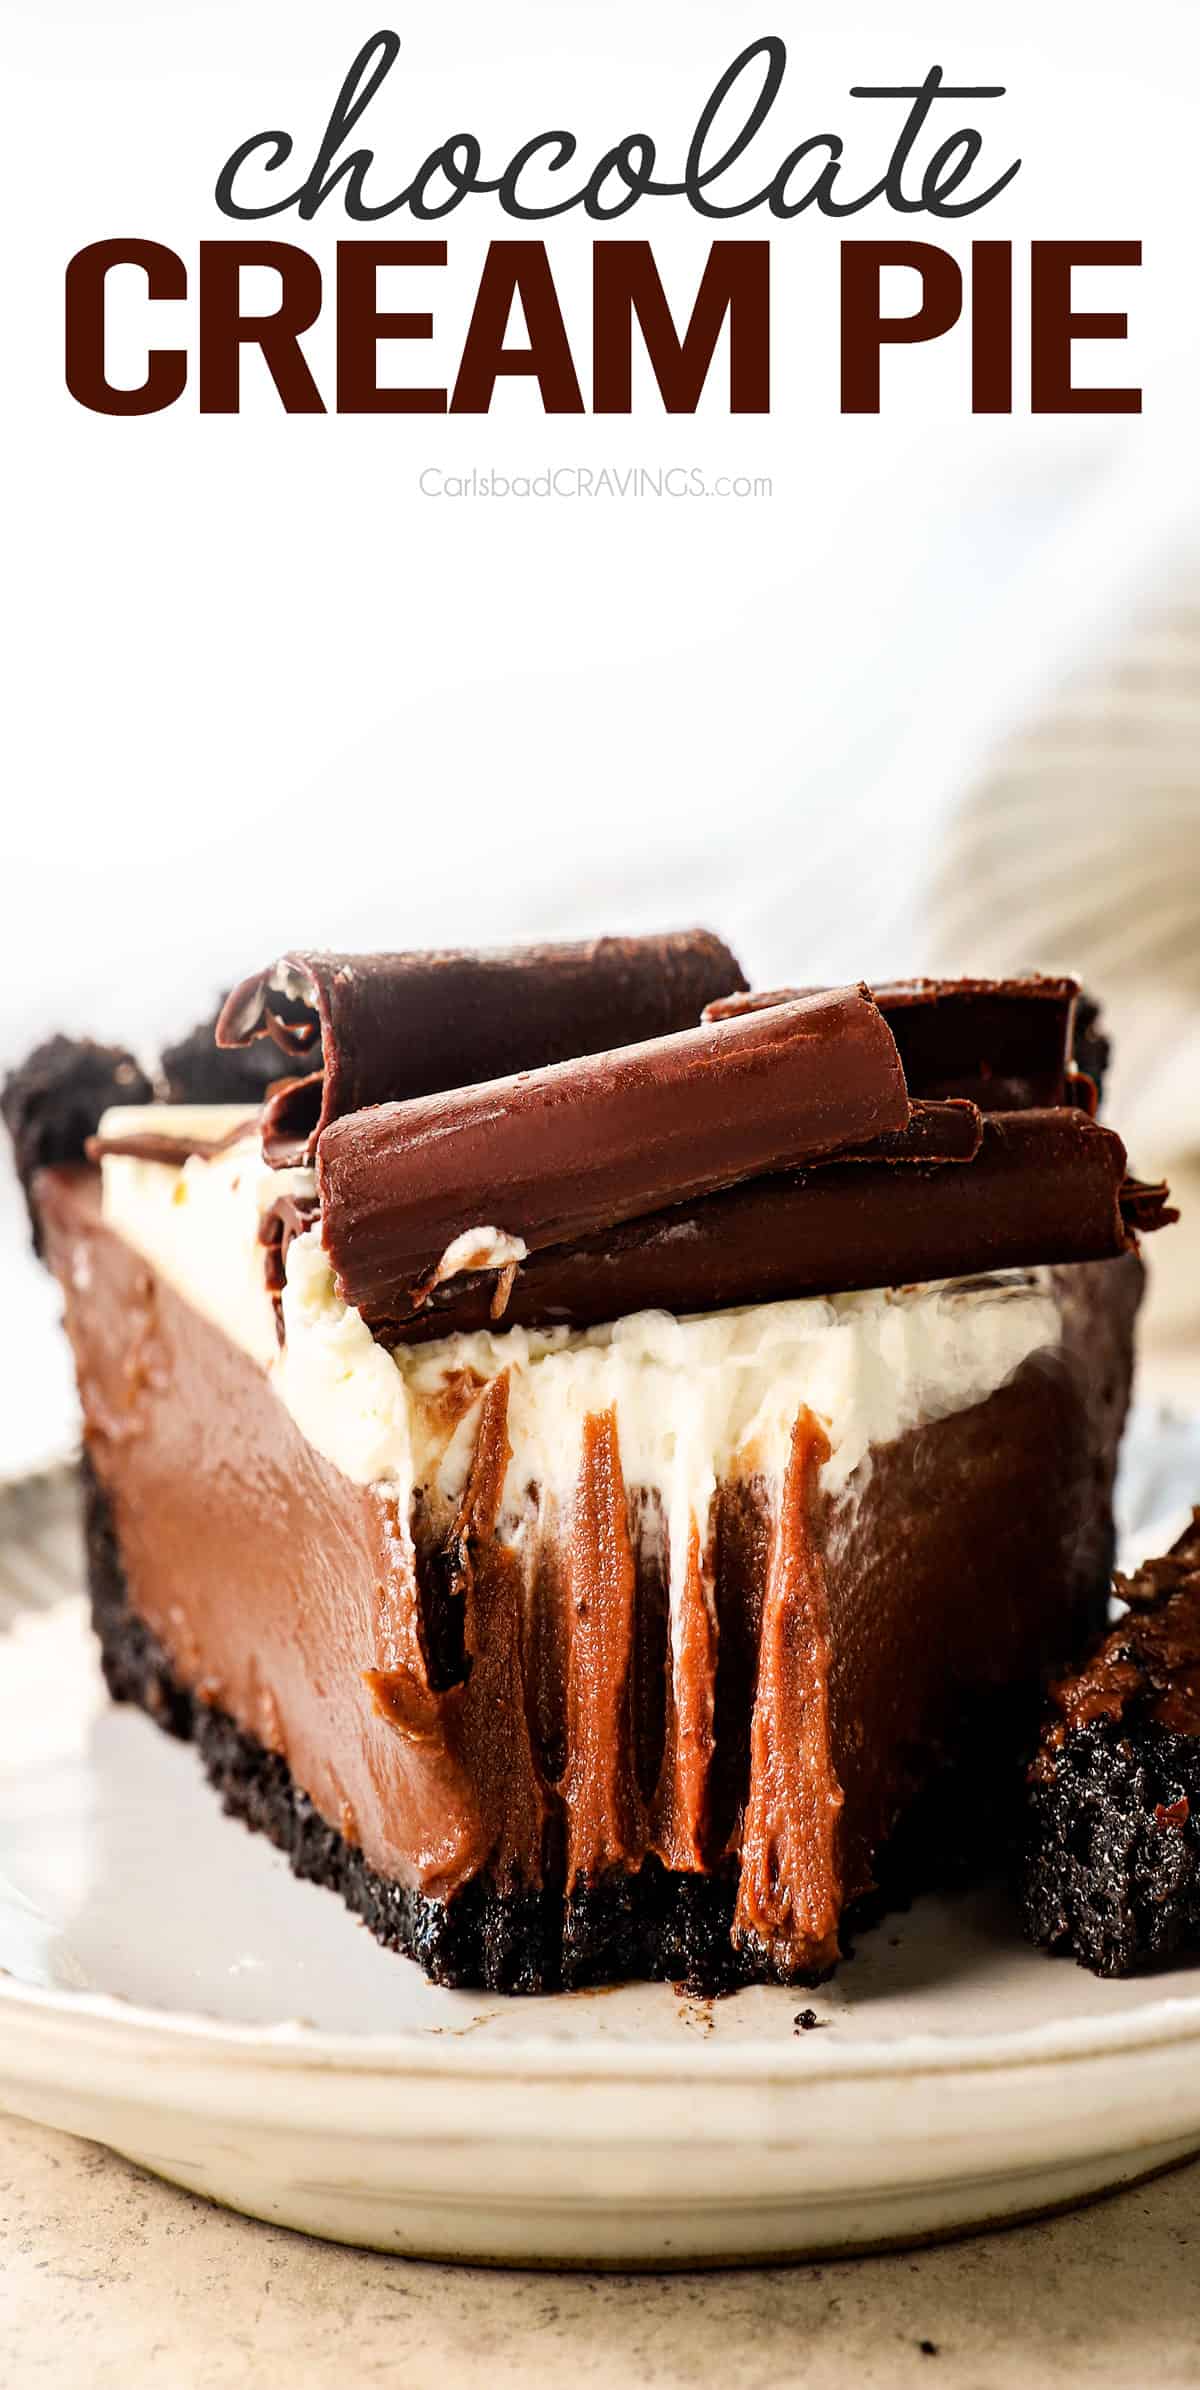
This Chocolate Cream Pie is made with an Oreo crust, chocolate custard filling, and stabilized whipped cream — all homemade! It’s rich, decadent, and so easy to prepare with my tips and tricks. Here’s what you’ll need to make the chocolate pie recipe (full measurements in the printable recipe card at the bottom of the post):
FOR THE OREO CRUST:
For the chocolate filling:
FOR THE STABILIZED WHIPPED CREAM:
HOW TO MAKE Chocolate Cream Pie
Homemade Chocolate Cream Pie is easy to prepare, but you have to pay attention to the technique. The key is to never stop whisking the egg yolks while tempering and to not overcook. Please don’t be intimidated, you’ll be head over heels over the end result! Let’s take a closer look at how to make this indulgent dessert. I also recommend watching the How To Make Video in the printable recipe card with full measurements at the bottom of the post:
Step 1: Make the Oreo Cookie Crust
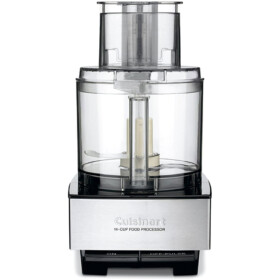
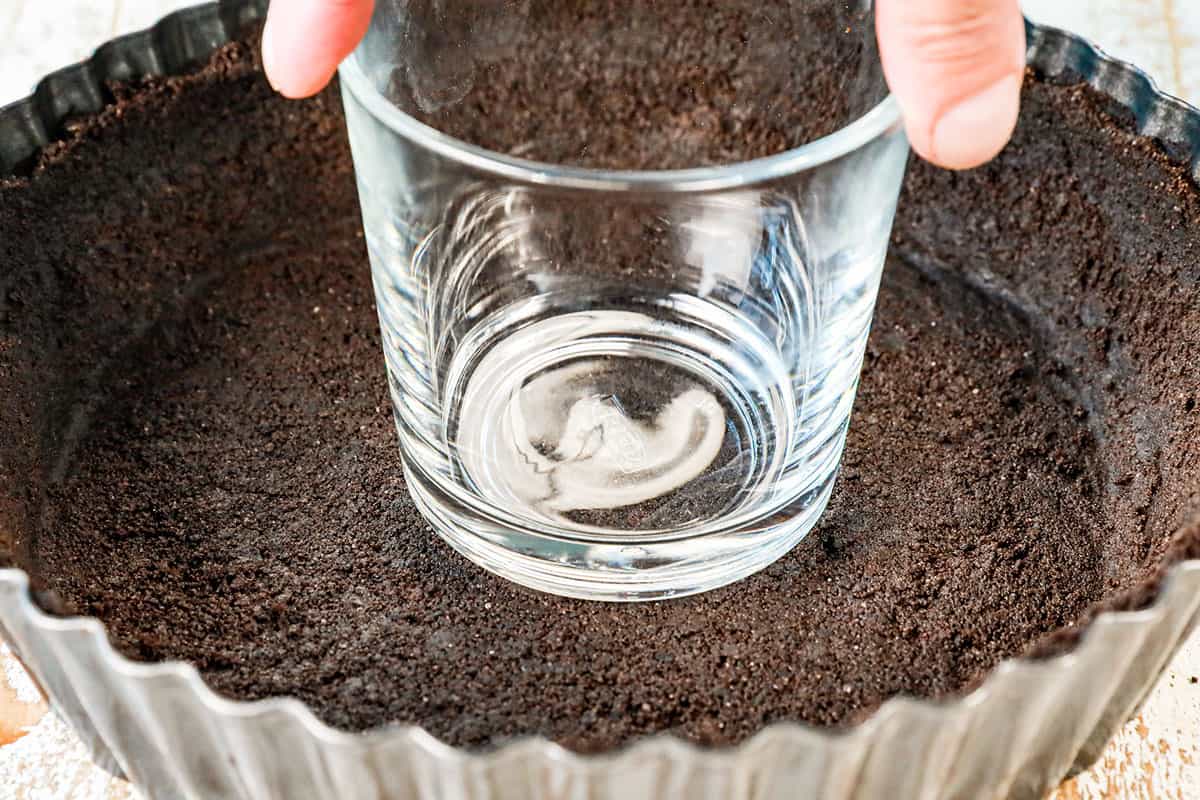
Process Oreos into crumbs: Make the crumbs by either pulsing the Oreos in your food processor or crushing in a sealable bag with a rolling pin/side of a can. You want very finely ground crumbs because they stick together better.Combine crumbs and butter: If you use your food processor, simply add the butter directly to the processor and process until the crumbs are moistened. If you don’t have a food processor, add the crumbs and butter to a bowl and stir until the crumbs are evenly moistened.Make the crust: Transfer the moistened crumbs to your pan and press firmly on the sides and then use the bottom of a glass to help create a compact, even bottom. This helps the crust stay intact and not crumble when sliced. Bake the crust: Bake the crust for 10 minutes then allow it to cool while you make the chocolate custard filling. Baking the crust before adding the filling allows it to seal together and cooling the crust before adding the filling prevents it from becoming soggy.
Step 2: Make the Chocolate Filling
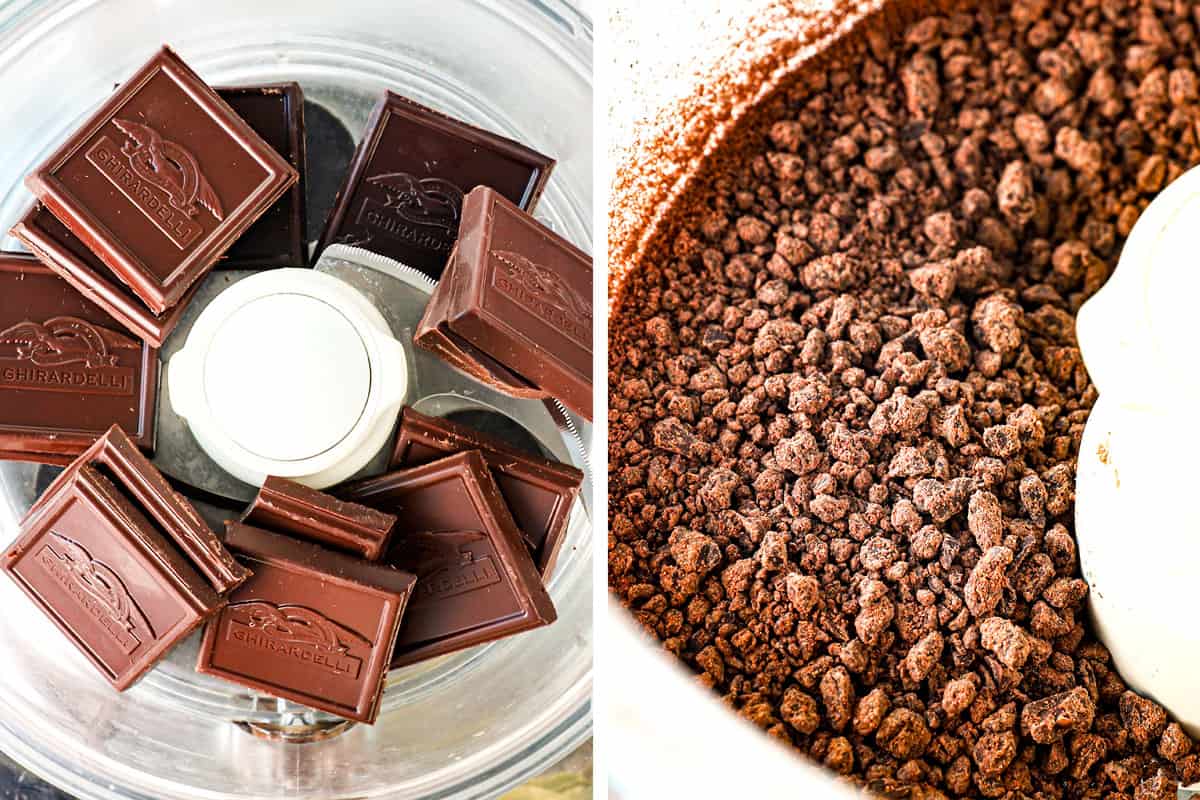
Process the chocolate: Before you process the Oreos, I suggest adding the chocolate and processing it into small pieces. This not only saves you time and elbow grease, but helps the chocolate melt seamlessly later in the recipe.
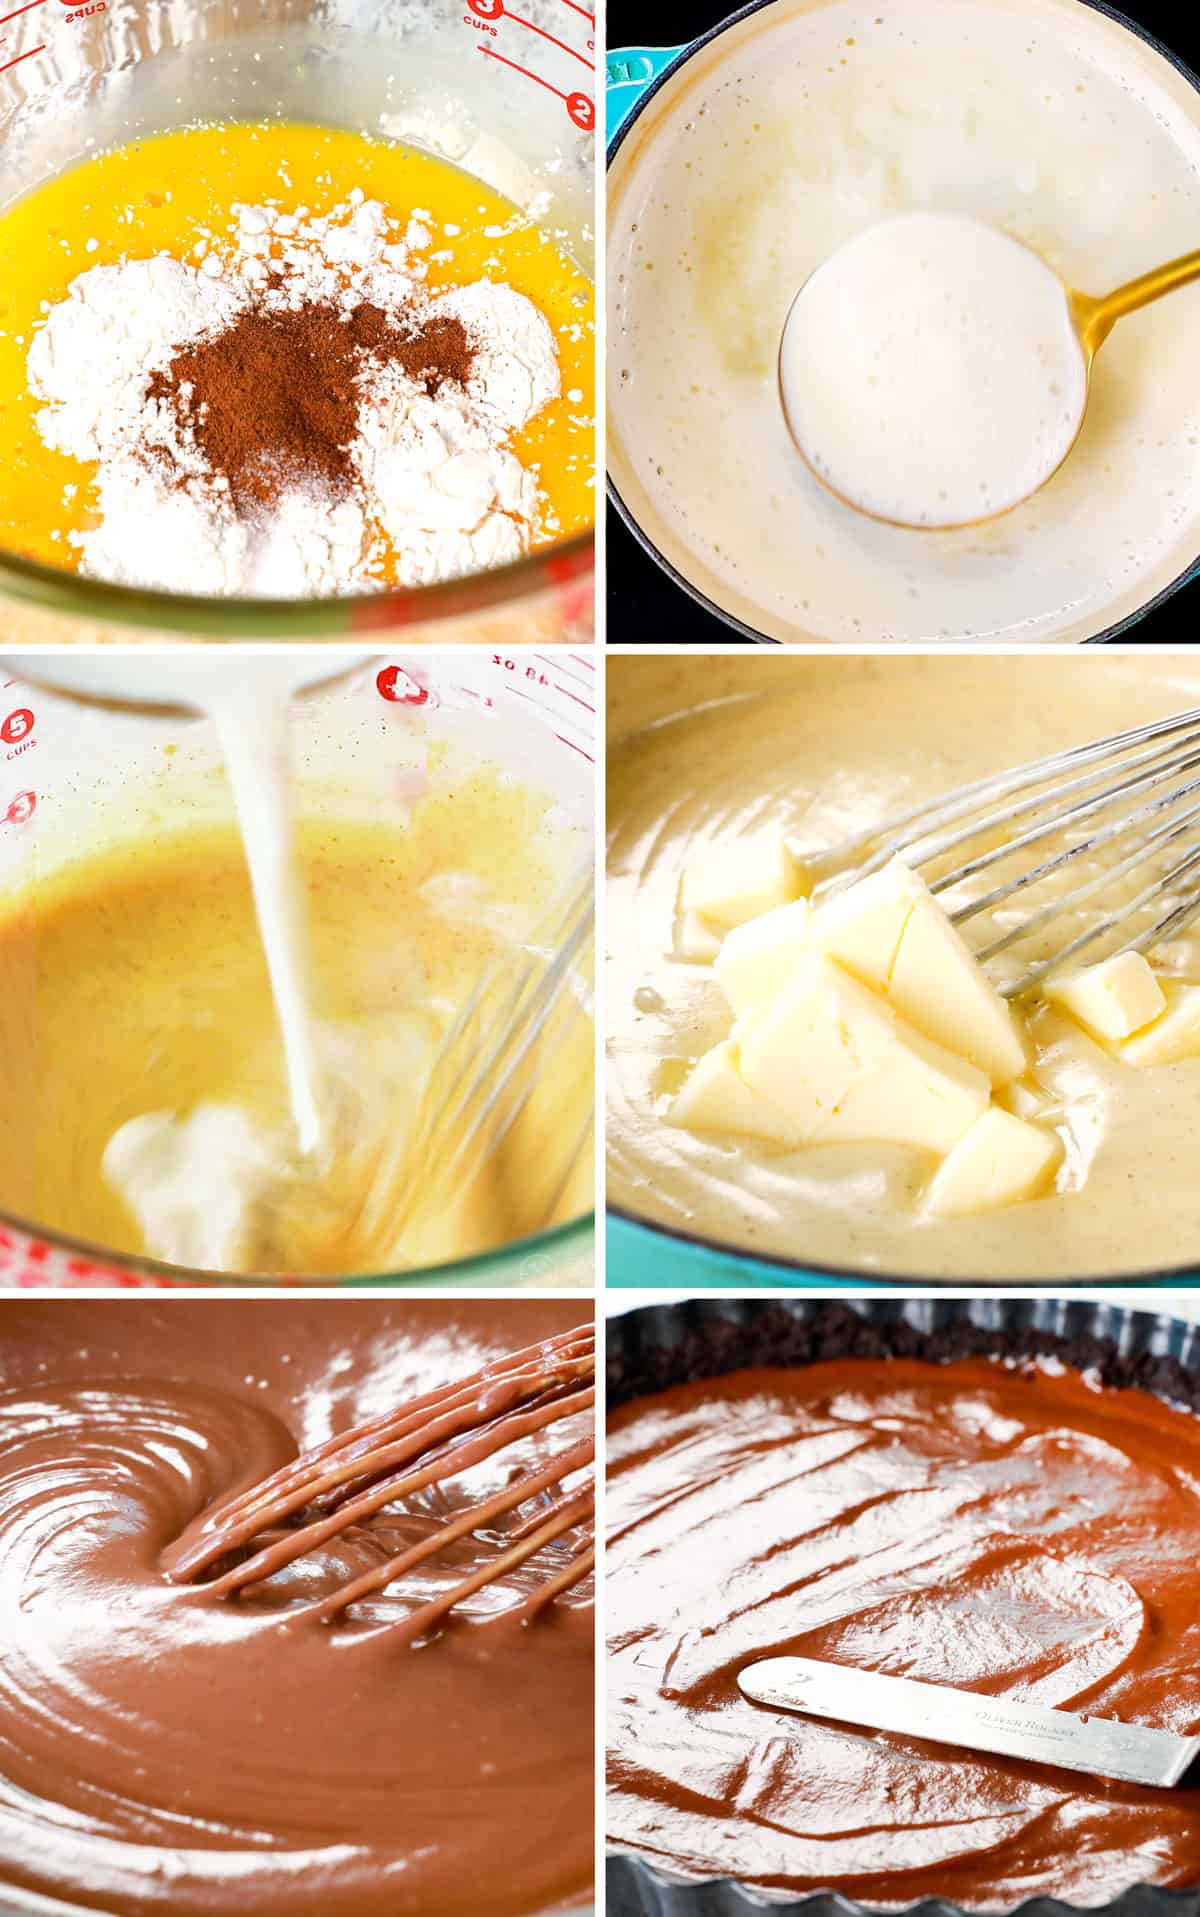
Whisk egg yolks: Add the egg yolks, cornstarch, cinnamon and salt to a large liquid measuring cup or medium mixing bowl and whisk until completely combined. The mixture may seem thick because of the cornstarch, which is normal.Dissolve sugar: Add the sugar and half and half to a medium saucepan and bring to a simmer, stirring often. The goal here is to dissolve the sugar completely before adding the egg yolk mixture.Temper the eggs: This step is key to the success of your entire Chocolate Cream Pie recipe, but don’t worry, it’s easy! You can’t just add the egg yolks to the simmering half and half all at once, or they will scramble. Instead, we will temper the egg yolks, which simply means, slowly raising the temperature of the egg yolks by whisking in a little warmed half and half into the whisked egg yolks a little at a time. It is best to go slow and gradually whisk in a little and then a little more and then a little more. This recipe specifies slowly streaming in ½ cup ladle a couple times, but you can just eyeball it. It is fine it it’s more. The key here is to NEVER STOP WHISKING!Thicken the mixture: Gradually whisk the tempered egg yolk mixture back into the saucepan until combined with the rest of the half and half (again, never stop whisking during this process). Bring to a simmer, whisking constantly (especially around the edges) until the mixture thickens and a few bubbles burst on the surface, about 1 minute. Remove from the heat and whisk in the vanilla. Whisk in butter and chocolate: The order here is important. First, whisk in the butter until melted. This helps cool the mixture down a bit before adding the chocolate, otherwise, the fats in the chocolate can separate. When adding the chocolate, it’s helpful to add it in batches, so it melts more smoothly. Transfer to the crust: Pour the filling into the cooled pie crust and smooth into an even layer. If your crust is too warm then wait and add it to a bowl instead, then the crust when ready.
Step 3: Chill the Pie
Refrigerate: Press a piece of plastic wrap directly on the surface of the filling. Refrigerate until filling is cold and set, about 3 hours, but best if overnight. You can add the stabilized whipped cream any point after 3 hours and continue to refrigerate until ready to serve. If using regular whipped cream, then pipe it on just before serving.
Step 4: Make the Stabilized Whipped Cream
Make the gelatin: Add the unflavored gelatin to a microwave-safe bowl, then pour the water over top. Let stand for 5 minutes and then microwave for 20 seconds. Stir to combine. Whip the heavy cream: Add the heavy cream, powdered sugar, and vanilla extract to a large mixing bowl. Whip just until soft peaks form. You can use a handheld or stand mixer to do this. Add the gelatin: Turn the mixer to low and slowly pour in the gelatin mixture. Mix until combined, then increase the speed to medium and continue mixing until stiff peaks form.
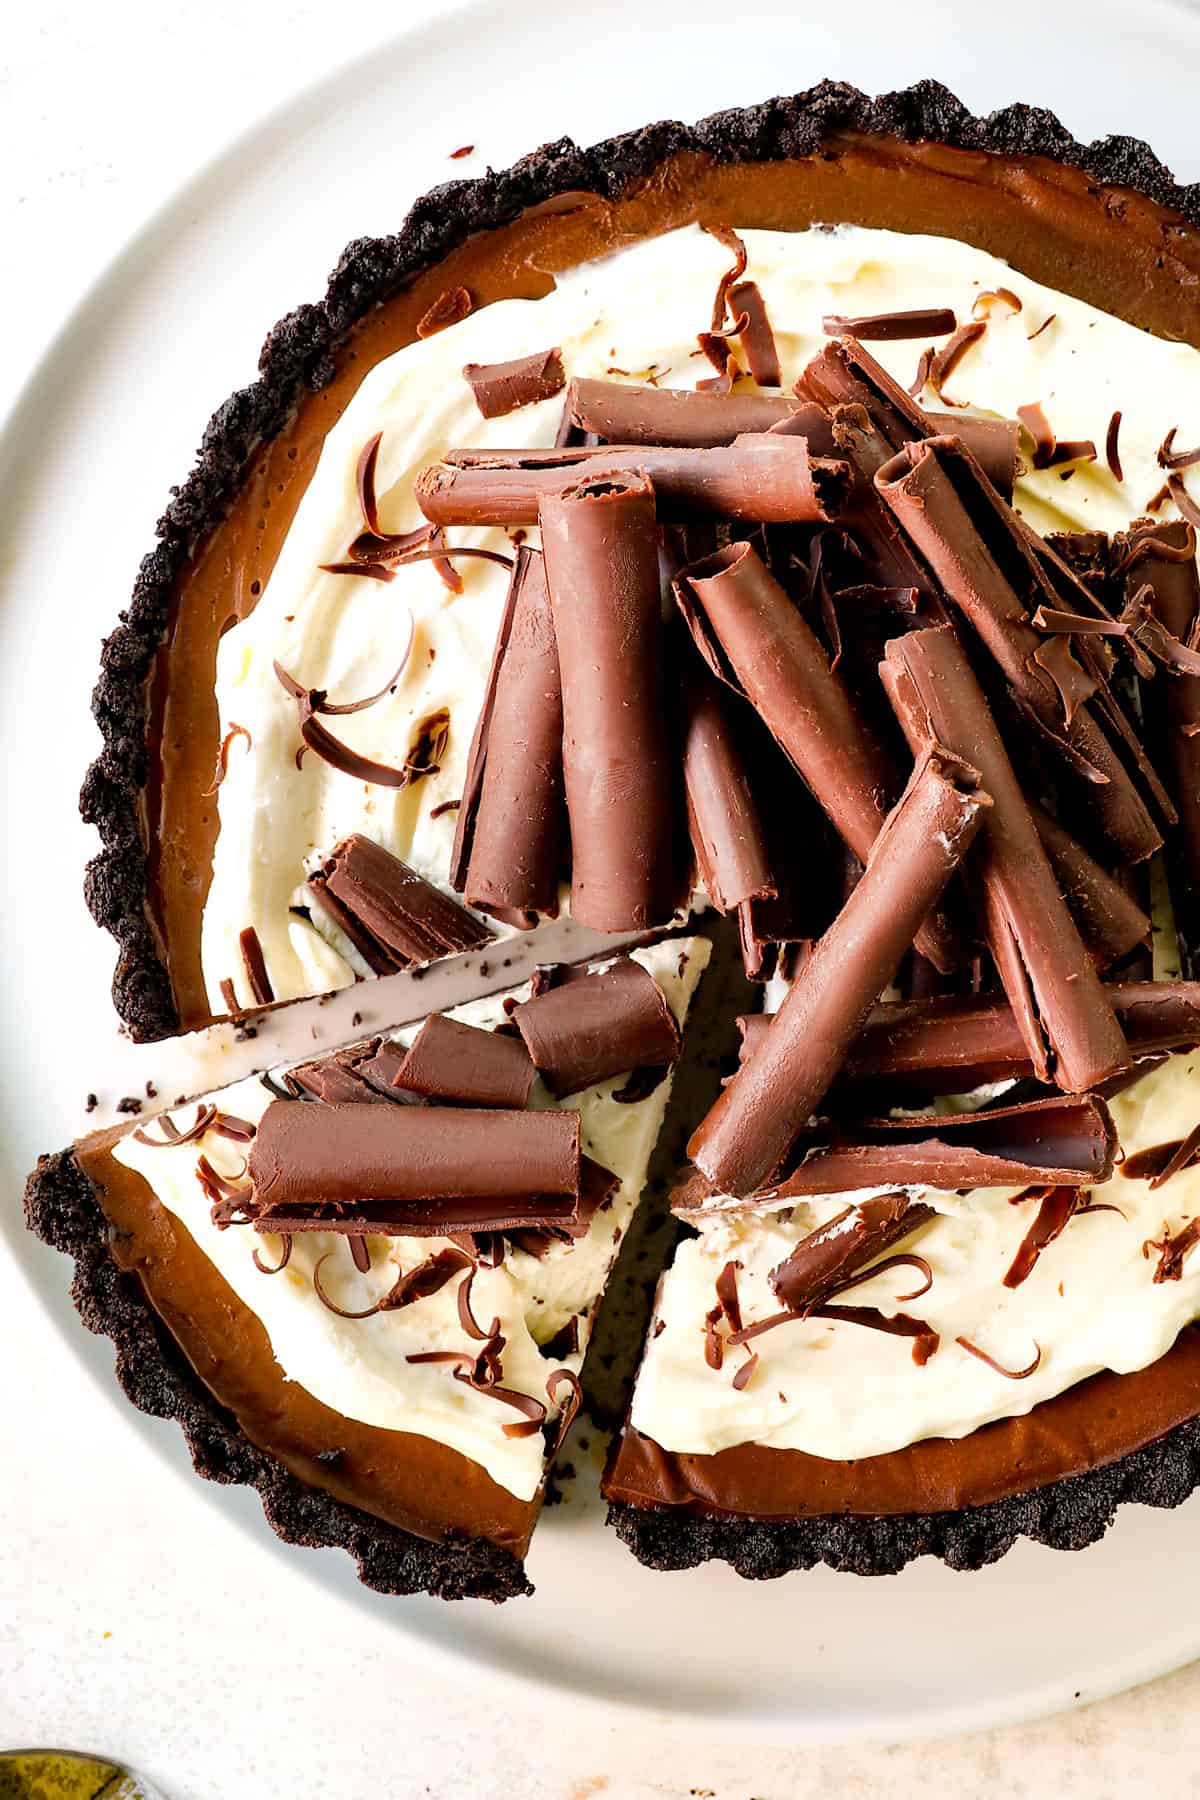
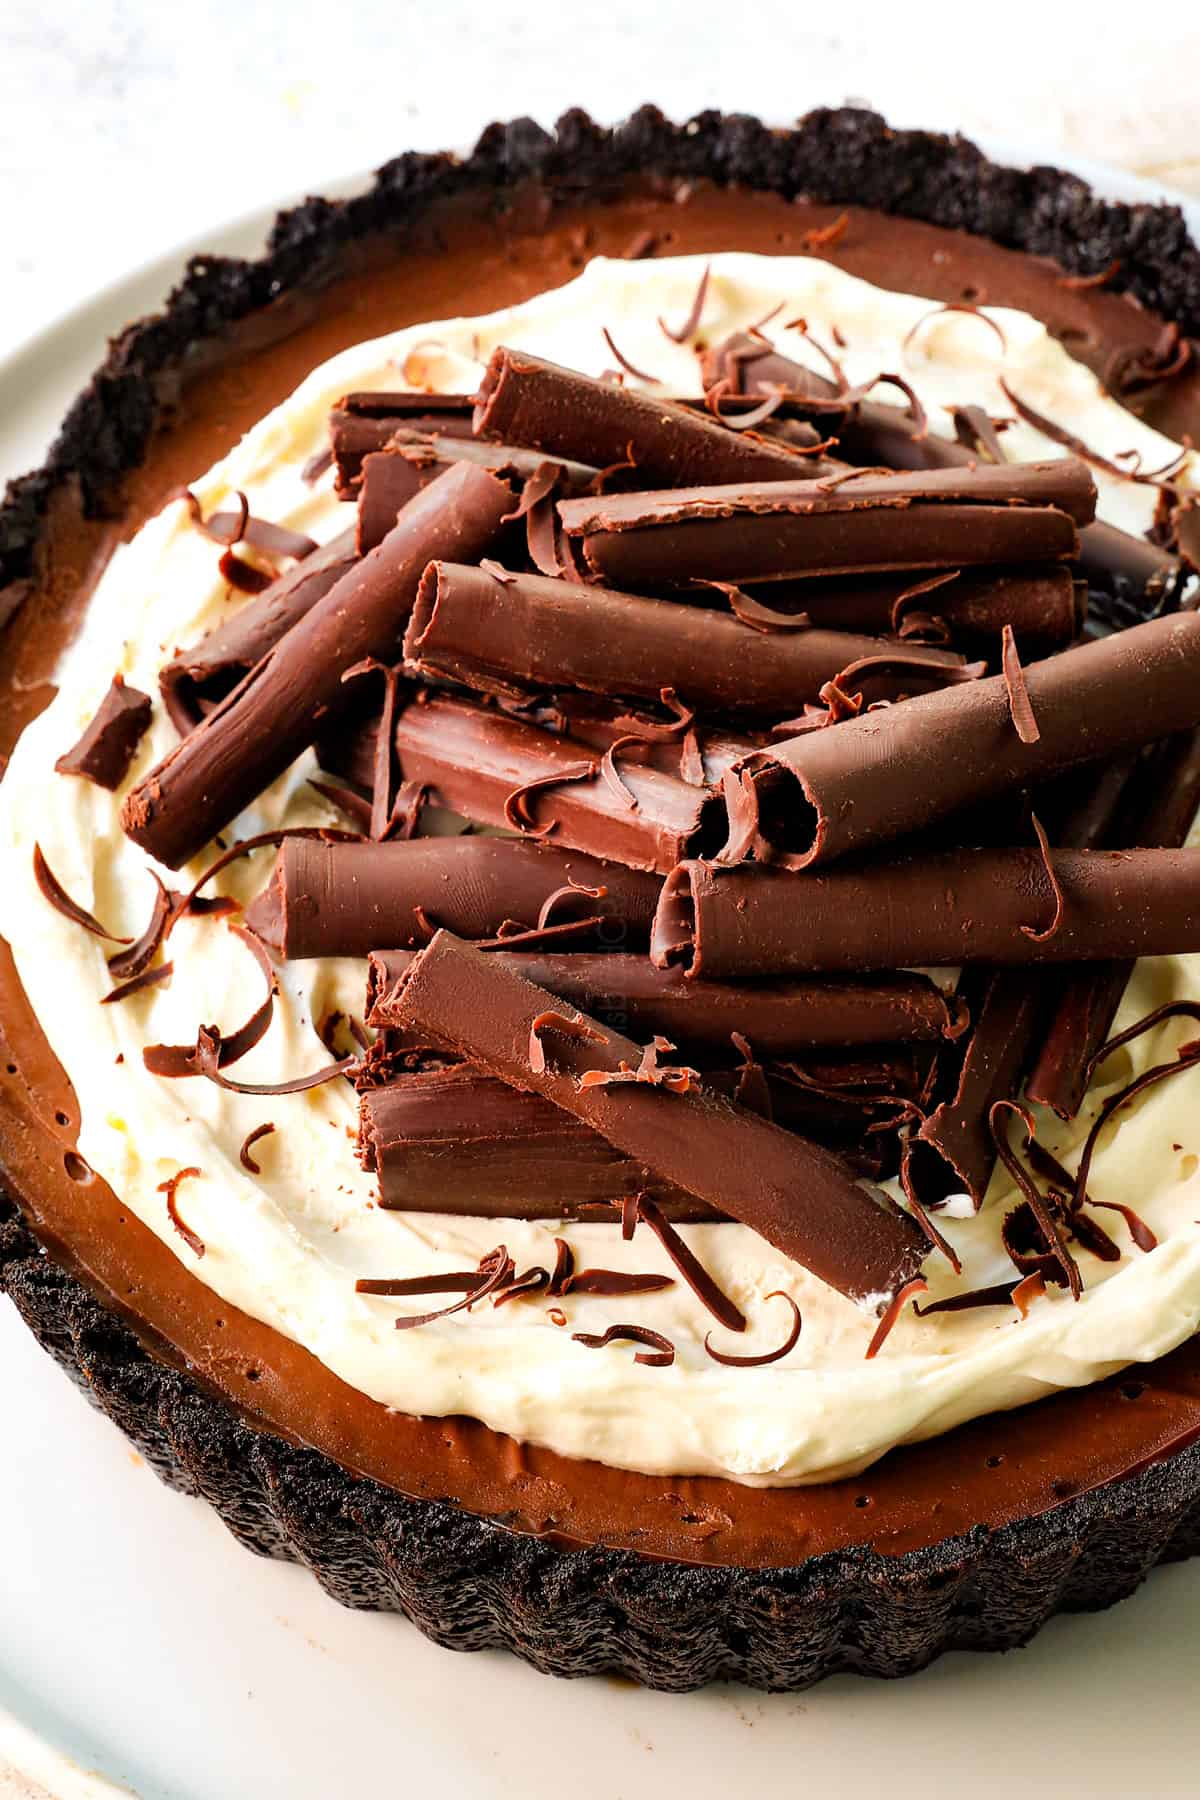
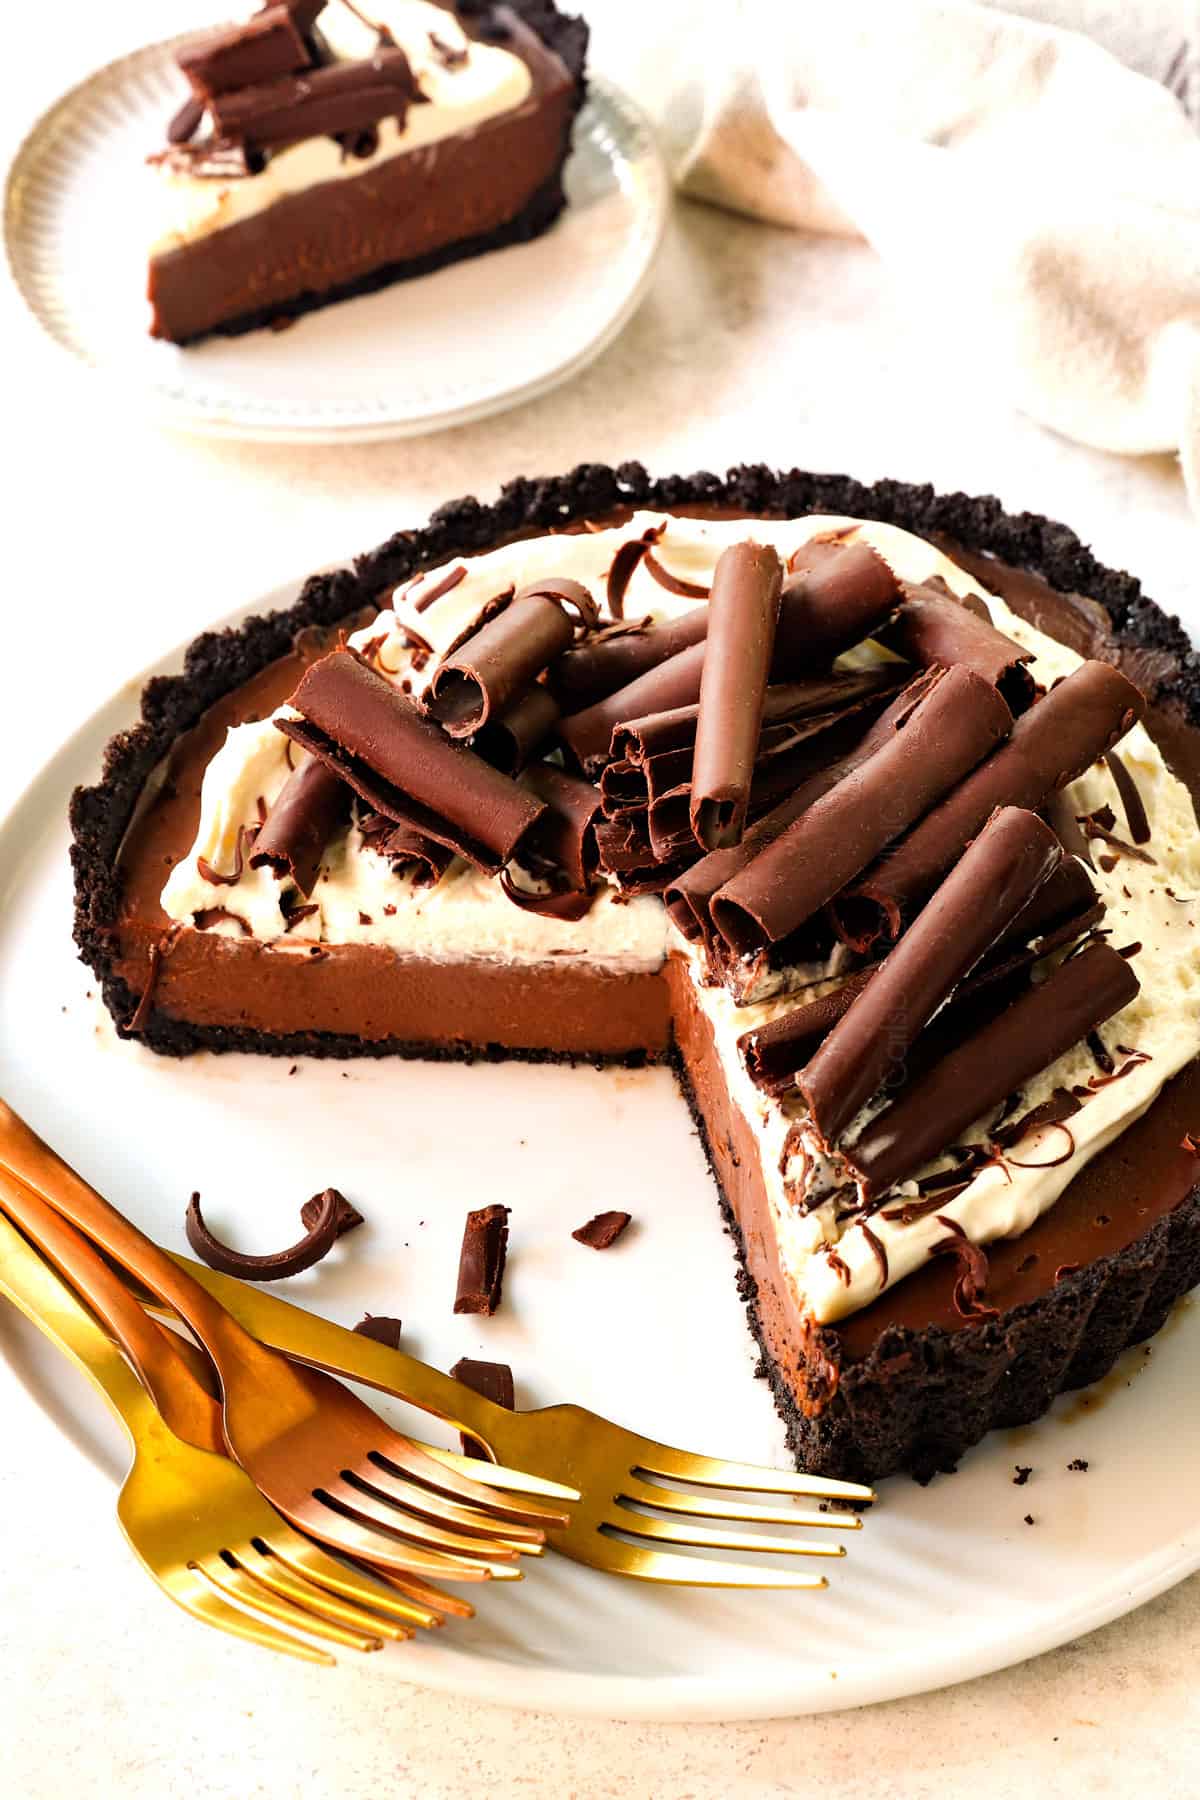
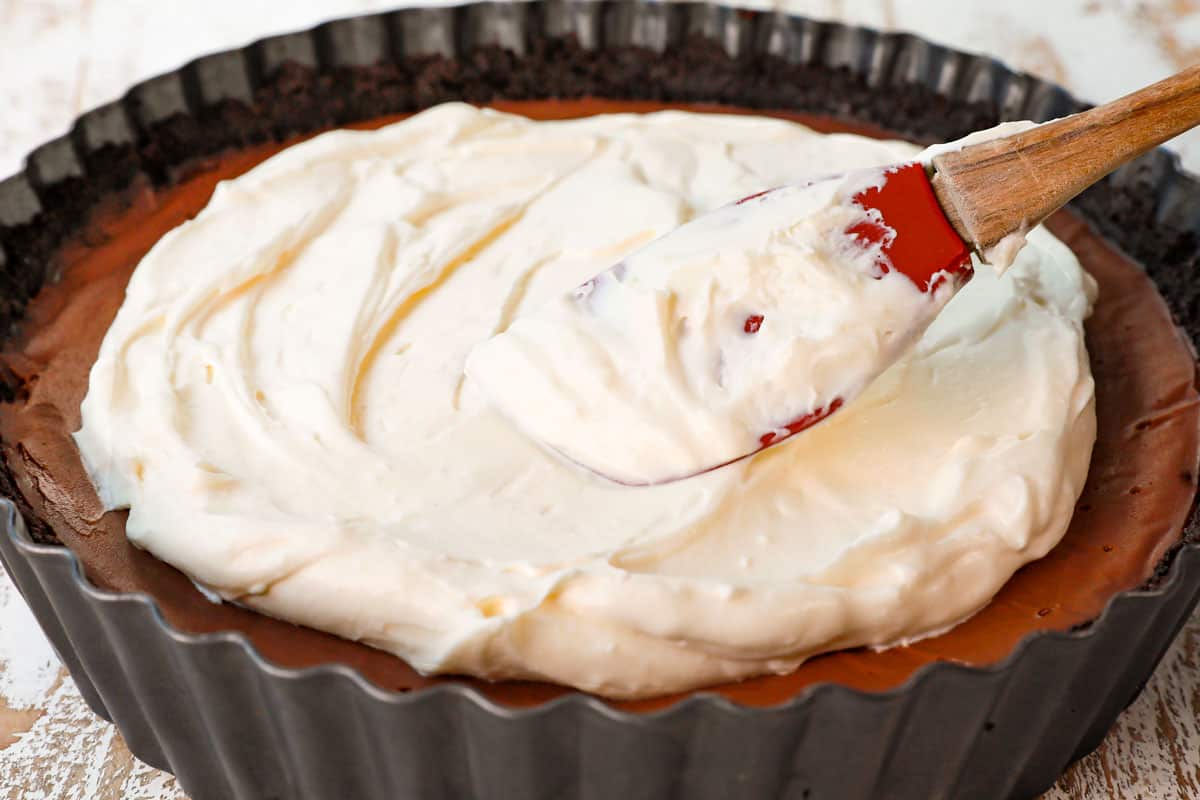
Step 4: Assemble the Pie
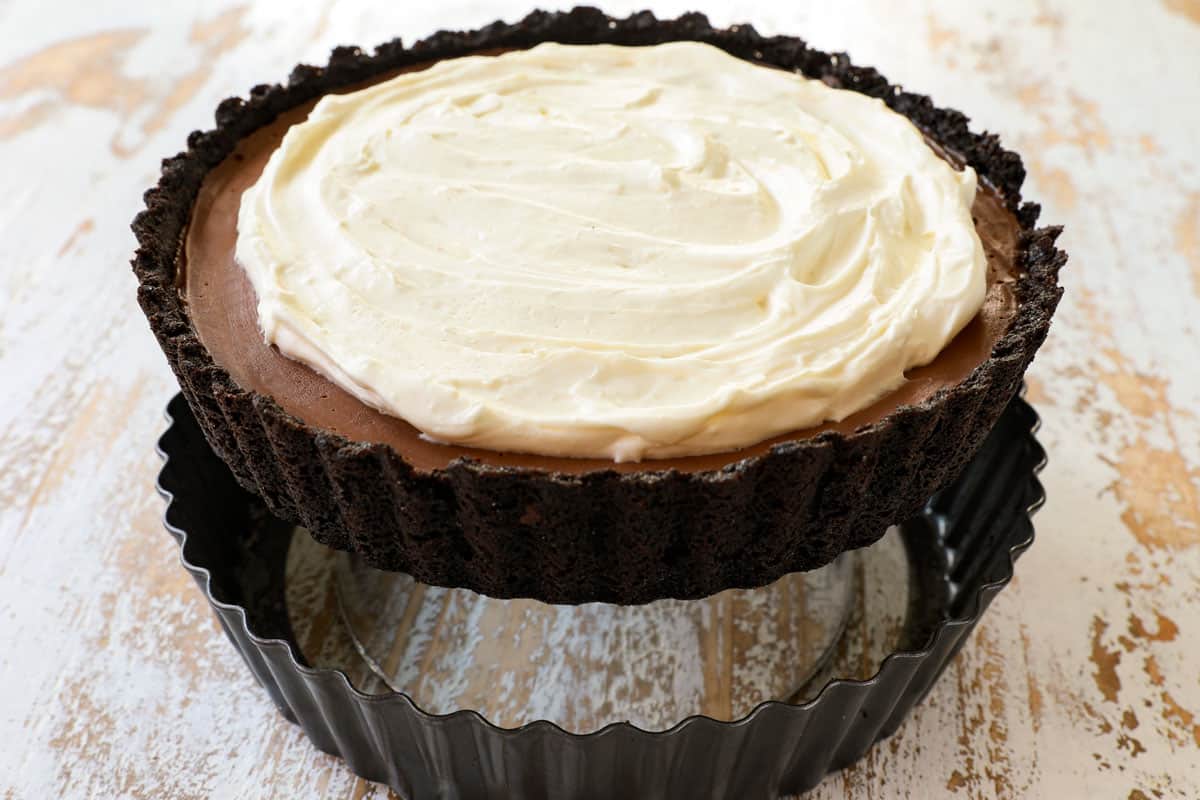
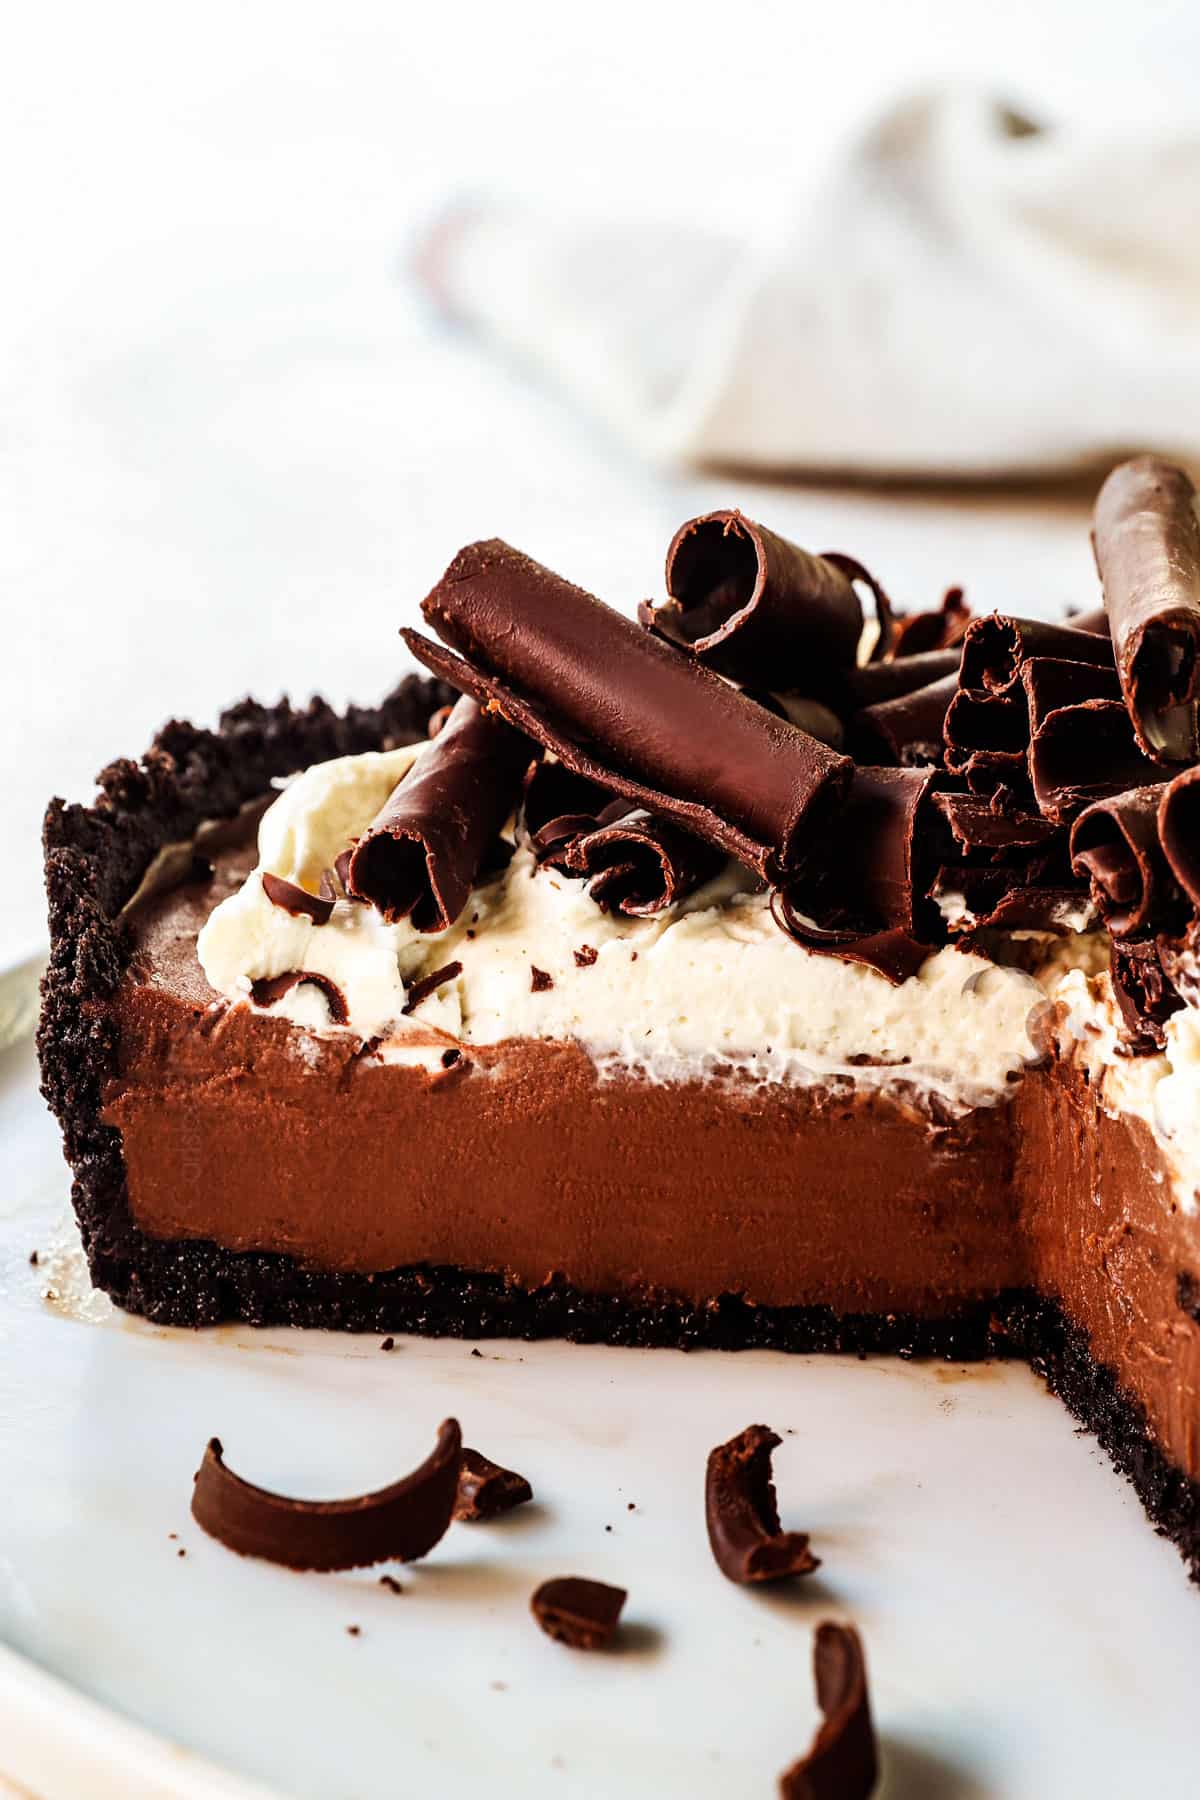
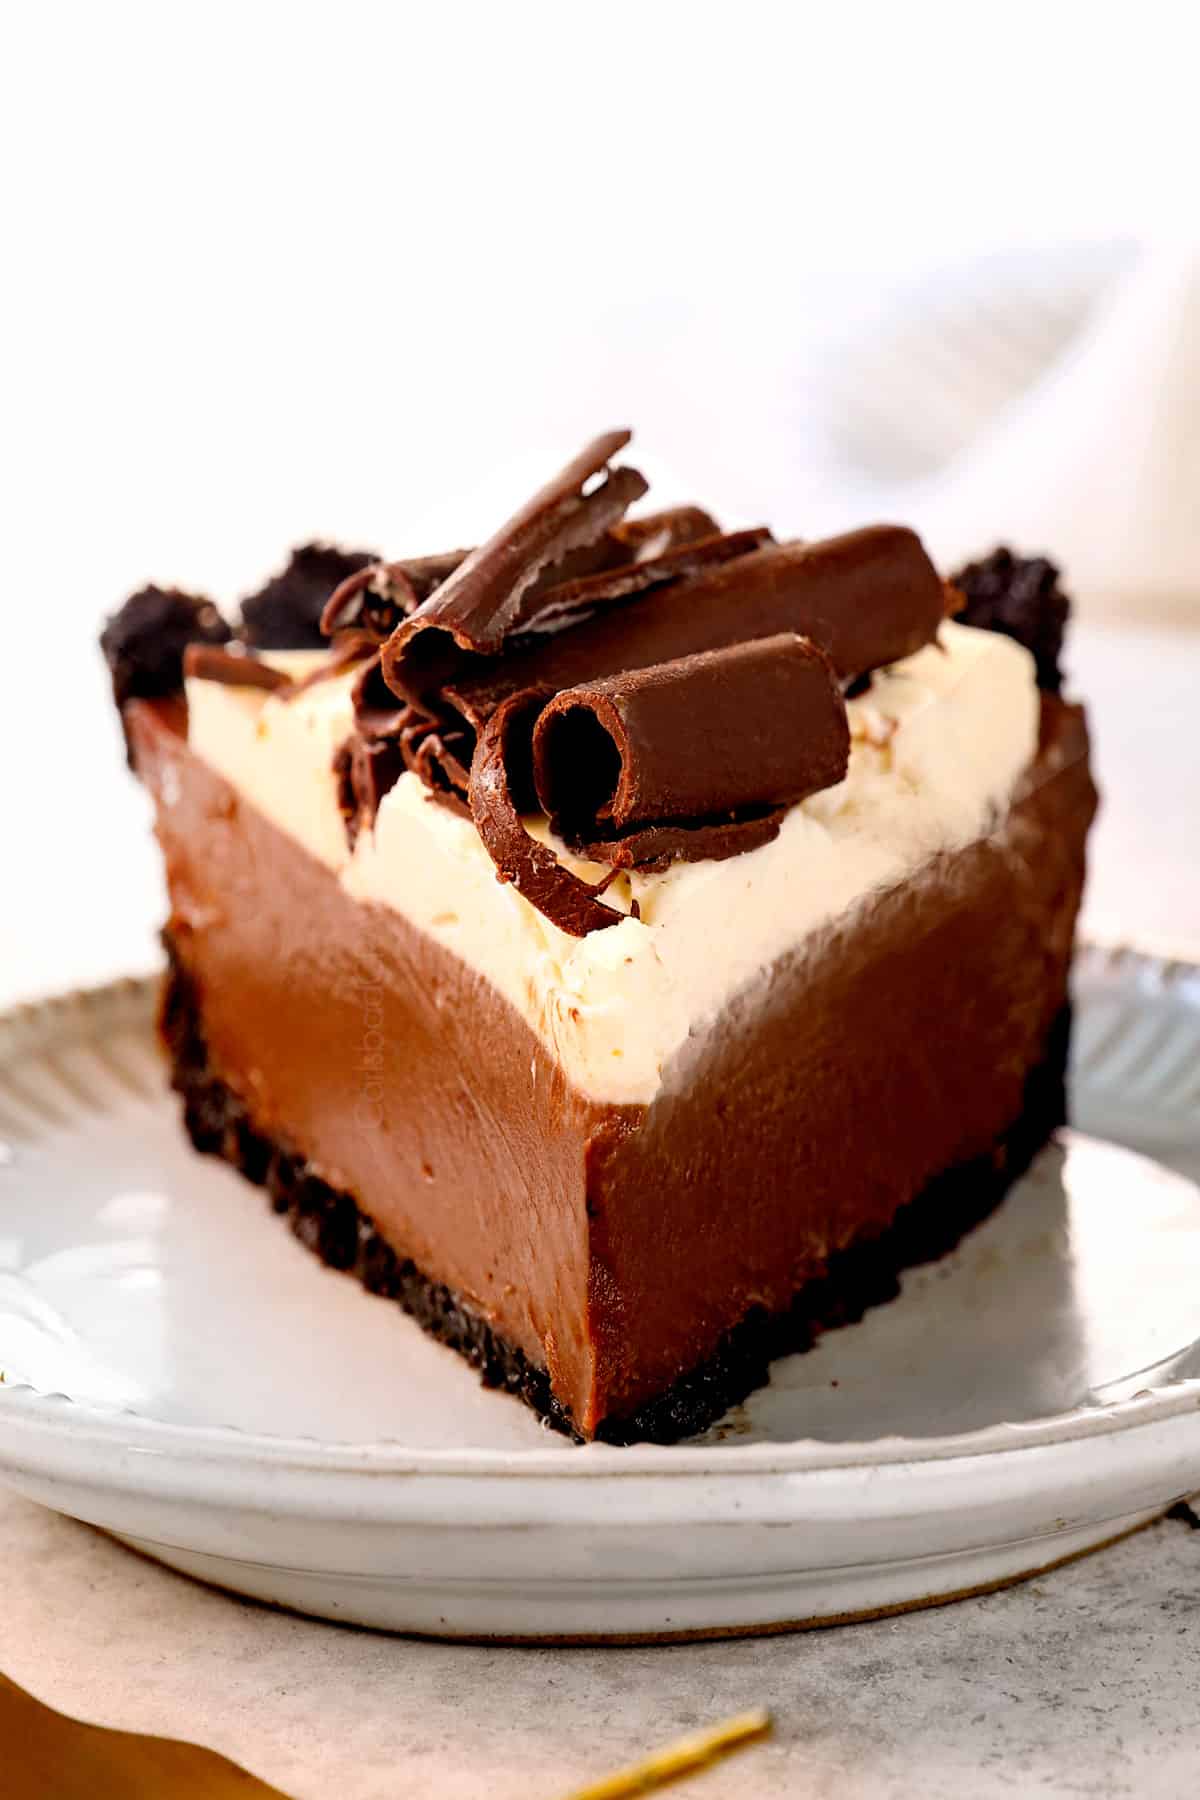
Add heavy cream: Spread or pipe the stabilized whipped cream on top of the filling. Garnish: Top the pie with chocolate shavings or chocolate curls, if desired.
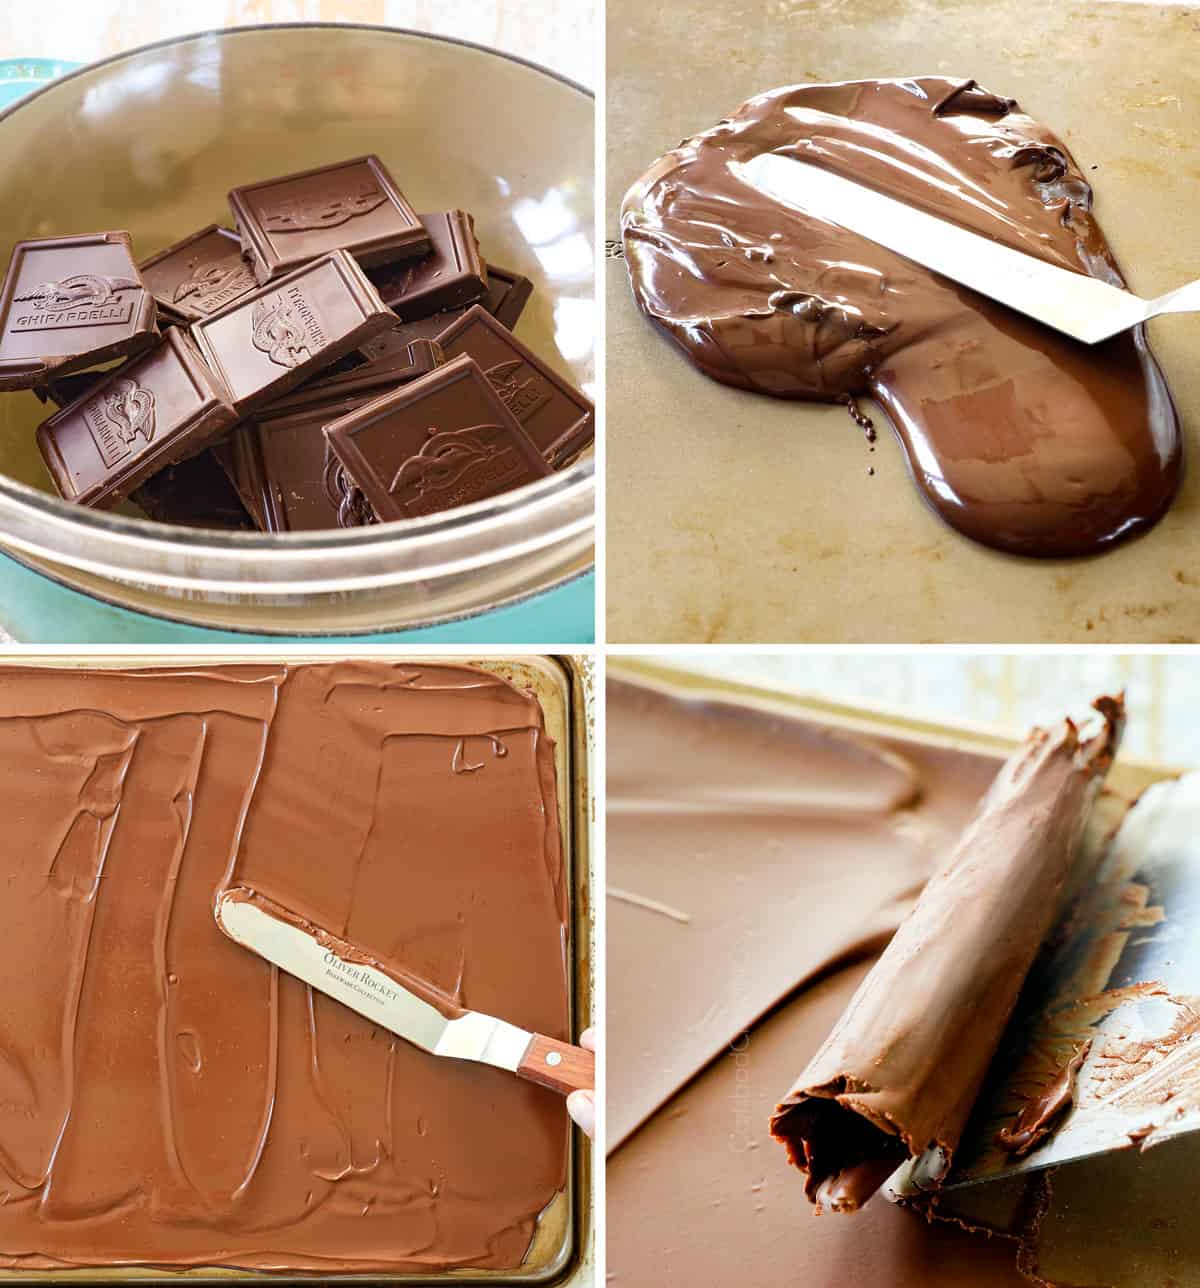
How to make Easy Chocolate Curls
You are welcome to decorate your Chocolate Cream Pie however you like. Some ideas include chocolate shavings (shave semi-sweet chocolate directly from the squares using a carrot peeler), mini chocolate chips, crushed candy, etc. but I love the “wow” factor that chocolate curls add – and they’re so easy to make! Tag @CarlsbadCravings and Use #CarlsbadCravngs Leave a Review, I Always Love Hearing From You!


![]()