PIN THIS RECIPE TO SAVE FOR LATER
Are you ready for the Best Homemade Hummus?
Oh hummus, how do I love thee? Let me count the ways….
What can’t you imagine your life without? Coffee? Diet Coke? Chocolate? For me, it’s hummus and tzatziki. I absolutely love hummus and am always dunking my veggies in hummus, slathering wraps with hummus or adding it to grain bowls.
In the past, I would always keep my fridge stocked with various tubs of hummus until I learned just how easy it is to make homemade hummus – and how much better it tastes. It’s not only uber fresh, lusciously smooth with a bright lemony garlic blend, but it’s made with just a handful of pantry friendly ingredients. This means you can make homemade hummus any time for the creamiest snack, or as a last-minute dip for movie night, backyard barbecues, parties or potlucks. Everyone will be raving about the recipe and wondering your secret to the creamiest every homemade hummus.
To arrive at this conclusion, I put several popular theories to the test from peeling individual chickpeas to using chickpeas straight out of the can, to Solmonov’s famous method of soaking dried chickpeas overnight and then boiling them in baking soda, to using canned chickpeas and boiling them with baking soda for 20 minutes, to overcooking chickpeas without the baking soda.
You would think peeling the chickpeas or boiling the chickpeas to a mush would produce promising results, but the hummus was dense and grainy. The only methods that blended into a silky, creamy, light, whipped texture were: 1) soaking dried chickpeas and boiling with baking soda and 2) boiling canned chickpeas with baking soda for 20 minutes.
The baking soda breaks down and softens the texture of the chickpeas so they are ready to blend into the silkiest hummus on the planet. The two methods were both SO unbelievably creamy and, in all honesty, practically indistinguishable from each other. So, in my opinion, it’s not worth using dried chickpeas for the best homemade hummus recipe.
Now that the hummus was ready to blend, I discovered that processing them for a full 4 minutes was another game changer. Two batches of hummus can be prepared exactly the same way and the one processed for longer will win every time.
Armed with this knowledge, I set off to tackle other theories such using ice verses ice water, adding tahini first or with the chickpeas and of course, the quantities of ingredients. My results are in this hummus recipe. I hope you love it as much as we do!
You can read on or use the “jump to recipe” button at the top of the post to skip to the hummus recipe.
What is hummus?
I’m sure you’re familiar with hummus from your favorite Mediterranean or Middle Eastern restaurant or the rows of options lining your grocery store shelf. But what exactly is hummus? Hummus is the quintessential Middle Eastern dip or spread popular in Turkish, Lebanese, Syrian, and Egyptian cuisine, among others such as Greek. It is made by blending chickpeas (garbanzo beans), tahini (sesame paste), lemon juice, olive oil, garlic and salt. It is appropriately named as hummus, also known as humus, houmous, hommus, or hommos, is Arabic for chickpea. Chickpeas are a legume packed with folic acid, dietary fiber, and protein. They are sweet and nutty and become luxuriously creamy when blended in a food processor. Tahini is a rich, nutty, slightly bitter paste made from sesame seeds and adds another depth of creamy flavor. Bright lemon juice balances out the rich nuttiness and garlic adds the requisite aromatic punch. Hummus can be made with just these simple ingredients or there are thousands of variations (see hummus recipe variation section) – you can add almost anything to hummus! The hummus company Sabra boasts over 14 different hummus flavors alone. Different countries and regions claim their own spin on hummus with different staple ingredients such as cumin or sumac. Hummus is traditionally served cold as a dip for pitas or veggies, as a spread for wraps or sandwiches or in grain bowls or salads. Once you learn how to make your own homemade hummus, you will be adding it to everything!
Origins of Hummus
Hummus is likely as old as its main ingredient, the chickpea, dating back more than 10,000 years to Turkey. The exact origin of hummus is difficult to pinpoint, however, as most Middle Eastern countries from Turkey to Lebanon, to Syria to Israel claim its origin, even earning the phase, “hummus wars.” Hummus expert Rosenfeld said, “Hummus is a Middle Eastern food claimed by all and owned by none.” We do know that the first recorded recipe for hummus appeared in a 13th century Egyptian cookbook, but it was likely a common staple for centuries before that. American food historian Charles Perry explains he believes Damascus, Syria, to be the most likely candidate as the originator of hummus. He states, “Historically, Egypt has been more likely to adopt Syrian dishes than vice versa.” He further explains Damascus was a sophisticated city with a powerful ruling class: “The practice of whipping hummus up against the wall of the bowl indicates a sophisticated urban product, not an ancient folk dish.” In conclusion, although cultural appropriation is an important issue, when it comes to hummus, we will likely never know its true origin. One thing we can all agree on, however, is hummus is DELICIOUS!
Best Hummus ingredients
If you have never made homemade hummus before, you might be surprised how few ingredients it requires. Most of the ingredients can be found in your pantry right now, and if not, they are easy to stock which makes hummus the perfect last-minute dip for potlucks, backyard barbecues, game day or just a family snack. You will need:
Chickpeas: also known as garbanzo beans are the quintessential ingredient for hummus. You can use canned chickpeas or make chickpeas from scratch by soaking and cooking (more on that below). As far as quality canned chickpeas, look for Bush’s, Bob’s Red Mill or S&W Premium. Tahini: is a rich, creamy paste made from roasted sesame seeds and is super important for authentic tasting and uber creamy hummus. Tahini is widely available at the grocery store, usually by the peanut butter. Choose a brand that is made with 100% hulled sesame seeds. The tahini should be smooth and creamy, mild and nutty without tasting overly bitter. You can also make your own tahini with just sesame seeds and oil (instructions to follow). Along with hummus, tahini is also fabulous in salad dressings, dips, sauces and as a spread on sandwiches, toast, etc. One of my favorites is Mighty Sesame Co. Tahini made with Ethiopian sesame seeds (the gold standard). Extra virgin olive oil: is used both in the hummus and drizzled over the hummus. It not only adds flavor but imparts a luxurious texture. You will want to use extra virgin olive oil vs. olive oil because extra-virgin olive oil is made from pure, cold-pressed olives, whereas regular olive oil is a blend, including both cold-pressed and processed oils which give it a more neutral flavor. Lemon juice: fresh please for the best bright, zingy flavor. Store-bought lemon juice will taste stale and lacking, which will make your hummus taste stale and lacking. Of course, you can always use bottled in a bind, but it won’t be quite as good. To not find yourself in a bind, freeze lemon juice by the tablespoon in an ice cube tray – now you’ll always have it fresh lemon juice at your fingertips! Garlic: fresh garlic is a must! Don’t use powders or even pre-peeled. This hummus recipe calls for 2 cloves garlic which you will want to mince before adding to the food processor. Feel free to use more or less garlic to suite your personal taste. You can also swap in roasted garlic for a rich, sweet and nutty caramelized taste. I’ve detailed how to make Roasted Garlic Hummus in my recipe variations to follow. Ground cumin: adds subtle notes of warm, earthy, nutty, with a hint of both sweet and bitter. Salt: enlivens the nutty, fresh flavors. I use regular table salt for this homemade hummus recipe, but you are welcome to use kosher salt or sea salt just be sure to use twice ss much because the crystals aren’t as dense as table salt. Also, make sure to salt to taste, using more or less as needed. Ice cubes: I use ice cubes before adding cold water to my homemade hummus to create a light, fluffy texture. After you add the ice cubes and you still want a lighter hummus, then you can add cold water a tablespoon at a time to smooth out. Garnish: don’t skip the garnish! A drizzle of EVVO, some fresh herbs, a few pinches of sumac or smoked paprika. Of course, these are all optional, choose your favs or none at all.
FRESH CHICKPEAS VS CANNED CHICKPEAS
You can use canned or dried chickpeas for this hummus recipe. For canned chickpeas, you’ll rinse, drain, then simmer for 20 minutes to soften; for dried chickpeas, you’ll soak, then cook on the stove, in the oven, in the slow cooker or pressure cooker. Making your own chickpeas can be short-cutted by combing the rapid-soak method (60 minutes +) and cooking in the pressure cooker (30 minutes) , but even then, this will require over 90 minutes. Although making your own chickpeas is more authentic, I am in the canned chickpeas camp because it makes homemade hummus super accessible, quick and easy; but most importantly, I don’t find a noticeable difference in taste or texture.
How to make Homemade tahini
Homemade tahini is easy to make and less expensive than store-bought if you purchase the sesame seeds in bulk. I recommend hulled sesame seeds as opposed to unhulled or sprouted. This homemade tahini recipe yields approximately ½ cup and can be kept in the refrigerator for one month. It is also easy to double and triple.
Add 1 cup hulled sesame seeds to a large skillet and toast over medium-low heat until seeds are golden (not brown). Transfer seeds to a large plate so they don’t continue to cook; cool completely. Add sesame seeds to your food processor and process for 1-2 minutes to form a crumbly paste. Add 3 tablespoons neutral oil such as canola oil or light olive oil and process until smooth and pourable, stopping to scrape the sides of the food processor as needed. Add a pinch of salt or more to taste and process to mix in.
Tahini substitutions: what can I use instead of tahini?
Tahini is a prominent flavor in hummus and should not be omitted for authentic tasting hummus – it will be missed. It is not only creamy and nutty but slightly bitter. If you find yourself in a bind or if you are allergic to sesame seeds, you can try unsweetened peanut butter, cashew butter, almond butter, or Brazil nut butter. Please be aware these nut butters taste different than tahini and therefore will affect the end result.
How to make Homemade Hummus
This homemade hummus recipe is SO easy to make, you’ll have it on weekly repeat! Here is my step by step guide for how to make hummus with photos. You will find the ingredient measurements in the printable recipe at the bottom of the post.
How to make Hummus from Dried Chickpeas
Cook chickpeas. If using dried chickpeas, you’ll need to soak and cook according to one of the aforementioned methods. If using canned chickpeas, rinse and drain then transfer to a medium saucepan. Sprinkle with baking soda then fill the pot so the chickpeas are covered by several inches of water. Bring to a boil then reduce to a simmer until the chickpeas are practically mushy and the skins are popping off; about 15-20 minutes. Don’t worry if the chickpeas get super mushy- that’s a good thing. Soft chickpeas = smooth hummus.
How to cook Chickpeas for Hummus
Cooking your own chickpeas for hummus is very easy, it just takes some planning ahead. Here are four methods to cook dried chickpeas: SOAK BEANS Before we jump into cooking the beans, you will need to soak the beans. You can either use the quick soak method which only takes about an hour but requires simmering the beans or the long soak method which take longer but is more hands off.
Quick soak method: add chickpeas to a large pot and cover with 3” of water above the surface of the beans. Bring to boil and boil for 5 minutes. Remove from heat and let the beans continue to soak for 1 hour. Long soak method: add the beans to a large bowl and cover with 3” of water above the surface of the beans – don’t skimp on the water because the beans will rehydrate and triple in size. Soak the beans for at least 8 hours or up to overnight.
COOK BEANS
How to cook beans on the stove: soak beans per preferred method, rinse and drain. Refill the pot with water along with ¼ teaspoon salt and ½ teaspoon baking soda. Boil 2-3 hours or until skins are popping off and they’re practically mushy. How to cook beans in the oven: no need to soak beans, simply add beans to a Dutch oven along with ¼ teaspoon salt and ½ teaspoon baking soda and cover with 3” of water above the surface of the beans. Cover beans with a tight-fitting lid and bake at 375 degrees F for 2 hours or until skins are popping off and they’re practically mushy. Add additional water if needed if the beans are not fully cooked after 2 hours. How to cook beans in the slow cooker: soak beans per preferred method. Add beans to slow cooker along with ¼ teaspoon salt and ½ teaspoon baking soda. Cover and cook on high for 4 hours or on low for 8-9 hours or until or until skins are popping off and they’re practically mushy. How to cook beans in the pressure cooker: no need to soak beans, simply add beans to your pressure cooker along with ¼ teaspoon salt, ½ teaspoon baking soda and cover with 1” of water above the surface of the beans. Close the lid, set pressure valve to “sealing.” Pressure cook on HIGH for 30 minutes followed by a 10-minute natural pressure release. Release steam by turning pressure release valve to “venting.” For hummus, the skins should be popping off and the beans should be practically mushy, if not, repeat the pressure cook process in 5-minute intervals.
MAKE AHEAD: For any of the above cooking methods, if you don’t use the cooked chickpeas immediately, store them in their water/juice (just like canned chickpeas) in an airtight container; refrigerate for up to 5 days.
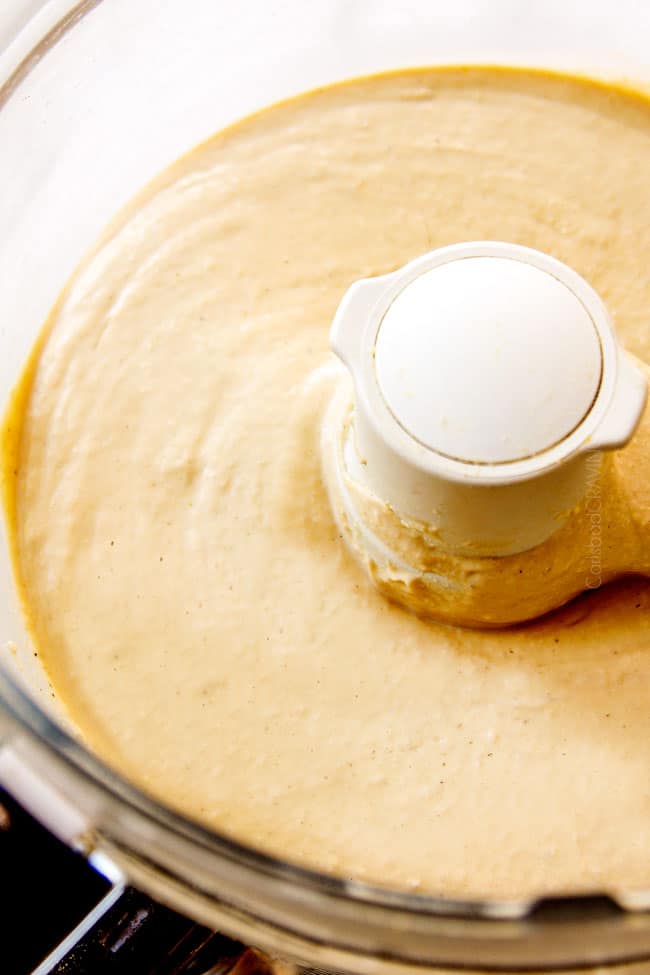
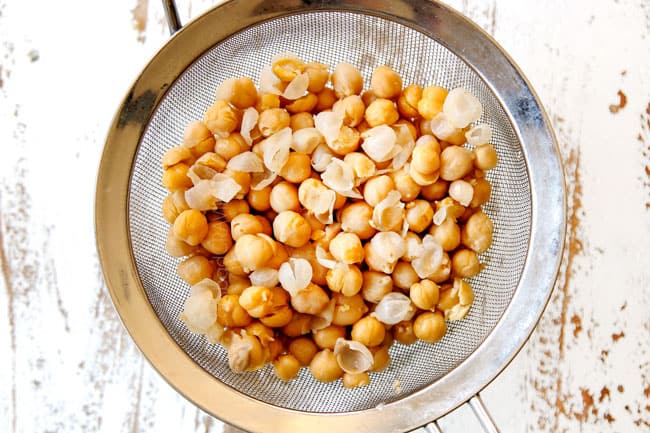
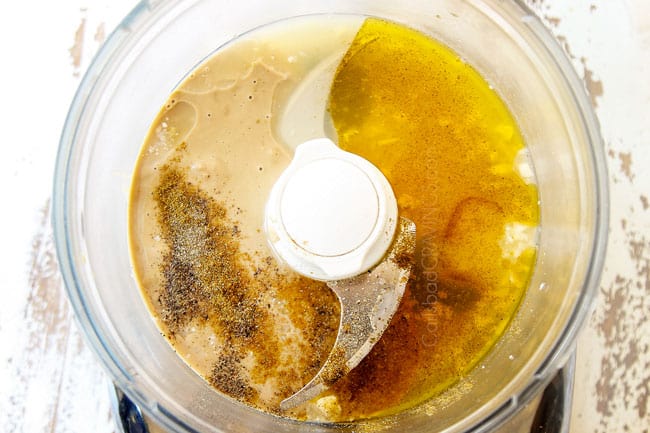
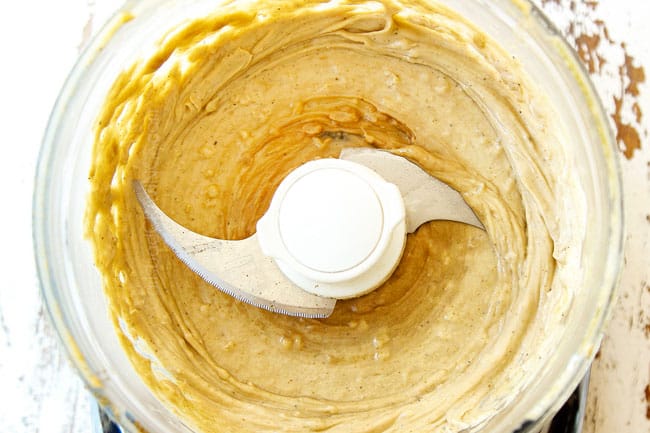
Peel chickpeas. Rinse and drain the cooked chickpeas in a fine mesh strainer, running them through your fingertips to rub off any loose skins. Most of their skins will have sloughed off while cook which makes them easy to pick out instead of peeling individual chickpeas. Pick out the noticeable skins the best you can, but don’t worry if you can’t get all of them. Any remaining skins will be soft from simmering and won’t affect the overall texture significantly. Blend tahini. Add tahini, lemon juice, garlic, olive oil, ground cumin and salt to your food processor and process for 2 minutes. This will not only chop the garlic and blend the ingredients but aerate them for lighter hummus.
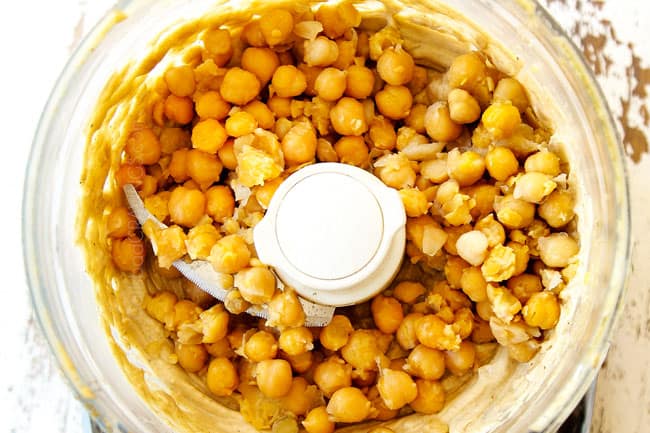
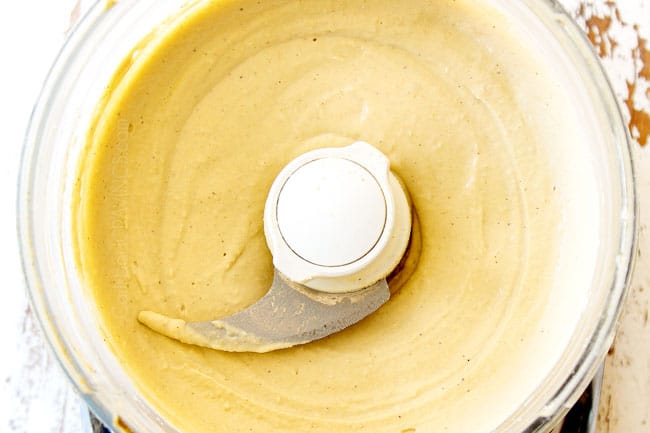
Blend chickpeas. Add the cooked and drained chickpeas along with 2 ice cubes to the food processor and process for 4 minutes – no less! Blending for 4 minutes is the secret to the smoothest hummus recipe.
Adjust consistency. After 4 minutes you can check your hummus for consistency and seasonings. For thinner hummus, add water, one tablespoon at a time, for tangier hummus add lemon juice, for more flavorful hummus, add salt.
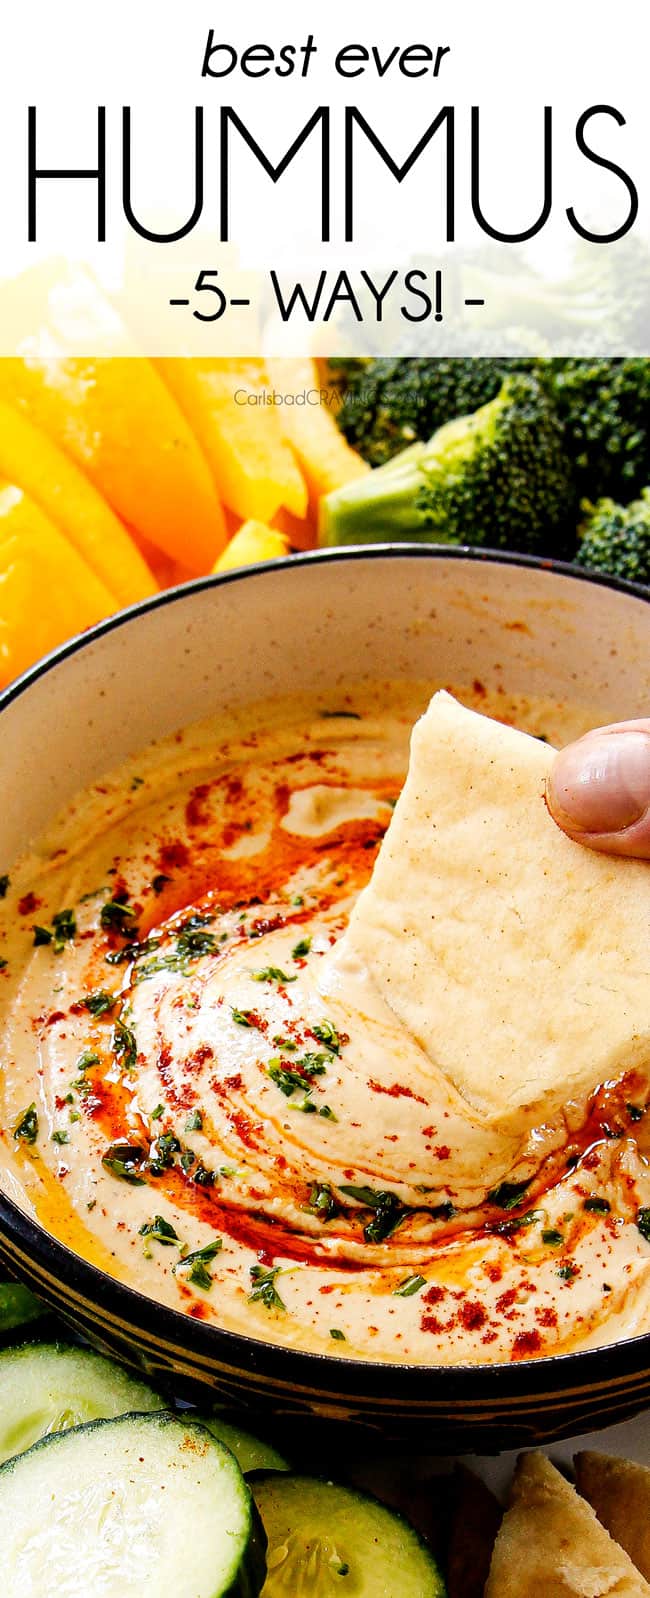
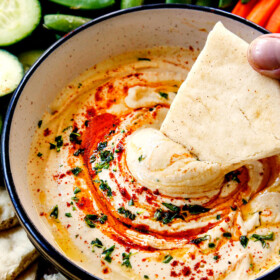
Garnish. If serving hummus as a dip, transfer to a serving bowl and drizzle with extra virgin olive oil. As far as other toppings – the sky is the limit!
Best Homemade Hummus recipe tips
Homemade hummus is wonderfully simple with just a few ingredients. This means it is important to use quality ingredients and the best techniques. Read on for a few tips and tricks that will transform your hummus recipe from ordinary to extraordinary.
Cook chickpeas with baking soda
Cooking either your canned or dried chickpeas with baking soda until almost mushy is the #1 tip for the creamiest homemade hummus. The baking soda softens the chickpeas and helps the skins slough right off of the chickpeas as they cook. This means you don’t have to painstakingly peel each chickpea – it’s okay to leave whatever skins don’t pop off by themselves. Note that the baking soda is key here, you can’t just simmer chickpeas until mushy and expect the same luxuriously smooth results. An added bonus of baking soda is it can help reduce gas and bloating – win, win! Some brands of canned chickpeas are harder than others, so don’t limit yourself to simmering them for 20 minutes. Cook the chickpeas until they are soft and the skins are popping off. It is better to “overcook” the chickpeas than undercook them.
Peel Chickpeas
Peeling the chickpeas is a game changer to create extra smooth hummus. Although you don’t have to peel each chickpea thanks to the baking soda, it is ideal to remove as many of the skins as possible. The baking soda will cause many of the skins to slough right off. If you don’t see a bunch of skins after you’ve simmered your chickpeas- it means you haven’t cooked them long enough. Cook until you see a bunch of scaly looking skins. Pick these noticeable skins out before you rinse the chickpeas. After you’ve picked over the chickpeas, rub them in between your fingers as you rinse them. This will quickly remove most of the remaining skins.
Use quality tahini
All tahini is not created equal. Unfortunately, tahini spans a wide range of flavor and quality. Some are more oily, nutty, pasty or bitter. I’ve had hummus so bitter it’s ruined my hummus – so choose wisely! The variances come from the type of sesames seed used, how they are processed and how they are roasted. Some sesame seeds have a higher oil-to-meat content which yields richer tahini, some seeds are left unhulled which yields more bitter, grittier tahini, some are roasted more which results in stronger-tasting tahini. In additional, some brands contain additives such as oil, salt sugar, and even coloring. So how do you know which tahini to purchase? It is actually quite simple. Tahini made from 100% roasted and pressed organic Ethiopian white Humera sesame seeds is considered the gold standard. Humera sesame seeds are named after Humera, a small town in Ethiopia. They are one of the most sought-after sesame seed types in the world due to their white color, favorable aroma, high oil content, incomparable richness and reliable nutty and sweet flavor. They are also hand-harvested in small amounts for consistent quality. Honorable mentions: Other tahini brands made from Humera sesame seeds include Seed & Mill and Pepperwood Tahini (they have two kinds, so look for “Organic Ethiopian Hulled Sesame Tahini”). If you don’t want spend quite as much money on tahini, you can still find quality tahini made from 100% sesame seeds, even if they aren’t Humera sesame seeds. Here is what to look for:
Made from 100% hulled sesame seeds Lighter colored Minimal oil separation in the jar
Use fresh tahini
Tahini can last for up to 6 months if refrigerated, but you’ll still want to check and make sure your tahini is fresh. If your tahini has been sitting around longer than that, it’s best to toss it because the sesame oil can become rancid over time. If you use rancid tahini without knowing it, your homemade hummus will taste terrible, not to mention you’ve wasted time and ingredients.
Stir tahini
Depending on your brand and age of tahini, you will notice that some of the solids and oil will have separated, similar to natural peanut butter. You will want to stir the tahini until it’s completely incorporated before scooping out so you don’t get mostly oil or all solids. If your tahini is extra difficult to stir, empty it into a bowl to mix.
Blend tahini first
You will be amazed at what this simple step does to elevate your hummus recipe! No matter what variation of homemade hummus you make, always process the tahini first with whatever additional add-ins before adding the chickpeas. This will whip the tahini into a smooth, rich, creamy paste while aerating the ingredients to create lighter, fluffier hummus.
Use ice cubes
Many hummus recipes call for ice water, but instead, use ice cubes! Ice cubes create a creamier, fluffier, more luxurious hummus as they slowly breakdown and are incorporated into the hummus – just think freshly churned ice-cream. They also help you not short change the processing. You can add ice water at the very end if your hummus needs to thin or smooth out.
Don’t rush it!
This tip is HUGE! After you add the chickpeas, let the food processor run for a solid 4 to 5 minutes. The longer you process the hummus, the smoother it will become, it’s as simple as that. For the most intoxicatingly creamy hummus, blend for the full 5 minutes.
How to make Hummus Creamier
There are several ways to make hummus creamier:
Peel the Chickpeas: Removing the outer skins of chickpeas will result in a smoother and creamier texture. Boil canned chickpeas with baking soda. The baking soda breaks down and softens the texture of the chickpeas and warm chickpeas can blend more easily. Use Tahini: Tahini is a key ingredient in hummus that contributes to its creamy texture. You can increase the amount of tahini you use to make the hummus creamier. Use Ice Water: Cold water helps the hummus emulsify better and become creamier. Blend Longer: Keep on blending if your hummus isn’t as creamy as you like. The longer you blend, the creamier! Soften Chickpeas: If you’re using dried chickpeas instead of canned, cook them until they are very soft and easily mashed. Overcooked chickpeas can be easily mashed into a creamy consistency. Add Yogurt or Greek Yogurt: Adding a small amount of plain yogurt or Greek yogurt can lend a creamier texture to your hummus while also adding a tangy flavor.
How do you thin hummus?
Reserve the ice water until the very end because you probably won’t need it. After your ice cubes are completely blended and you still would like a thinner hummus or a smoother hummus, then add ice water a little at a time until it thins to desired consistency.
Best Hummus Recipe variations
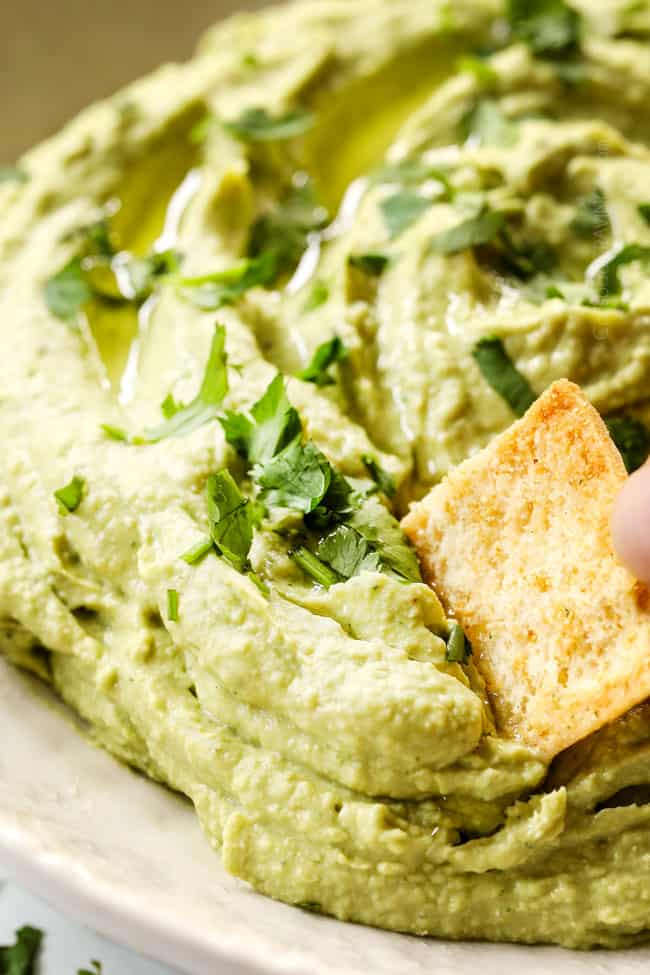
There are countless variations of hummus because hummus is a chameleon of sorts when it comes to flavorings and tastes amazing with practically everything. My favorite remains this traditional homemade hummus recipe, but don’t let that keep you from experimenting. I’ve also included recipes for my other favorite variations: sun-dried tomato hummus, roasted, red pepper hummus, pesto hummus and avocado hummus. In addition to trying these hummus recipes (section below), you can also blend any of the following into your homemade hummus when you add the tahini, before adding the chickpeas:
Harissa hummus: another fav! Harissa is traditionally a blend of smoked hot chili peppers, garlic, olive oil, cumin, coriander, mint and caraway. Add 1 ½ tablespoons, more or less to taste. Roasted garlic hummus: swap the fresh raw garlic for a 1-2 heads of caramelized, sweet, roasted garlic. You can use way more roasted garlic because it’s not as pungent. To roast garlic, rub any loose papery skin off 1-2 whole heads of garlic. Cut tips off each clove of garlic to expose a bit of the garlic. Lay garlic root side down on a foil lined baking dish. Drizzle garlic with 2 tablespoons oil. Crimp foil closed around garlic. Roast garlic at 300 degrees F until the garlic cloves are soft and fragrant, 45 minutes to 1 hour. Open the cool to cool; once cool enough, squeeze the garlic cloves out of their papery skin. Caramelized onion hummus: caramelize one diced yellow onion by heating 1 tablespoon olive oil in a skillet over medium heat. Reduce heat to medium-low and add the onion. Cook for about 15 minutes, stirring often until the onion is very soft and golden brown. The key here is to cook low and slow so the natural sugars in the onion caramelize. If the onion starts to brown too quickly, reduce the heat. Green goddess hummus: add ¾ cup of a combination of loosely packed fresh, leafy herbs such as parsley, basil and tarragon, 3 green onions or 3 tablespoons chives. Kalamata olive hummus: process ¾ cup pitted, drained Kalamata olives with the tahini. Olive tapenade hummus: tapenade is a chunky olive-based spread found next to the olives at your grocery store. It typically contains Kalamata olives, garlic, capers, parsley, thyme and olive oil. Blend ¼ cup tapenade in with the tahini. Roasted jalapeno hummus: heat a grill or gas burner to medium heat. Place two whole jalapeños over direct heat. Brown the entire jalapeno, flipping as the bottom starts to blister and brown. Place the jalapenos in a paper bag and let cool for 15 minutes, then peel off the skins (they should slip right off). Slice the jalapenos open to remove the seeds and membranes. Keep some of the seeds to add in afterwards if you would like spicier hummus. Pickled jalapeno hummus: add desired number of jarred jalapenos to the hummus with the tahini and enjoy the spicy tang. Salsa hummus: add ¼ cup of your favorite salsa and omit the ice cubes; add as needed. Salsa verde: is essentially adding roasted tomatillos, garlic, jalapeno, onions to your hummus for a flavor bomb. Omit the ice cubes an add as needed. Shortcut pesto hummus: I’ve provided a from-scratch pesto hummus recipe below, but you can also add ¼ cup (or more to taste) store-bought pesto hummus. Spinach hummus: blend in 1 cup fresh spinach. This works particularly well with other fresh leafy herbs. Sweet potato hummus: add half of a baked sweet potato, 2 teaspoons maple syrup, ½ teaspoon chili powder, a pinch of cayenne pepper, a pinch of nutmeg and additional salt to taste. Butternut squash hummus: prepare a baking sheet by lining with foil and spraying with cooking spray. Add 1 cup cubed butternut squash (½ inch cubes), drizzle with olive oil and season with freshly cracked salt and pepper. Bake at 400 degrees for 20 to 25 minutes or until fork tender. Process squash with tahini along with additional cumin, coriander and cayenne pepper (about ½ teaspoon each).
HUMMUS WITHOUT CHICKPEAS:
Beet hummus: is a little different in that you won’t just add beets but replace the chickpeas with ½ pound cooked beets. To cook the beets, scrub clean and cut the tops off. Place in a baking dish with 1/-4-inch water. Cover with foil and bake until fork tender. Fresh pea hummus: swap the chickpeas for 2 cups shelled peas, fresh or frozen. Add peas to a saucepan, cover with water and simmer for 5 minutes; drain. Pea hummus also likes other herbs such as mint and chives.
Seasoning variations:
You can completely change the flavor profile of your hummus by adding different seasonings. Here are just a few options:
Za’atar seasoning for an exotic blend of sesame, sumac, salt and herbs Fresh or dried herbs for a more herbaceous hummus Everything bagel seasoning with its mix of black and white sesame seeds, dried minced garlic and onion, sea salt flakes and poppy seeds – extra yummy for pitas! Dill and oregano for a Greek tzatziki flair Cajun seasoning for an instant oomph of spicy heat Spice it up with cayenne pepper, chipotle chile powder, or blend in jalapenos or chipotle chile peppers Lemon pepper for a bright and peppery flair Layer the flavor with cumin, coriander, paprika, etc.
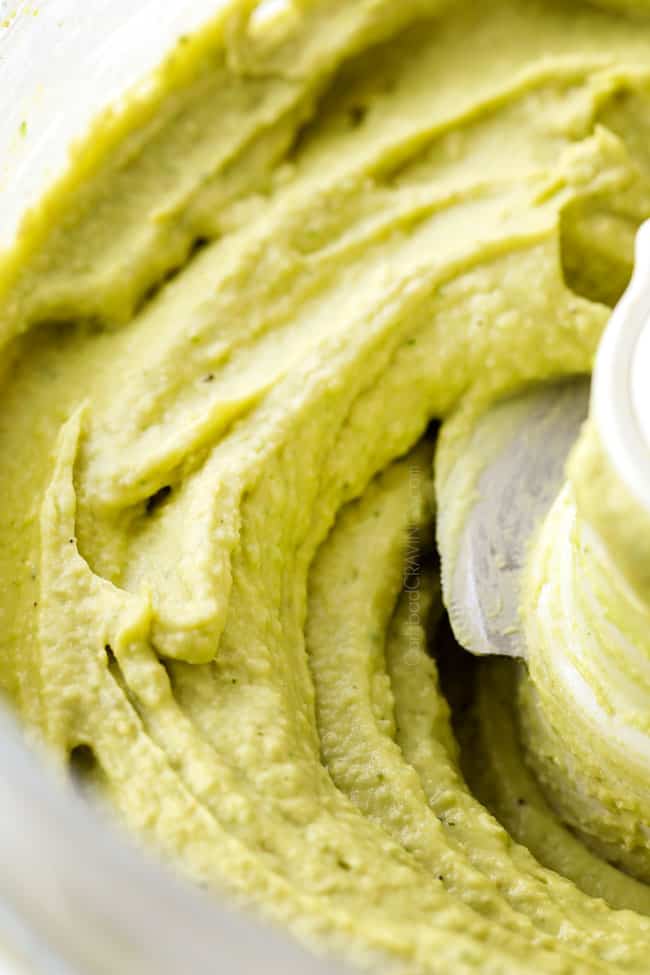
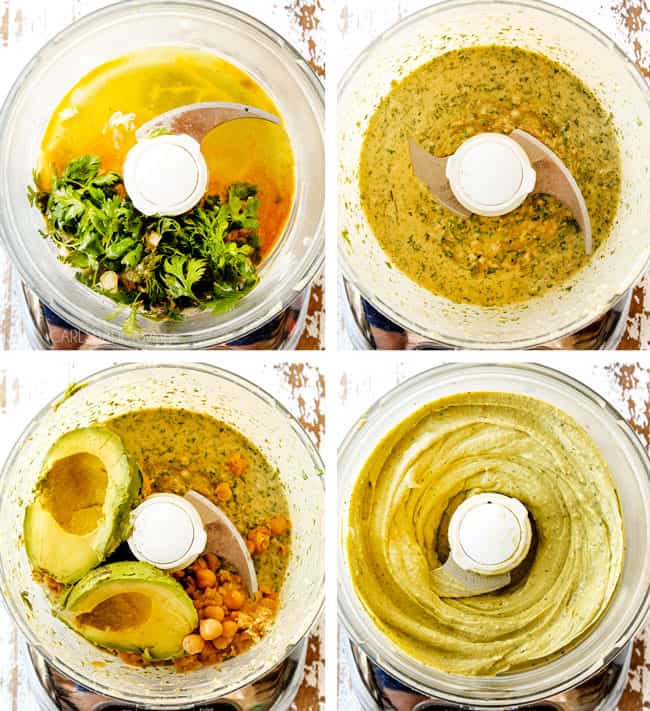
HOW TO MAKE AVOCADO HUMMUS Recipe
1 15 oz. can chickpeas ¼ cup lime juice ¼ cup packed cilantro 2 tablespoons extra virgin olive oil 1 ½ tablespoons well-stirred tahini 2 garlic cloves, minced ½ -1 jalapeno, peeled, deveined, roughly chopped ¾ teaspoon salt plus more to taste 1/2 teaspoon ground cumin 1 large avocado pitted, and peeled 2 ice cubes
DIRECTIONS:
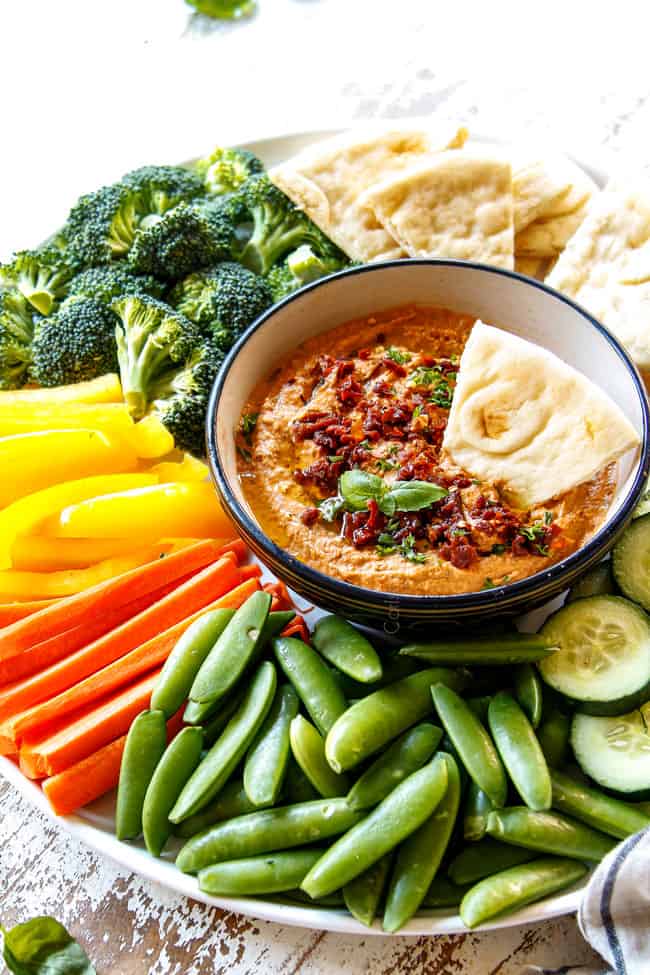
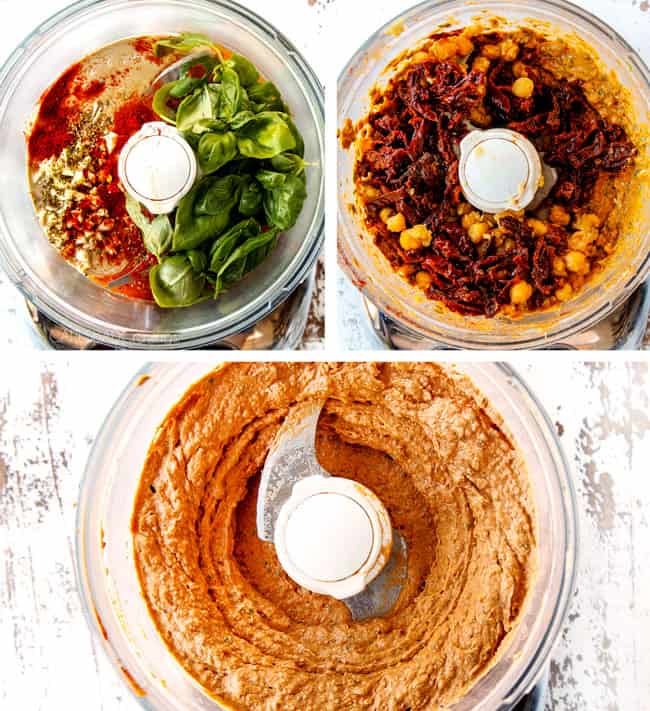
HOW TO MAKE Sun-Dried Tomato Hummus Recipe
1 15 oz. can chickpeas ¼ cup well-stirred tahini ¼ cup fresh basil 3 tablespoons fresh lemon juice 2 tablespoons oil from sun-dried tomato jar 2 garlic cloves peeled ¾ teaspoon salt plus more to taste ¼ tsp EACH dried oregano, dried parsley, smoked paprika, red pepper flakes 1 cup drained oil-packed sun-dried tomatoes (6.7-ounce jar, drained) 2 ice cubes
Directions:
Cook chickpeas per plain hummus recipe instructions. Add all the ingredients to your food processor except chickpeas, sun-dried tomatoes and ice cubes; puree until very smooth, about 3 minutes. Add chickpeas, sun-dried tomatoes and ice cubes and process for 4 minutes, no less! Once completely smooth, add ice water, one tablespoon at a time, if needed, to thin to desired consistency. Season with additional salt and lemon juice to taste.
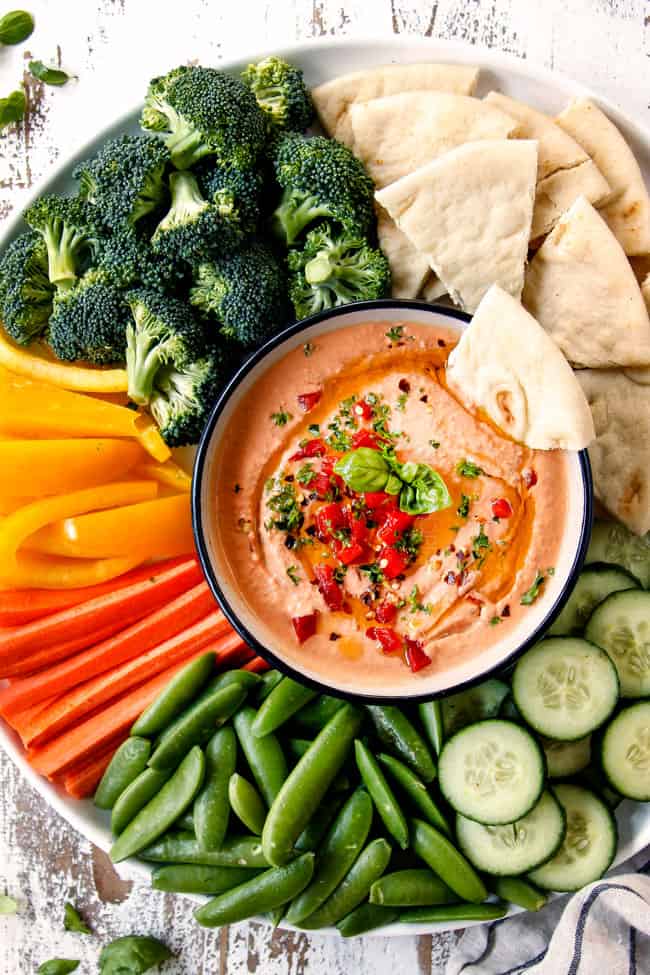
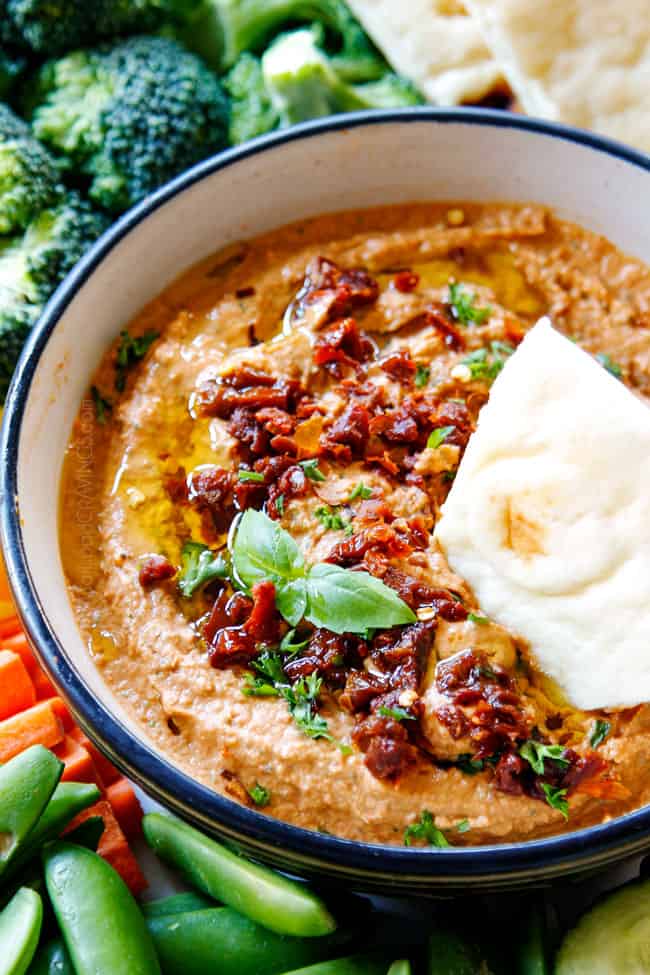
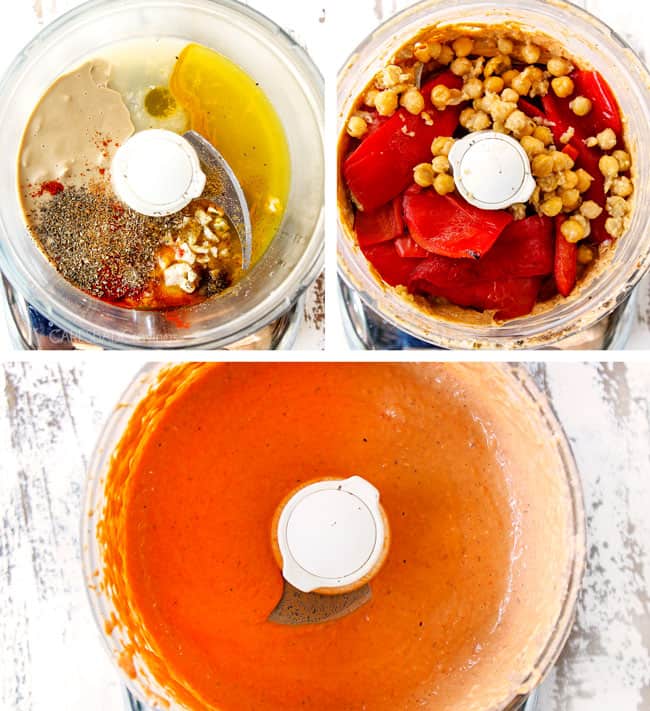
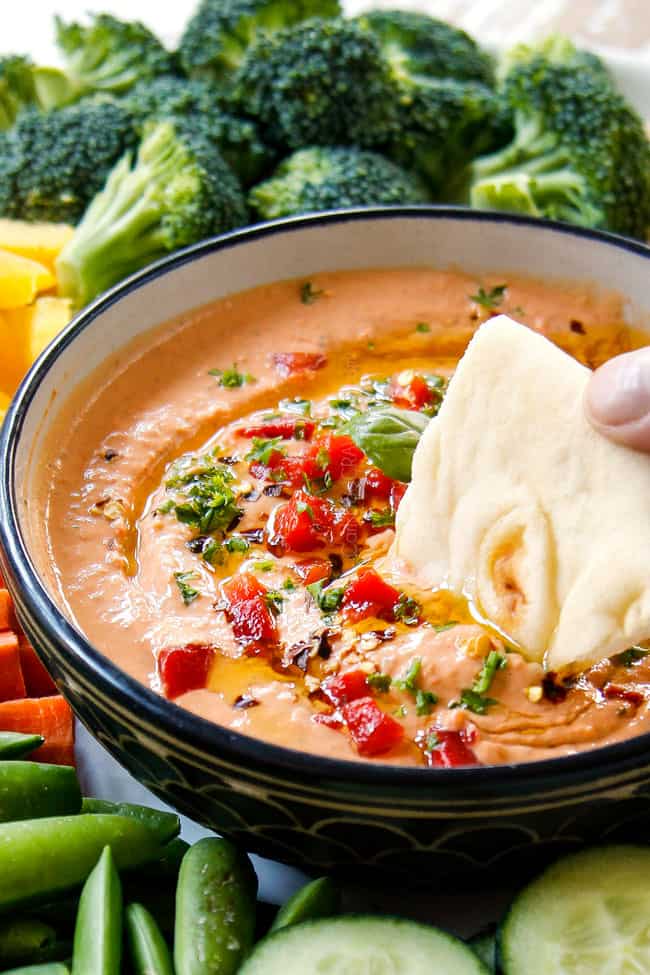
HOW TO MAKE Red Pepper Hummus Recipe
1 15 oz. can chickpeas ¼ cup well-stirred tahini ¼ cup fresh lemon juice 2 tablespoons extra virgin olive oil 2 garlic cloves peeled ½ tsp EACH smoked paprika, dried basil, salt ¼ tsp EACH ground cumin, dried oregano Pinch cayenne pepper 2 whole red bell peppers (substitute about ¾ cup jarred roasted red peppers)
Directions:
Cook chickpeas per plain hummus recipe instructions. Add all the ingredients to your food processor except chickpeas and roasted red peppers; puree until very smooth, about 3 minutes. Add chickpeas, red peppers and process for 4 minutes, no less! Once completely smooth, add ice water, one tablespoon at a time, if needed, to thin to desired consistency. Typically, the bell peppers have extra moisture so you don’t need any water. Season with additional salt and lemon juice to taste. Garnish with extra olive oil and a sprinkling of chopped fresh herbs.
HOW TO ROAST PEPPERS
Move an oven rack so that it is about 5 inches from the broiler. Turn oven broiler on. Remove core of peppers then cut into large flat pieces. Arrange pepper pieces, skin-side up, on a baking sheet. Broil 5 to 10 minutes until the peppers skin has charred. Add peppers to a brown plastic bag, seal then wait 10 to 15 minutes or until cool enough to handle. Gently peel away the charred pepper skin and discard. Reserve 1 to 2 pieces of the peeled roasted pepper pieces to use as a garnish when serving then roughly chop the rest.
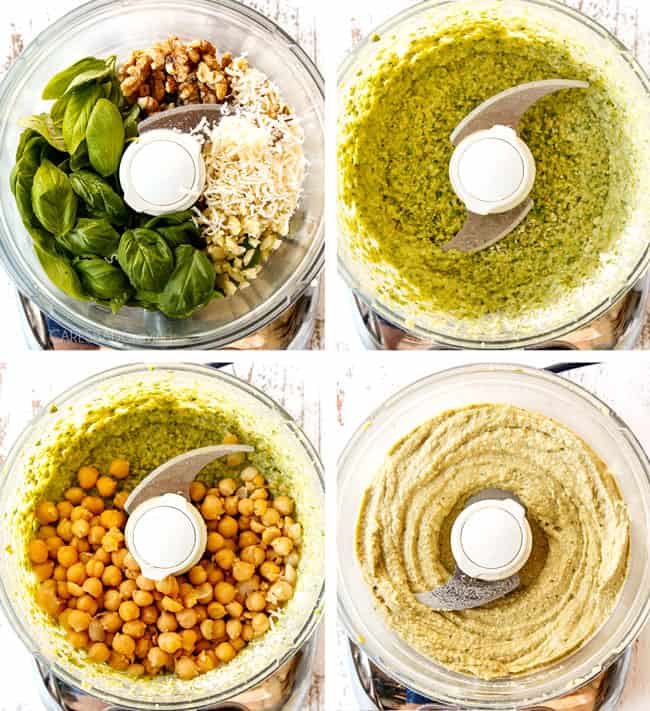
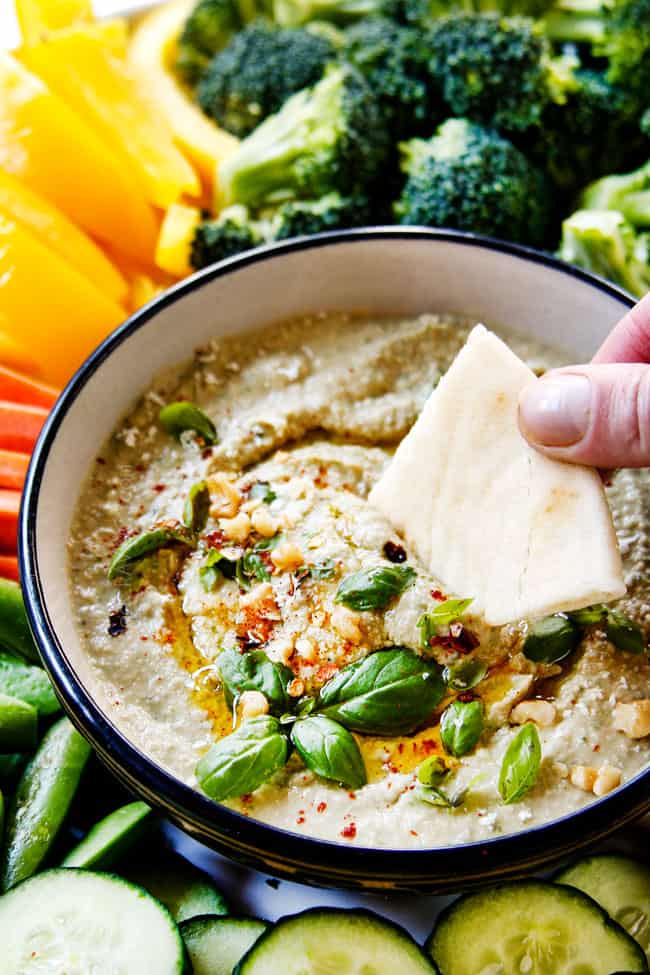
HOW TO MAKE Pesto Hummus Recipe
1 15 oz. can chickpeas ½ cup fresh basil leaves ¼ cup olive oil ¼ cup freshly grated Parmesan cheese ¼ cup pine nuts or walnuts 3-4 tablespoons lemon juice 3–4 garlic cloves peeled ½ teaspoon sea salt Pinch red pepper flakes 2 ice cubes
Note we don’t add tahini because we are adding pine nus or walnuts instead.
DIRECTIONS:
Cook chickpeas per plain hummus recipe instructions. Add all the ingredients to your food processor except chickpeas and ice; puree until very smooth, about 3 minutes. Add chickpeas and ice cubes and process for 4 minutes, no less! Once completely smooth, add ice water, one tablespoon at a time, if needed, to thin to desired consistency. Season with additional salt and lemon juice to taste. Garnish with extra olive oil and a sprinkling of chopped fresh herbs.
How to serve this recipe for Hummus
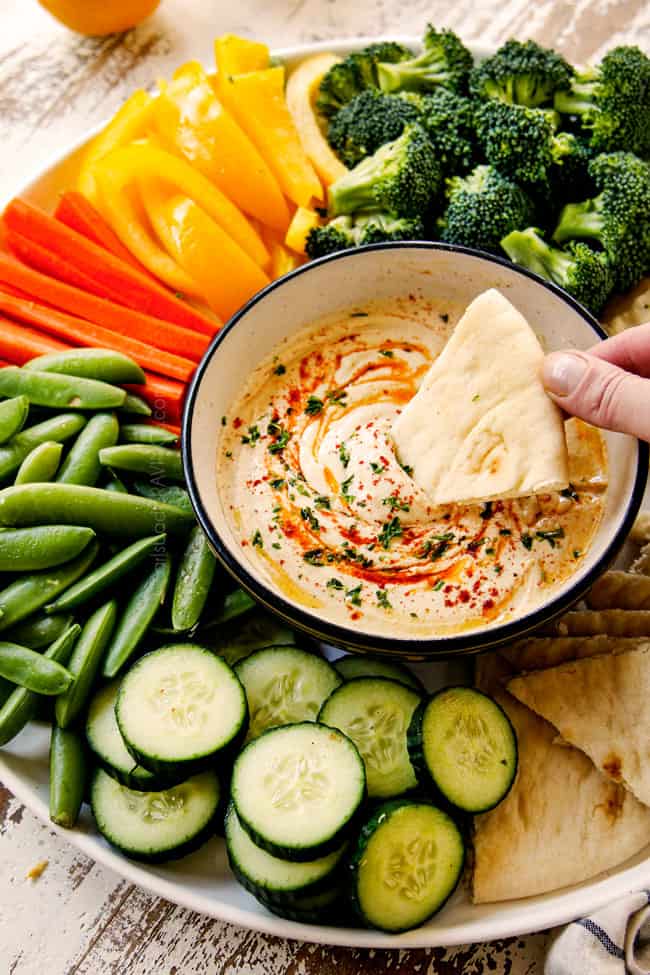
Homemade hummus is sensational as a dip for pitas, pita chips, and veggies. I can eat 10X more veggies when I’m dunking them in hummus – it’s just so good! Serve hummus with any of the following or make it the center of your crudité board and surround it with all of the following:
Homemade pita chips: hummus and pitas in every form – does it get any better?! You can purchase pita chips or they are super easy (and healthier) to make yourself. To make, slice pita bread into wedges, brush with olive oil, sprinkle with salt and spread into a single layer on a baking sheet. Bake at 375 degrees F for 5 minutes, flip over and cook an addition 5 minutes or until crispy. Vegetables: dunk all your favorite veggies like carrots, celery, bell peppers, cucumbers, broccoli, cauliflower, snap peas, jicama or any crunchy raw veggies. Crackers, chips or baguette slices: dip your favorite crunchy snacks into hummus such as crackers, chips, pita chips, toasted pitas, crostini, etc.; tortilla chips are particularly tasty with avocado hummus and baguette slices are particularly tasty with pesto hummus.
Hummus Garnishes
Hummus is delicious with just a drizzle of olive oil, but even more fabulous with a few simple garnishes. Here are some to choose from:
Olive oil: use extra virgin olive oil for the best flavor Finely chopped herbs: such as parsley, basil, mint, chives, etc. Sumac: a tangy, slightly sour seasoning made from the dried and ground berries of the wild sumac flower; it’s often used in Mediterranean and Middle Eastern cooking Za’atar: an exotic seasoning made from a blend of sesame, sumac, salt and herbs Nuts: sesame seeds, pine nuts or dukkah, a Middle Eastern mixture of herbs, nuts, and spices Middle Eastern hot sauce: zhoug or shatta Everything bagel seasoning: mix of black and white sesame seeds, dried minced garlic and onion, sea salt flakes and poppy seeds
Other Hummus Serving Suggestions:
Toast and bagels: hummus make a flavorful spread for toast, bagels or crostini; serve them with just hummus or top with sliced avocados, tomatoes, sprouts, etc. Burgers/sandwiches: swap hummus for mayo on your burgers or sandwiches. Wraps: slather hummus on flatbread, pitas, etc. before adding your toppings. It’s a traditional topping on doner kabobs but would also be tasty in gyros as well. Salads: whisk in some extra lemon juice and oil to create a dressing. Roasted veggies: use the aforementioned hummus dressing then drizzle it on your favorite fresh, grilled and roasted veggies. Grain bowls: add hummus to grain bowls with Greek chicken, chicken shawarma, roasted curry cauliflower, tomatoes, cucumbers, etc. Pizza: spread it on pizza like my Greek Chicken pizza. Eggs: add it to scrambled eggs, omelettes, etc. “Glue” for chicken: instead of slathering chicken in mayo or an egg wash, slather in hummus instead before crusting with panko, chips, etc. Mashed potatoes: stir directly into your favorite mashed potato recipe instead of sour cream – I know it sounds weird, but is SO good! As a side: hummus is perfect alongside Chicken Souvlaki, Beef Souvlaki, Greek Salmon or other fish, Chicken Shawarma, Doner kebabs, and Greek rice.
Simple Hummus Recipe storage
How long does homemade hummus last?
Hummus should be stored in an airtight container in the fridge for up to 7 days. I find homemade hummus keeps its flavor beautifully and even tastes better the next day but other variations such as roasted red pepper, pesto, avocado, etc. mellow somewhat and need a little spritz of lime juice and possibly salt/pepper to brighten up.
Can I freeze hummus?
Hummus freezes very nicely because although it is creamy, it doesn’t contain any cream. To freeze, transfer hummus to an airtight container. Freeze for up to three months. Defrost in the refrigerator where it can keep for up to one week.
Want to try this Hummus RECIPE?
Pin it to your Appetizer, Side or Healthy Board to SAVE for later!
Find me on Pinterest for more great recipes! I am always pinning :)!
©Carlsbad Cravings by CarlsbadCravings.com Carlsbad Cravings© Original Tag @CarlsbadCravings and Use #CarlsbadCravngs Leave a Review, I Always Love Hearing From You!